Saturday, February 28, 2009

Squash Anyone?

I saw some lovely zucchini cakes on Life's Ambrosia. I saved the recipe for later use. But today my student's were making potato pancakes. To save time, after they peel them, they bring them to me and we put them in the food processor, then they take them to their kitchen in a towel and squeeze out the starchy potato water....So I am looking at my fruit bowl tonight and I see the spaghetti squash...potato pancakes....the zucchini cakes...hmmmmmmm, I wonder. Are you seeing where I am going now?

Yes, I substituted the zucchini from this recipe and used the spaghetti squash...it was AWESOME.

So here is what I did:

Spaghetti Squash Cakes
Adapted from Life’s Ambrosia.com

Makes: 8 cakes

1 spaghetti squash (mine weighed 2lbs 5oz. on my scale so get one of the smaller ones)
1/2 cup freshly grated Parmesan cheese
1 cup panko bread crumbs
sprinkle of ground nutmeg
1/4 teaspoon paprika
1 clove garlic, minced
1 egg
1/4-1/2 tsp. salt
pepper to taste
1-2 tablespoons olive oil

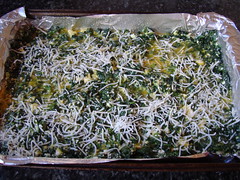
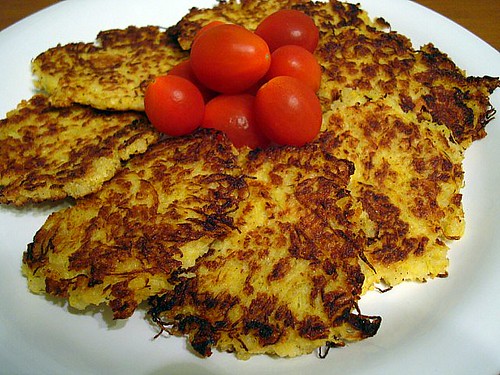
1. Puncture the rind all over the spaghetti squash. Place in microwave 5-6 minutes per pound. So mine was in for about 12 minutes. Let cool in microwave for 5-10 minutes in microwave.
2. Slice squash in half, scoop out seeds and use fork to remove the 'spaghetti squash strings.'
3. Place squash on clean dishtowel. Gather up towel edges and squeeze squash over sink....I swear, it felt like over two cups of water. Even when I stopped squeezing I thought more could have been squeezed out. I ended up with a compressed ball o' squash about the size of a softball. Break up squash with fork in a bowl.
4. Add remaining 8 ingredients, except olive oil, and mix thoroughly. Using a heaping 1 oz. cookie scoop form the mixture into 8 patties.
5. Heat olive oil in a pan over medium heat. Once heated, add patties and cook until golden brown. About 3-4 minutes per side. Serve.

These were great with a dollop of sour cream....Life's ambrosia suggested ranch dressing.

K-man was REALLY surprised how good these were!

Friday, February 27, 2009

Classic Burger Restyled!

Mushroom Cheeseburger Bake


A classic cheeseburger filling baked in a simple press-in crust!

1 lb. lean ground beef (you can use turkey)
1 large onion, chopped
1 package mushrooms, sliced and sauteed (you could use ones from a can/jar)
1/2 c. ketchup
2 Tbsp. Worcestershire sauce
1-1/2 cups baking mix PLUS 2 Tbsp for mix.
4-5 Tbsp. water
1 cup shredded cheese

Preheat oven 425 degrees. Grease a 2 qt. baking dish (I used my new 2 qt. non-stick glass dish, It was a dream, slid right out). Saute mushrooms, set aside. Cook ground beef and onions until beef is brown and onions tender. Stir in mushrooms, ketchup, Worcestershire sauce and 2 Tbsp baking mix (I totally forgot about this); mix well and set aside.
Preparing crust: combine 1-1/2 baking mix with enough water to form soft dough. With fingertips dipped in baking mix, press dough into bottom and up sides of prepared baking dish.


Top with meat mixture. Bake 20 minutes. Take out from oven sprinkle with cheese and return to oven (can be turned off) to only melt cheese. Makes 6-8 servings.


Cook's Notes:
If you saw that I missed putting the extra 2 Tbsp of baking mix in my meat mixture. Not only did I not miss it...but I think the mixture needed to be a bit on the juicy side the crust being dry...overall I think it would have been too dry. It's not overly drippy and oozing with sauce down there.....What do you think?

This was one of those recipes I had stowed away in my recipe box that I got from a product I bought many years ago. It was a baking mix called "Recip-Ease." I googled it to see if they were making it still. I figured just because my store only carries Bisquick and Jiffy....doesn't mean it isn't being sold in other stores. But alas, I could not find it anywhere but the name only cross-referenced with some site Jamie Oliver has going...

K-man wanted me to tell you that this was "totally awesome" he also added and I quote him exactly: "This was just like bowling...totally up my alley" (LOL, I love him so....)

Thursday, February 26, 2009

Um, excuse me....these aren't PIES!


Why aren't these called Whoopie Cakes? Chocolate Gobs works. But definitely not pies! These were a hit! Read down below for details about our sales and notes and the such.....

Thursday is Cookie Club Day and today's delectable delight were Whoopie Pies! (2 for $1.00- sorry, we don't take online orders! LOL)

Whoopie Pies
from Martha Stewart.com

3 1/2 cups all-purpose flour
1 teaspoon salt
1 1/2 cups unsweetened cocoa powder
1 tablespoon baking soda
1 teaspoon baking powder
1 cup (2 sticks) unsalted butter, room temperature
2 cups sugar
2 large eggs
2 cups buttermilk, room temperature
2 teaspoon pure vanilla extract
1 recipe Seven Minute Frosting, recipe follows

Heat oven to 400 degrees F. Sift together flour, salt, cocoa powder, baking soda, and baking powder. Set aside. Line 2 baking pans with silpats (French nonstick baking mats or parchment paper). In the bowl of an electric mixer fitted with the paddle attachment, cream butter and sugar until light and fluffy. Add eggs buttermilk, and vanilla. Beat until well combined. Slowly add dry ingredients. Mix until combined.

Using a 1-ounce ice cream scoop, scoop cookies onto lined baking pans, 12 cookies per baking pan. Bake for 12 minutes. Remove to a rack to cool. Repeat with remaining batter. Spread 2 tablespoons of frosting on the bottom of 24 cookies. Sandwich together with remaining 24 cookies. Store in an airtight container up to 3 days.

Seven Minute Frosting:
2 large egg whites
1 1/2 cups superfine sugar
2 teaspoons light corn syrup
1/4 teaspoon cream of tartar
5 tablespoons cold water
1/2 teaspoon pure vanilla extract

In a medium heatproof bowl, combine egg whites, sugar, corn syrup, and cream of tartar with 5 tablespoons of cold water. Place over a pot of boiling water. Using a hand held electric mixer beat on high for 7 minutes. Remove from heat and add vanilla extract. Continue to beat until frosting has cooled.

Yield: 3 cups


Baker's Notes:

  • In Martha's pictures hers were smaller with more filling. If we had done smaller ones I don't think there would have been enough frosting! Using our small cookie scoops...look how big these turned out. When I first put the frosting in....it just oozed out and the cookies weren't warm! Perhaps I did something wrong in the cooking of the frosting...dunno.
  • The frosting was a bit of a pain to do. Heating, spinning bowl, whipping with electric mixer, arm getting tired....I was thinking I should have just cut corners and used some whipped white frosting or marshmallow cream...When I got to my last few cookies, I did run out of the frosting and had to use a little marshmallow cream....it's not the same. The frosting definitely tastes better.
We made a quadruple batch today. Meaning a double batch per KitchenAid Mixer. OH man, did that make a lot of cookies! It is hard to tell sometimes the exact amount a recipe can make, the dishers may be different....I was thinking "well, each 'pie' will require 2 cookies, and I don't want to end up only making like 50 and selling only 25 with all the effort..." Well, after we mixed both bowls worth and I got each oven running (3 of them- don't you wish you could bake your cookies at home in 3 ovens at a pop?). I then merged the bowls together....it was unreal the amount of batter we had. I thought the batter would never reach bottom.

But, it was a great call, the students loved them. Even though they didn't know what a 'whoopie pie' was...when I told them they were a homemade version of the Oreo Cakesters, then they knew! All it took was a few students buying them and they shared with others who came and bought their own...who shared with others....it was great. We ended up making over $104. That means @ two sandwiches per bag our quadruple batch made 208 sandwiches (give or take a few cookies that were sampled)

A lot of work but it was worth it. Definitely a do-again but perhaps the same 'pie' with a peanut butter filling?

Wednesday, February 25, 2009

Girly Observation...

I read many of your blogs everyday ladies! Most of you are married and you blog about the highs and lows of your marriage....the good, bad and the ugly of your spouse. Trust me, I hear ya.

I am not married to K-man. Yes, we live in sin...LOL. We have been together for over 2 years and it's wonderful. In my little blog musing today, I wanted to emphasize to appreciate anything or everything your man does.

First, I am not saying AT ALL, that any of my lady food bloggers are NOT doing this....this is just my input, my observations, how happy my 'thank you's' make K-man. Or possibly how happy your man would be over some extra thank you's.

Of course, I do most things around the house...the cooking, the cleaning, the gardening, the laundry BUT that is because I take the initiative to do it and just want it done quickly or MY way. But WHENEVER, I ask K-man....for help he does it.

  • He hates shopping...but if I really want him to go (to pick out HIS fish) he goes without making issue. After, I thank him.
  • I do all the cooking, BUT if I need him to chop, or help carry food out, set up for dinner/get our drinks....after I thank him.
  • Any house improvement is usually my idea and I can fix and put lots of things together by myself...but there are some things I just don't want to mess with....A simple request...K-man does it.
BUT there are several things, I never have to ask him to do..

  • Mow and edge the lawn. I have the summers off being a teacher....and would do this during the day....K-man thought I mowed it too short...."hunny, let me do this from now on" OK! After, he mows, I tell him how wonderful the lawn looks.
  • I start doing the laundry....he puts the laundry in the dryer....hangs up my "delicates". Takes stuff out of dryer and folds. He is ADAMANT about not letting me carry the basket of laundry upstairs....I thank him for helping with laundry.
  • I cook the dinner, we are sitting in the afterglow of fullness...K-man wants me to NOT miss my fave TV shows....he takes the plates and loads the dishwasher. When he comes back and joins me to watch....I thank him for doing the dishes.
  • When I am vacuuming upstairs and K-man knows I am on my way down to our TV room....when I get downstairs....everything is moved out of the way. I 'vrrooomm' around and he puts everything back.
K-man used my car one night to go to his band practice. He uses my car mostly cuz it's the car at the end of the driveway and it's easier to take it rather move cars! The next morning when I was loading my totebag into my car for work...I went ahead and warmed up my car....He had filled it with gas, late at night after his practice in the freezing cold. So when we did our usual morning ritual of me handing him his coffee in his travel cup....I said..."thank you sweetheart for putting gas in my car last night" He said..."aww, you are welcome sweetheart....so glad you noticed."

See? Our men want the things they do to be noticed! The little smile on his face when I thanked him told me that this made him truly happy. Of course....it drives me crazy...when K-man puts out his pouty lip and says "did you notice...?" I am scanning the room wildly, then he says..."no, not here...." Grrrrr. He's testing me....LOL

Here's a sample of K-man's sense of humor. In the early days....when I was still putting things in the house together....arranging things....

K-man: "Did you see my contribution to the home decor?"
JennyMac: "Um no, sweetheart, where is it?"
K-man: Not gonna tell you, you have to find it.
JennyMac: Hmmmmm

I looked for days...this is what I found finally:

The box wasn't on the TY kitties laps but in front of them....but I put the box on them so you could see why he put the empty sardine box there....LOL

Lastly, I see K-man checking out my blog from time to time....He turns to me with a smile...
"Hunny, I like it when you mention me on your blog...makes me feel like a rockstar"

JennyMac: "Sweetheart, you ARE!"

Tuesday, February 24, 2009

Another version inside out...

I got this recipe from Dana, The Homesteading Housewife for making cookies out of cake mix....I tell ya...it's great! I made a Spicy Mexican Chocolate Crinkle version and then Ms, Ginger from Once a Upon a Gourmet Gin made a Chocolate Covered Strawberry version, now here's another....A reverse crinkle...Almond Joy flavored!


Almond Joy Crinkles

1 (18.25 oz) box of Coconut Cake Mix (Duncan Hines)
1/2 c. vegetable oil
2 eggs (I should have used 3-4 egg whites instead, to keep the WHITE of the cake mix, otherwise your batter turns yellow, oh well)
1 cup coconut (I pulsed this in the food chopper so I wouldn't get long shreds of coconut when you bite into the cookie)
1 cup toasted almonds (also pulsed in the food chopper for coarse pieces, not finely ground!)
Unsweetened cocoa (um, don't use the Special dark like I did, otherwise your cookies will look black! LOL)

  1. Preheat oven to 350 degrees.
  2. Stir dry cake mix, oil, 3-4 egg WHITES, ground almonds and coarsely chopped coconut until dough forms.
  3. Shape in 1 inch balls and roll into cocoa.
  4. Bake for 12 minutes (this is longer than Dana's recipe only because the coconut makes this cookie very moist and chewy).
  5. Remove from pan after a minute or so and cool on wire racks!
What is interesting about this is that the unsweetened chocolate is balanced from the sweetness of the cookie. I am sad that it looks BURNT but it 's not.

I was thinking that I should have tested a few cookies first by rolling some in powdered sugar and cocoa and maybe just drizzling some chocolate like Gin did...but you know what? I really wanted the REVERSE effect of dark on the outside and light on the inside. Achieved. But I didn't have any regular unsweetened cocoa to see if they looked differently.

So look out next week for another version cake mix cookie...I won't tell you which flavor...I want you kept in suspense! Check back and see what I did!

Monday, February 23, 2009

Decade old magazines aren't so bad!


It's not about the recipe contents sometimes....but the techniques!

When I came upon this recipe I wasn't interested in what was IN it but what was ON it. (It was some barbecue dish) "How cool!" I thought. A main dish with built in breadsticks!!! I am so going to do this. So I began thinking....what main dish needs a some bread sticks on the side? A main dish that has a protein and plenty of veggies that a bread would compliment.

So my foodie friends...you reap the benefit of my brainstorm....

Sausage and Peppers with Breadsticks

1 pkg sausage of choice (I used chicken andouille)
1 large onion, chopped in large chunks
2 green peppers, chopped in chunks (one yellow would have been nice, but oh well, it's all I had.)
2 cloves of garlic, minced
1-29 oz can of diced tomatoes (plain or italian style)
1 can bread sticks
about half a bag of shredded mozzarella
salt and pepper to taste
red pepper flakes
Italian seasoning for garnish.
  1. Preheat oven to 350 degrees.
  2. Slice and heat sausage through. If you are using raw sausage...remove casing, break up and brown. Drain grease if rendered a lot. The chicken sausage I used put out virtually nothing.
  3. Add onions, peppers, garlic and saute.
4. Add your can of diced tomatoes. Season with salt, pepper, pepper flakes to your liking.

5. Cook for veggies to soften and for liquid to cook down.

6. Grease your 13X9 casserole dish (unless you are using the NEW non-stick glass bake ware!).

7. Place your sausage and peppers in baking dish when you feel it's pretty ready. Top with some shredded mozzarella.

8. Open your can of bread sticks and place on top in lattice form. The recipe I saw had twisted them as well for eye appeal but I was so absorbed in 'weaving' that I forgot to twist them. DRAT.

9. Sprinkle Italian seasoning on bread sticks and bake for 13-15 until breadsticks are brown. I think this would have looked nicer if I had brushed the breadsticks with beaten egg before I put on the seasoning. Sheesh...I must have been hungry!


K-man gave a two MMmmmm- Mmmm rating!

Sunday, February 22, 2009

When missing something Important....

Improvise!

In order to make lettuce wraps....you need one important ingredient. Hello, LETTUCE? Er...well, lettuce LEAVES, not the torn up stuff prewashed in a bag (like what I had). Nothing like a few lettuce leaves going to keep me from making my copycat PF Chang's dish!

I also noticed that the recipe said to make 3 different sauces. The pouring sauce, the flavorings for the chicken stir fry and more stir fry sauce for the veggies. BAH! I hardly think all these 3 sauces are going to REALLY compliment each other, especially when some of the same ingredients were being used and ALL of those flavors would be eventually in one lettuce leaf, heading for my taste buds? Again, BAH.


This is my recipe/process:

Copycat Chicken Lettuce Bowl

Sauce:
1/4 cup sugar
1/2 warm water
2 Tbsp. soy sauce
2 Tbsp. rice wine vinegar
2 Tbsp. ketchup (I had only the spicy/tabasco ketchup- worked fine)
1 Tbsp. lemon juice (I had only lime on hand)
1/8 tsp. sesame oil
1 Tbsp. dijon mustard
2 cloves garlic
2 Tbsp corn starch (save for later)

4 chicken boneless breasts (I always have some already cooked for fast easy meals)
*1/2 cup mushrooms (I soaked some dried ones in warm water)
*Bag of broccoli slaw
*Carrots slices (I used some a handful of the baby carrots I had)
*Half an onion in large chunks
1-2 eggs scrambled

*What I listed above is what I had on hand. Make your recipe to your liking by making the stir-fry veggie combo you LIKE!

1. Prepare above sauce (except for corn starch)and have ready in bowl.

2. In your hot cooking vessel, scramble your egg and put aside.

3.Put a little oil in your pot and start stir-frying your veggies. Now I added some of the sauce....about 1/2 of the bowl. While my veggies were cooking I cubed up my chicken. (You certainly can use fresh chicken and saute them in the oil before your veggies.)

What you see here is the carrots, onions, mushrooms, cubed chicken and 1/2 of the sauce. Now would be a good time to add your corn starch to the remainder in the bowl.


4. Once your veggies are tender crisp, chicken is heated through/cooked add your broccoli slaw and the rest of your sauce. (I hope you have this in your markets...It's great. You would find it where your bagged lettuce/coleslaw is in your grocery.) Stir to coat and when thickened.... turn off heat.


5. Place your lettuce bed in bowl. Pile on your chicken/veggie mixture and put your scramble eggs on top. Garnish with green onions and/or toasted almonds.


Don't forget your chopsticks!!


Planning Ahead for your food holidays....

February 23, 2009 National Banana Bread Day
February 24, 2009 National Tortilla Chip Day
February 25, 2009 National Chocolate-Covered Peanuts and Clam Chowder Day
February 26, 2009 National Pistachio Day
February 27, 2009 National Chocolate Cake, Kahlua and Strawberry Day
February 28, 2009 National Chocolate Souffle Day
March 1, 2009 Nothing! Can you believe it? Someone call the presses, no food was designated on this day. Any suggestions?

Saturday, February 21, 2009

YAY! National Sticky Bun Day!!


This is a fun and easy recipe that my 6th graders use in class. So if they can do it, your kids can and for you....it's easy peasy when you get a hankering for "sumpin' schickie"!


Let's get started by preheating your oven to 400 degrees.....First, I highly suggest you get some of these new non-stick glass dishes... awesome!

Put in your dish 2 Tbsp. of butter, melt in microwave for about 30 sec.


Add 1/4 cup of dark brown sugar and 1-1/2 tsp. cinnamon.


Next, add a 1/4 cup of maple syrup or dark brown corn syrup, BUT first spray your measuring cup with some nonstick cooking spray...


LOOK, it all slides right out!


Stir all together


So it looks like this....


I love nuts on my stickies! About 1/4 cup of your favorite nut or whatever you have on hand.


Arrange your 10 canned biscuits in your dish. It's okay if they don't fit or expect them to be roomy. Squish them in there!


Bake in your preheated 400 degree oven for 10-12 minutes or until golden...


Now for the tricky part. Place your plate on top of your baked buns, with a potholder in each hand quickly invert them onto your plate. It helps if the plate/platter is basically the same shape as your baking pan.


OH MAN, look at that stickie goodness!!!


.....and so fluffy on the inside....


TA-DA! That is some food styling mastery! hahahaha. Well I am getting better but I do notice this....pictures are always better during the day....at night....certain sites...ahem.....reject my night pictures, even though I 'fix' them on 'picnik'.....oh well. Sometimes that makes me sad....K-man always reassures me..."don't let those idiots make you feel bad about something like a picture, everything tastes great honey!" Awwwwwww.

Anyway....here's the recipe....

Quickie Stickies


PREHEAT OVEN: 400
degrees

Combine:
2 Tbsp. melted butter
1/4 cup brown sugar
1/4 c. maple or dark corn syrup
1 -1/2 tsp. cinnamon
1/4 c. chopped nuts (optional)


-Pour mixture into cake or pie pan.

-Top with 10 refrigerator biscuits.

-Bake for 10-12 minutes.

-Turn upside down onto plate ....ENJOY!

For more easy recipes that a 6th grader can do....click EAT ME

OH, BTW, here is that nonstick glass dish after I flipped out the sticky buns....

Pretty cool, huh?....Now go buy some!!!

Baker to Customer: Yes, I have sticky buns.
Customer to Baker: Well you better not sit down then!

Friday, February 20, 2009

Easy Peasy Soft Tacos!

Got leftover chicken from dinner?

You too can have leftover chicken like this!!! Make it hot or cold your choice!

What you need:

Leftover grilled chicken, beef, fish, goat, bison, whatever (shredded, chopped)
Leftover salad mixings (lettuce, green onions, tomatoes)
Sour Cream
Guacamole (I used Wholly Guacamole in the off-season...it's pretty good!)
Salsa (I just bought this fire roasted salsa....mmmm fire roasted....way to go)
Tortillas (these were low carb too!)
Shredded Cheese

Step One:


If you have a GAS stove. Awesome. Heat up those tortillas right on the burner. I LOVE the little charred areas to add to my overall taco experience. The teacher here highly advises the use of tongs please!!


Step Two:


I say, make sure you have something mushy on the tortilla. Whatever you choose in whatever order, this is a must! You need something to help keep your 'fixin's' on the inside. Nothing is worse than to bite and it all falls out every which way.


Step Three:


The veggies would go great here. Your lettuce, green onions. I choose to NOT use tomatoes for I am using Salsa on this.


Step Four:


Add your chicken or any leftover meat really.


Step Five:


Last touches of flavor, guacamole, salsa, shredded cheese...
Now that the last additions are soft you must tuck your tortilla edges in well or OOZE city.

I toyed with the fact that perhaps I should have ended with chicken to help keep the smushy stuff in? Nah...it's fun licking your fingers!

Thursday, February 19, 2009

Outrageous Indeed!


Every Thursday is Cookie Day!!!

Isn't it funny how you stumble upon a recipe on foodgawker or tastespotting and when you click on the originating site...they have this posted recipe and they tell you that they didn't have great success and so they used another....why did they bother? They posted the 'unliked recipe' and only provided a link to the one they actually made....I don't understand people sometimes.....silly people! I swear at times I felt like I am a mouse in a maze looking for cheese in the foodie blog world! LOL

So I found the cheese....er um...the originating recipe for this cookie I found and I used to EXACTLY as shown (yes, I know I didn't tweak it....shocking huh?...um well I did add one thing...that isn't a tweak but an addition, right?)

If you ever tried and loved Ina Garten's Outrageous Brownies....Martha's got an outrageous cookie just like it...

Outrageous Chocolate Cookies
from marthastewart.com

They're soft and chewy with a slight crunch on the outside. Kind of a cross between a brownie and a cookie. One cookie will satisfy your chocolate craving for sure! Got milk?

Ingredients:

8 oz. semisweet chocolate, roughly chopped (or use semisweet chips and you won't have to chop the chocolate)
4 tbsp butter
2/3 cup all-purpose flour
1/2 tsp baking powder
1/2 tsp salt
2 eggs
3/4 cup light brown sugar, packed
1 tsp vanilla
1- 12 ounce package semisweet chocolate chunks
1 cup chopped walnuts (this was my add-in, I did about 2 handfuls)

Directions:

Preheat the oven to 350 degrees. Heat chopped chocolate and butter in a microwave-safe bowl in 20-second increments, stirring between each, until almost melted; do not overheat. (It took me like 2-3 30 second intervals and just stirred it for a bit to help it to continue melting) In another bowl, whisk together flour, baking powder, and salt.
In a mixing bowl, beat eggs, brown sugar, and vanilla on high speed until light and fluffy. Reduce speed to low; beat in melted chocolate. Mix in flour mixture until just combined. Stir in chocolate chunks.
Drop heaping tablespoons of dough 2 to 3 inches apart onto baking sheets. Bake, rotating sheets halfway through, until cookies are shiny and crackly yet soft in centers, 12 to 15 minutes. Cool on baking sheets 10 minutes; transfer to a wire rack to cool completely.


Baker Notes:


  • The disher I usually use for my cookies to be uniform....I totally went crazy and overflowed the scoop. This recipe with overflowing disher scoops rendered me about 20 large cookies. I also recommend parchment for this cookies for they came right off...but the ones on my silpat stuck a bit...
  • As for the procedure, I melted the chocolate and butter, tempered it into my egg/sugar mixture and put all the egg into the chocolate in the large bowl. I did not want to dirty another mixing bowl at this point (our water was turned off from a water main break being repaired) so I just dumped the flour, baking powder and salt right onto the chocolate mixture. My cookies turned out just like the pictured ones and the texture was like they described, chewy with a slightly crisp outside.
  • With the addition of the walnuts...they were exactly like a brownie cookie. This is DEF. keeper recipe!!!!
K-man made "Mmmm-mmmhmmm" sounds all through his eating the cookie I gave him. Then he said...."this is just like a brownie in a cookie"....coming from the man who doesn't cook....he's so funny! BTW, the flower background on my cookies up above were courtesy of my Valentine K-man!!

Wednesday, February 18, 2009

Do you know what an upside down cupcake is called?

Mini Cake!


When it rains it pours....I saw this recipe on a few sites this week...who knew it was Clementine Cake week? LOL. I didn't want a HUGE cake around the house to eat up and I thought I could cut the cooking time a bit if I made mini clementine cakes!


Clementine Cake
Adapted from Nigella Lawson

It is ridiculously moist, no flour and people will find it hard to believe they’re eating a cake of boiled rinds.

4 to 5 clementines (slightly less than 1 pound total weight)
6 eggs
1 cup plus 2 tablespoons sugar
2 1/3 cups ground almonds
1 heaping teaspoon baking powder

Optional: Powdered sugar for dusting, or for making a glaze

Put the clementines in a pot with cold water to cover, bring to the boil, and cook for 2 hours. Drain and, when cool, cut each clementine in half and remove the seeds. Then finely chop the skins, pith, and fruit in the processor.

Preheat the oven to 375°F .

Butter and line an 8-inch (21 centimeter) springform pan with parchment paper. (I used muffin tins regular and texas sized. NOTE: cut parchment circles for bottom of your pan...these will stick!)

Beat the eggs. Add the sugar, almonds, and baking powder. Mix well, adding the chopped clementines.

Pour the cake mixture into the prepared pan and bake for 30 to 50 minutes*(15-20 minutes muffin pan, when a skewer will come out clean; you might have to cover the cake with foil after about 20 to 30 minutes to stop the top from over-browning.

Remove from the oven and leave to cool, in the pan on a rack. When the cake is cold, you can take it out of the pan and dust it with powdered sugar. Nigella says the cake is best on the second day, I agree!

Tuesday, February 17, 2009

Greek Favorite Simplified


OH man! I love Spanikopita! I get it a few times when we go out but I don't make it much at home for one huge reason....the PHYLLO dough. It's so delicate that in only a few moments it dries out and cracks. You can't salvage it after that for it literally disintegrates. So you have to work fast: dough, brush with butter, lay another sheet of dough, brush with butter, another sheet....and so on and so on...

Usually you put like 10-12 layers on the bottom of your casserole dish, fill it with your spinach mixture and top with with another 8-10 dough and butter madness. The sheet by sheet thing is a pain in the butt and monotonous. So I found a wonderful alternative!!!

From the super bowl food I made...I really loved those antipasto squares. Cathy from Noble Pig selected them from one of her contest winners as submitted by Cutting Edge of Ordinary. I thought that I could do a great spinach and feta pie this way. I wanted a bread like top and bottom rather something made from pie crust or puff pastry. So this is what I came up with:

Spinach and Feta Squares

2 large packages Pillbury Big and Buttery Crescent Rolls
1 large bag of frozen spinach
4oz. package of crumbled feta
1 bunch green onions, chopped
1 clove of garlic, crushed
1 tsp. of dill
6 slices of swiss cheese
1/2 cup freshly grated parmesan cheese
3 eggs
salt and pepper

Line a 9X13 pan with your non-stick foil. Open one package of crescent rolls. Lay it all flat and press onto bottom of pan. Be sure to press all the perforations. Put down the six slice of swiss cheese. Microwave your spinach in a bowl for 3 minutes. Use a dish towel or cheesecloth to squeeze out all the water. Place your spinach, feta, chopped green onions, garlic, dill, salt and pepper to taste in a mixing bowl and combine. Spread out the spinach onto your swiss cheese layer and press lightly to fill all the gaps. Sprinkle all the parmesan cheese except for a few tablespoons. Beat eggs and pour most of it on top of spinach.

Top with second package of crescent rolls and brush with remaining egg. Sprinkle with remaining parmesan cheese and bit more of the dill. Bake for 30 minutes @ 350 degrees. When top is brown (about 20 minutes) you may want to cover it so it doesn't get overly brown, yet still want to cook the inside. Let pan cool about 10 minutes before cutting into squares. Serve warm or at room temperature. These are even better a day after reheated when the bread will get a on the crunchy side!


Oh yum, these are good. Look how yellow those farmer's market double yolks eggs made my pie!!! Wow.

This is a must-make!! Too easy not to.