
 Pretty cute for a 43 year old! hahahahahaha.
Tuesday, March 31, 2009

Monday, March 30, 2009
If lazy is bad....lemme be soooooo bad!
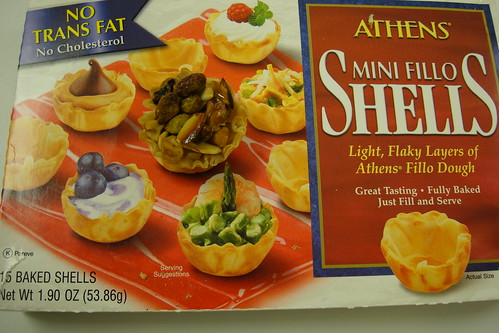
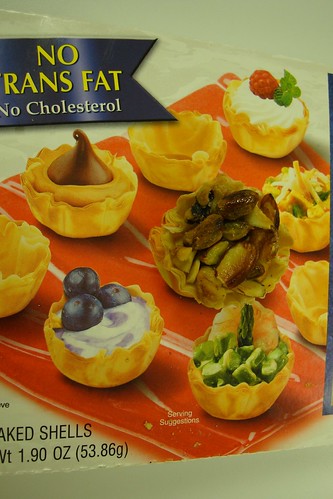
 SO, a few days ago you saw the Cheese Triangles my students made? That was from Greek Cuisine week. I saw Cathy's recipe on her blog and the light in my head went "BINK" I made REAL baklava once for my students.....way too much labor. I wanted something simple to enhance their Greek food samplings....Thank you Cathy, these ROCKED!
The Lazy Cook's Baklava
Woman's Day Inspired Cathy of Noble Pig
1 box (2.1 ounce) frozen mini fillo shells
1/3 cup chopped pistachios
1/3 cup chopped cashews (I used walnuts)
1/3 cup chopped almonds
1/4 cup honey
1 teaspoon water
Chop pistachios, cashews and almonds. Combine into one mixture. Fill shells with nuts and bake in a 350 degree oven for 8 minutes or until shells are lightly browned.
Mix honey with water. Remove the cups from the oven and spoon in honey mixture (really fill them up).
Serve warm or at room temperature.
Isn't this just adorable?
 After I tried one...yum!.....Immediately I counted them out....ok, I need 20 for my students.... the rest for ME, bwahahhahaha!
Can you find the REAL one?
These pix just make me laugh....
Sunday, March 29, 2009
Could this BE any flakier?
Buttery, Cheesy, Flaky, Crispy.....ohhhhhhh....THUD!
 This week the 8th graders are doing Greek Cuisine. I'd like to introduce you to the Tiropetes. In English that is a Cheese Triangle. All I can say is OMG! Little effort really, HUGE flavor.
Let my class show you step by step how to make them.....

Have your cheese filling ready and some melted butter.
Peel off two strips and use a pastry brush to coat with butter...
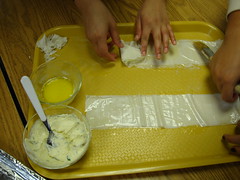
Put about a teaspoon of filling on the end of strip
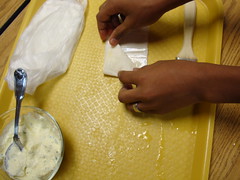
Start folding your buttered strip like a paper football (if you can't do this....get your child to come in and show you! My students are rock stars at this!!!)
 This student is folding theirs on their cookie sheet covered in foil.
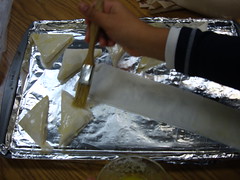
After your triangle is done being folded, place on cookie sheet and coat with butter. (hey, I didn't say these were low calorie!)
Bake @ 400 degrees for 10 minutes.
All done!
 Tiropetes (Cheese Triangles)
1/2 pound phyllo pastry dough (this is your typical box sold in the freezer section near the pie crusts)
1 cup (5 oz) crumbles feta cheese
1 c. (4 oz) ricotta cheese
2 eggs
1/4 c. chopped fresh parsley
dash white pepper
1/2 c. butter melted
Defrost phyllo according to directions on package. Preheat oven to 400 degrees. In a medium bowl, combine feta and ricotta cheeses. (I used a food processor) Add eggs, white pepper parsley (I added this last by hand, I didn't want a GREEN cheese mixture).
Spread the phyllo on a board and cut into strips about 3 inches wide. The length of the strip may be 10 to 15 inches, depending on the dimension of the sheet of phyllo. Work with 2 strips of phyllo. (Immediately cover the remaining strips with clear plastic wrap to prevent drying.)
Using 2 strips, place one over the other. Brush the top strip lightly with butter. Place a rounded teaspoon of filling at one ed of the strip; fold over to make a triangle. (Continue folding to make a triangle, that is as you would fold a flag or a paper football.
When the folding is complete, brush the triangle with butter and place on a baking sheet. Repeat with remaining ingredients. Bake for 10 to 15 minutes or until puffed and golden in color. Makes 30.
*If you add 1 c. of spinach to this cheese mixture in the recipe now you have changed the food to a Spinach Triangle or "Spanikopita". Yum!
 Cheese Pinwheel!
Teacher's Notes:
- If you are making these into appetizers, use only one roll from the package and keep the other in the freezer for spanikopita later. Thaw dough in the fridge over night. Keep the roll out for about an hour but you unwrap it and unroll it. Before you open it have a damp dish towel ready to cover. Unroll dough, press out wrinkles and use pizza cutter to cut into thirds lengthwise. These 3 stacks should give you about 30 (that is if you don't have any strips that dry out, break or disintegrate. Please keep in mind...this dough is CRAZY reactive to the air....it dries out FAST!
- Make the cheese mixture the day before. I find that it firms up better when it sits overnight.
- Taste your feta and ricotta before you add the eggs....you will find that you won't need to add any salt, the feta is salty enough.
- Although the kids haven't eaten this before (not on their main menu like burgers and pizza) some have eaten spanikopita BUT once they try this....the love it...the folding of the strips they totally get for they've made a million paper footballs. You can certainly cut a regular piece of paper into thirds lengthwise and practice first!

OH the buttery, crunchy, cheesy goodness....
K-man told me when we first were dating....that he hated feta...I brought home some of these leftovers and he was intrigued by the smell and wanted to try one...I didn't say anything....he gobbled as many as he could. I waited until 4 months later when the next class made these again, to tell him..."honey, I have a confession...these have feta"....he was stunned but when you think about it, the ricotta really mellows out the saltiness of the feta. Now he loves when I make these, BTW.....he also loves spanikopita too. LOL.
K-man told me when we first were dating....that he hated feta...I brought home some of these leftovers and he was intrigued by the smell and wanted to try one...I didn't say anything....he gobbled as many as he could. I waited until 4 months later when the next class made these again, to tell him..."honey, I have a confession...these have feta"....he was stunned but when you think about it, the ricotta really mellows out the saltiness of the feta. Now he loves when I make these, BTW.....he also loves spanikopita too. LOL.
Your upcoming Food Holidays....
March 30, 2009 Turkey Neck Soup Day
March 31, 2009 National Clams on the Half Shell, Oranges and Lemons and Tater Day
April 1, 2009 National Sourdough Bread Day
April 2, 2009 National Peanut Butter and Jelly Day
April 3, 2009 National Chocolate Mousse Day
April 4, 2009 National Cordon Bleu Day
April 5, 2009 National Caramel and Raisin & Spice Bar Day
Saturday, March 28, 2009
Food Blogger on her way to STARDOM!
 If you haven't picked up this yet....WHAT ARE YOU WAITING FOR? Paperback? Run out now and purchase..."A Homemade Life -stories and recipes from my kitchen table" This is the new release, hot on the shelf from Molly Wizenberg, a food blogger aka Orangette. I just finished reading it. Each chapter ended with a recipe. Of course it's a recipe that echoes what the chapter was about. If it was a childhood memory of something her mom cooked, or a re-creation of a restaurant dish she loved, the foods that friends and family cooked, etc.
Her writing just flows....Molly gets so honest in her thinking and writing about her food influences, the loss of her dad, her travels, the foods she eats, the meeting of her husband Brandon. Definitely a great book to cozy up with a cup of tea and one of her macaroons.
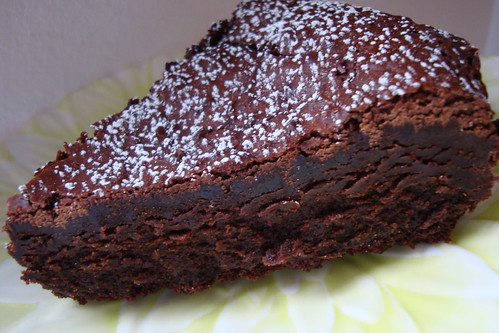
I thought the very last recipe in her book would be perfect for K-man's birthday. Something chocolate, decadent, birthday worthy and simple to whip together!
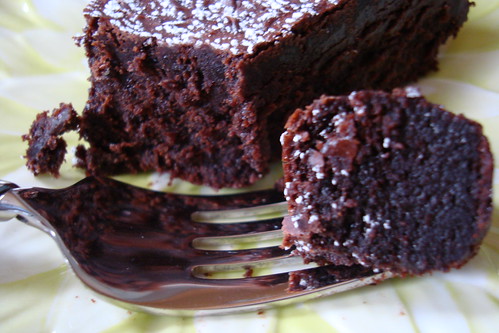
The very last recipe in her book is called:
The Winning Hearts and Minds Cake (or Molly's Wedding Cake)
7 ounces best-quality bittersweet chocolate
1 ¾ sticks (7 ounces) unsalted butter cut into ½-inch cubes
1 1/3 cup granulated sugar (she put 1 c. + 2T in her book)
5 large eggs
1 Tbsp unbleached all-purpose flour
Preheat the oven to 375 degrees, and butter an 8-inch round cake pan. Line the base of the pan with parchment, and butter the parchment too.
Finely chop the chocolate in the microwave, stirring regularly to combine. Add the sugar to the chocolate-butter mixture, stirring well, and set aside to cool for a few moments. Then add the eggs one by one, stirring well after each addition, and then add the flour. The batter should be smooth, dark, and utterly gorgeous.
Pour batter into the buttered cake pan and bake for approximately 25 minutes, or until the center of the cake looks set and the top is shiny and a bit crackly-looking. (I usually set the timer for 20 minutes initially, and then I check the cake every two minutes thereafter until it’s done. At 20 minutes, it’s usually quite jiggly in the center. You’ll know it’s done when it jiggles only slightly, if at all.) Let the cake cool in its pan on a rack for 10 minutes; then carefully turn the cake out of the pan and revert it, so that the crackly side is facing upward. Allow to cool completely. The cake will deflate slightly as it cools.
Serve in wedges at room temperature with a loose dollop of ever-so-slightly sweetened whipped cream.
At first, I was not going put her recipe up so you'd go out and buy her book....then I remembered two things:
a) Molly is against 'top secret' recipes she feels that all recipes should be shared.
b) Her recipe is on her website. All of them are. LOL.
....as you can see I used my heart pan...very appropriate I thought!

Lastly, can I just say OMG....I will never make another chocolate cake....this one is just amazing, you can taste the butter, the fudgy consistency, clean, not grainy, smooth. K-man said this was the best cake he's ever eaten! Well, I gotta go clean out my recipe boxes of all other chocolate cake recipes....bye!
Friday, March 27, 2009
Melt in your Mouth Chicken
If I only had a dollar for all the different ways I've prepared chicken....
I've grilled, baked, marinated, fried, stir-fried, made chicken strips, and put it in sooooo many casseroles. But there is one technique that I've been trying over and over again because I just can't believe how it makes my chicken....and I think it's proved worthy....
Soaking in buttermilk. That's it. So simple, yet amazing. Whether you put your thawed or frozen wings, boneless chicken breasts in a ziploc bag with enough buttermilk (regular or fat-free) and any of your favorite seasonings. You will be truly amazed how tender it makes it. I've marinated tons of chicken thinking it's the combo of oils, vinegar and seasonings that tenderize it. It may have a nice flavor but often they could easily get dried out. But no matter if I cooked my chicken a little too long after it was in buttermilk....it was always moist and tender. Even something like chicken wings just fell off the bone (even the day after when it was reheated). It's got to be something with the active cultures in buttermilk that breaks down the chicken I am convinced!
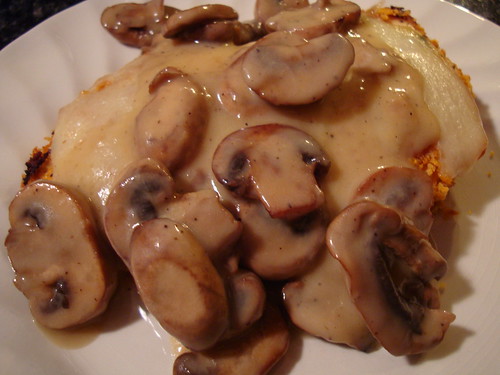
Tonight I made smothered chicken....here's what I did:
Mushroom and Swiss Smothered Chicken
4 boneless chicken breasts
2 cups of buttermilk (regular or fat-free)
Seasonings of your choice (I used a herb packet from World Market called 'Chimichurri')
2 cups crushed cornflakes
salt to taste
1 pint sliced mushrooms
4 sliced reduced fat swiss cheese
2 Tablespoons smart balance
3-4 Tablespoons flour
2 cups chicken broth
Place your chicken in a ziploc bag with seasonings and buttermilk the night before or the morning before you leave for work.
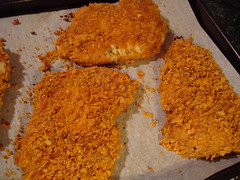 Preheat oven to 350 degrees. Take chicken out of fridge. Crush cornflakes with rolling pin or grind in food chopper. Place crushed cornflakes into shallow dish. Line cookie sheet with parchment paper or nonstick foil. Spray with non cooking spray. Take chicken out of bag and salt to taste. Keeping the chicken pretty wet from buttermilk, dredge into cornflakes, pat them firmly to pack cornflakes onto chicken. Place onto prepared cookie sheet. Repeat with remaining chicken breasts. Bake in oven 20 minutes or until meat is no longer pink.
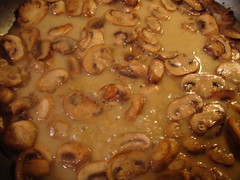 While chicken is cooking, saute mushrooms in saute pan. I used just a little olive oil and some salt to draw out the mushrooms moisture. When mushrooms are cooked, push mushrooms to one side of pan. Melt smart balance (you can use whatever oil of your choice), add flour and mix until you smell the flour's nutty fragrance. Put mushrooms into the roux and mix. Slowly add your chicken broth, keep stirring until you get the right thickness to your gravy.
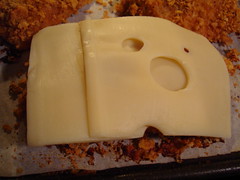 When chicken is done cooking, turn off heat from oven. Take out chicken and cover with 2 slices of cheese and put back in oven to melt cheese. Remove chicken from cookie sheet and cover with mushroom gravy.

A nice green salad or yesterday's post of lemon asparagus would go great with this. BTW, the two leftover breasts we had the next night were reheated in the oven and were STILL moist.
I tell ya...I am sold on buttermilk marinade for all my chicken from now on!
I've grilled, baked, marinated, fried, stir-fried, made chicken strips, and put it in sooooo many casseroles. But there is one technique that I've been trying over and over again because I just can't believe how it makes my chicken....and I think it's proved worthy....
Soaking in buttermilk. That's it. So simple, yet amazing. Whether you put your thawed or frozen wings, boneless chicken breasts in a ziploc bag with enough buttermilk (regular or fat-free) and any of your favorite seasonings. You will be truly amazed how tender it makes it. I've marinated tons of chicken thinking it's the combo of oils, vinegar and seasonings that tenderize it. It may have a nice flavor but often they could easily get dried out. But no matter if I cooked my chicken a little too long after it was in buttermilk....it was always moist and tender. Even something like chicken wings just fell off the bone (even the day after when it was reheated). It's got to be something with the active cultures in buttermilk that breaks down the chicken I am convinced!
Tonight I made smothered chicken....here's what I did:
Mushroom and Swiss Smothered Chicken
4 boneless chicken breasts
2 cups of buttermilk (regular or fat-free)
Seasonings of your choice (I used a herb packet from World Market called 'Chimichurri')
2 cups crushed cornflakes
salt to taste
1 pint sliced mushrooms
4 sliced reduced fat swiss cheese
2 Tablespoons smart balance
3-4 Tablespoons flour
2 cups chicken broth
Place your chicken in a ziploc bag with seasonings and buttermilk the night before or the morning before you leave for work.
Preheat oven to 350 degrees. Take chicken out of fridge. Crush cornflakes with rolling pin or grind in food chopper. Place crushed cornflakes into shallow dish. Line cookie sheet with parchment paper or nonstick foil. Spray with non cooking spray. Take chicken out of bag and salt to taste. Keeping the chicken pretty wet from buttermilk, dredge into cornflakes, pat them firmly to pack cornflakes onto chicken. Place onto prepared cookie sheet. Repeat with remaining chicken breasts. Bake in oven 20 minutes or until meat is no longer pink.While chicken is cooking, saute mushrooms in saute pan. I used just a little olive oil and some salt to draw out the mushrooms moisture. When mushrooms are cooked, push mushrooms to one side of pan. Melt smart balance (you can use whatever oil of your choice), add flour and mix until you smell the flour's nutty fragrance. Put mushrooms into the roux and mix. Slowly add your chicken broth, keep stirring until you get the right thickness to your gravy.When chicken is done cooking, turn off heat from oven. Take out chicken and cover with 2 slices of cheese and put back in oven to melt cheese. Remove chicken from cookie sheet and cover with mushroom gravy.A nice green salad or yesterday's post of lemon asparagus would go great with this. BTW, the two leftover breasts we had the next night were reheated in the oven and were STILL moist.
I tell ya...I am sold on buttermilk marinade for all my chicken from now on!
Thursday, March 26, 2009
Fresh and Simple
Spring is here and the grocery is going to come alive with more fresh and LOCAL produce. Get ready!
Lemon Pepper Asparagus....
 I see some blogs and some recipes that are using canned or frozen veggies. Of course, I know everyone has their reasons for using those forms of veggies. Personally, I try to purchase enough veggies each week to have at least one fresh veggie for every meal. They are so simple to prepare.
Above you see asparagus cut on a diagonal with just one thick slice of red onion cut into fourths. All I used was a little olive oil, lots of coarse black pepper, and right before I was ready to dish it out....Freshly squeezed 1/2 of one lemon all over it, oh the SIZZLE. Push it around until the lemon juice is gone. Plate them and top them with some fleur de sal. Perfection with those mock potatoes last night!
K-man loves asparagus and would eat it every night if possible! Speaking of which....
Today is my sweetheart's BIRTHDAY! Stay tuned tomorrow for the cake I made him!
Lemon Pepper Asparagus....
I see some blogs and some recipes that are using canned or frozen veggies. Of course, I know everyone has their reasons for using those forms of veggies. Personally, I try to purchase enough veggies each week to have at least one fresh veggie for every meal. They are so simple to prepare. Above you see asparagus cut on a diagonal with just one thick slice of red onion cut into fourths. All I used was a little olive oil, lots of coarse black pepper, and right before I was ready to dish it out....Freshly squeezed 1/2 of one lemon all over it, oh the SIZZLE. Push it around until the lemon juice is gone. Plate them and top them with some fleur de sal. Perfection with those mock potatoes last night!
K-man loves asparagus and would eat it every night if possible! Speaking of which....
Today is my sweetheart's BIRTHDAY! Stay tuned tomorrow for the cake I made him!
Wednesday, March 25, 2009
Oh the Mockery!
Mmmmmm Creamy Mashed Potatoes!
 NOT! What you see here is some totally creamy and practically fat free mashed cauliflower, an alternative for those evil mashed potatoes. Don't get me wrong, I loved those evil mashed potatoes but we can't have them all the time...but these are guilt free.
Here's what you need:
Mock Mashed Potatoes aka Cauliflower
1/2 head of cauliflower, steamed (I do mine in the microwave) and drained of all water
3 Tbsp. fat free sour cream
2 cloves roasted garlic (I like to roast a few bulbs of garlic and keep it in the fridge for when I want a 'gentler' garlic flavor)
1/4 cup reduced fat grated parmesan cheese (I used this for more 'binder' than flavor)
salt and pepper to taste
1. Put it the first three ingredients in the food processor and blend.
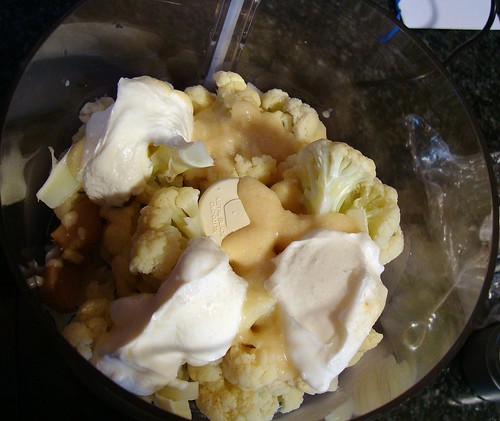 After you blend add your parmesan cheese, blend. Then add your salt and pepper. Blend again. Taste. Feel free to add more parmesan or sour cream to get the right consistency and/or flavor.
 I took this out of the processor and put it in a serving dish and reheated it again. I wanted the cheese to melt and bind to keep the cauliflower from being too 'smooshy'.
Since K-man loves cauliflower, he totally loved this! Whip some up for your next meal!
NOT! What you see here is some totally creamy and practically fat free mashed cauliflower, an alternative for those evil mashed potatoes. Don't get me wrong, I loved those evil mashed potatoes but we can't have them all the time...but these are guilt free.Here's what you need:
Mock Mashed Potatoes aka Cauliflower
1/2 head of cauliflower, steamed (I do mine in the microwave) and drained of all water
3 Tbsp. fat free sour cream
2 cloves roasted garlic (I like to roast a few bulbs of garlic and keep it in the fridge for when I want a 'gentler' garlic flavor)
1/4 cup reduced fat grated parmesan cheese (I used this for more 'binder' than flavor)
salt and pepper to taste
1. Put it the first three ingredients in the food processor and blend.
After you blend add your parmesan cheese, blend. Then add your salt and pepper. Blend again. Taste. Feel free to add more parmesan or sour cream to get the right consistency and/or flavor.I took this out of the processor and put it in a serving dish and reheated it again. I wanted the cheese to melt and bind to keep the cauliflower from being too 'smooshy'.Since K-man loves cauliflower, he totally loved this! Whip some up for your next meal!
Tuesday, March 24, 2009
XXX Cookies!
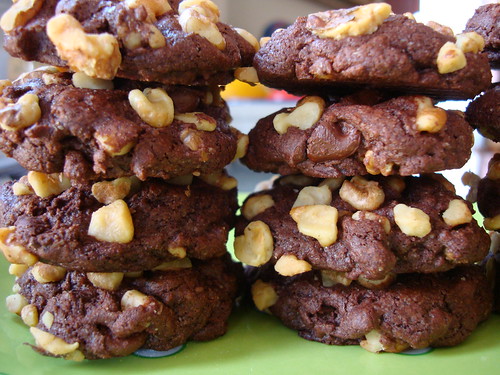
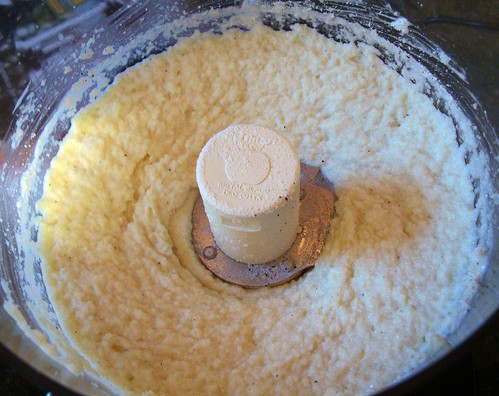
If you are a fan of the Lipsmack here, you are well aware of my obsession with cake mix cookies. I've decided to give it a rest and try something new....BROWNIE MIX! Lololololollol. Gotcha! I've been so busy making K-man these citrus-y based cookies...I've been dying to have another chocolate one. Time for some chocolate porn!
Triple Chocolate Brownie Cookies
1 box family style brownie mix (I used Duncan Hines chewy fudge)
*about 2 eggs (I used egg beaters)
1/2 cup oil
1/2 cup chopped walnuts (plus more for tops)
1/2 cup chocolate chips
3/4 cup coarsely chopped chocolate wafers cookies (mine were little chocolate cats from Trader Joe's)
Preheat oven to 350 degrees. Place mix in a large bowl. Add your walnuts, chips and chopped cookies to fully distribute through the brownie mix.
The brownie mix was already using 2 eggs and 1/2 cup oil plus 1/4 cup water. I know I didn't want/need the water but I wanted to ensure that my brownie batter was going to be stiff enough....So here is the tricky part:
*I filled my 1/2 cup with egg beaters A LITTLE LESS than 1/2 cup. Pour onto mix. Place 1/2 cup of oil in mix. Slowly stir to see how it comes together. You want a stiff dough. I know I added just a splash more of the oil/egg until it came together as I wanted.

Use your small cookie disher or ice cream scoop to form into balls.
I then took each ball and dunked them into more chopped walnuts. Just half of it. Flip the ball over and....

Place onto cookie sheet and use hand to slightly press down. The nuts help to keep the dough from sticking to your fingers.
Bake for 10 minutes. If you eat one right out of the oven, you will think the middle is not done yet...but as they sit, they will firm up. You don't want to over cook them!
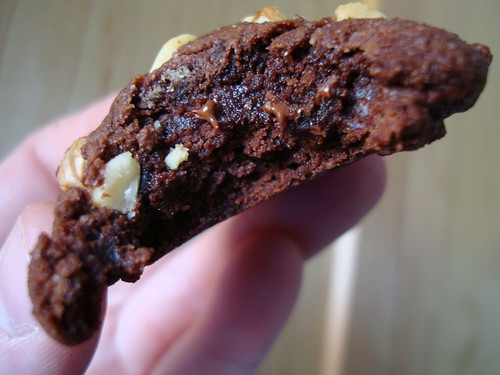 See? You want them fudgey and gooey in the middle!
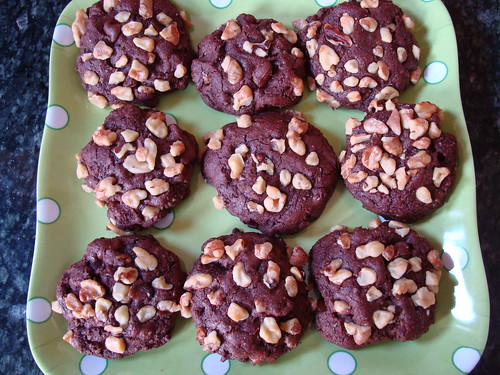 Got milk?
Monday, March 23, 2009
Cheeeburger Anyone, er Pizza?
I love a good cheeseburger and I certainly love pizza. Why can't we have the best of both worlds and combine the two? Done! So does that make this a Cheeseburger Pizza or an Open Faced Cheeseburger? Oh I know....
Extra Large Open Faced Cheeseburger!
1 pizza crust or (I used 2 Middle Eastern Breads here called 'Lavash,' it's thin and has no pocket)
1 lb ground beef, browned
1 tsp. smokey hickory salt
1/2 onion, chopped
3 Tbsp ketchup
2 Tbsp mustard
cooked bacon
sliced cheese
mushrooms
red onion
sliced tomatoes
shredded lettuced (I always use the angel hair cabbage, for it stands up to the heat on the pizza and stays crunchy, it doesn't taste 'cabbagey')

1. Brown the ground beef and chopped onion. I added the hickory salt in here for I wanted my beef to have an "off-the-grill" kinda flavor to it. Drain off fat.
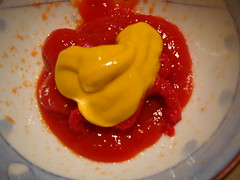
2. Mix your mustard and ketchup together.
Do you notice the lil red spots on the white of the bowl? It was the last of my ketchup so aside from the random spattering around the edges I also got a chuckle from the 'farting' noise it makes when it gets to the end of a bottle...LOL. Yes, I teach middle schoolers, can you tell?

Spread your ketchup/mustard mixture on your crust or 2 breads.
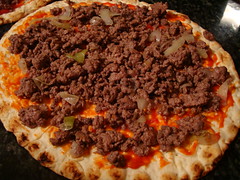
Spread on your browned beef and onion mixture.
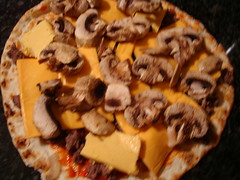 Put on your sliced cheese. I had a combo of Velveeta I was trying to use up and some 2% american cheese slices.
Add your mushrooms on top.
Bake @ 400 degrees until cheese melts and mushrooms shrivel.
While baking...
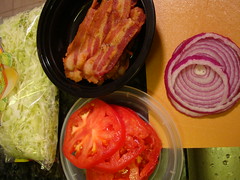
Slice up your toppings! Make sure they are all thin!
Crumble your bacon or leave in strips...you preference.

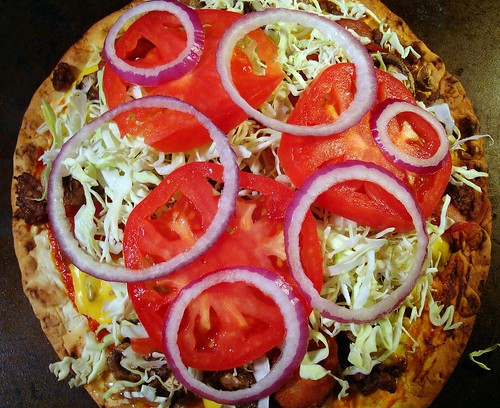
Make you open faced cheeseburger now. Put on the crumbled bacon or slices. Layer the cabbage or lettuce, arrange your tomato slices and finish with red onion!
This was soooooooooo yummy!
Sunday, March 22, 2009
Juicer Review
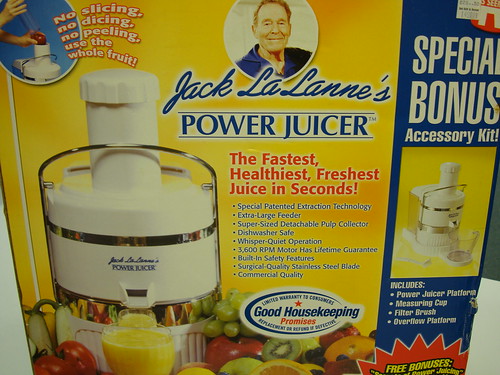
I saw on Cathy's Noble Pig site that she was asking for some suggestions for a juicer. I gave her my suggestion of Jack LaLanne's Power Juicer. After I read more AFTER my post... I realized that she was talking more about a juicer for a juicing things for recipes not for drinking....oh well. I demonstrated this appliance to my students and they had fun choosing the combos they wanted and tasted them.
I am going to show you how easy it is to use and some points to ponder...
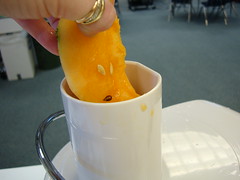
 Here is a pineapple wedge, canteloupe wedge, green apple half and orange half.
The directions say to remove all stems and any of those huge PITS....seeds are okay. Even though you can put that crazy outside of the pinapple in the juice and the tough outside of the canteloupe....I found it wasn't THAT difficult to slice of most of the rinds. Just most of it. The reason...it was easier to push into the juicer and I didn't have more pulp shot out the 'other end' of the juicer that I had to clean up.
As for the citrus fruits...I suggest cutting off most of the peel for the pith as you know is bitter and it will make your juice bitter as well. Just a rough removal of the peel is good!
In goes the canteloupe....OMG, this smelled amazing! So fresh and springy!

This was the pineapple...I cut most of the outside off and totally left the core in it! Went in like BUTTAH!
Here is the poor little apple with skins and seeds...waiting timidly for his juicing fate from the 'pusher'...(enter in the Mr. Bill voice..'OH, NOOOO!!! as I do it).
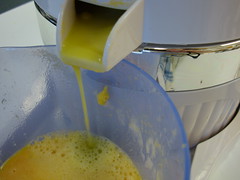
Out comes the juice! Mmmm.
When you make your concoctions. You must drink them right away. The juice also has some 'viscosity' from the pulp and it will start to turn brown. Also some settling will occur in just the first few minutes!
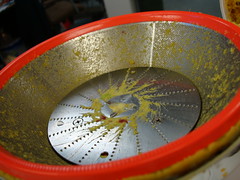
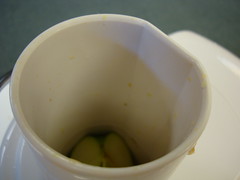
Here is the sharp sucker that grinds all those fruits up. The blade is actually the round disk on the bottom and the curved walls are a fine metal mesh strainer for separating the pulp from the juice.
Now for the nasty reality after you make your juice....

The clean up....The round center is the 'pusher' with a bit of an orange stuck to it. The chute is on the right which literally shoots out the fiberous remains. I use the word shoot purposefully. Some of my students got a more exciting demonstrations that they bargained for, it you KNOW what I mean...LOL
Of course the pulp stuff is great for your garden, your pigs if you have a farm. The cookbook even has suggestions how you can incorporate that pulp into more healthy and fiberous muffins! Clearly you'd have to be more selective about your skins and remove all the seeds....I don't think I'd want THAT type of FIBER!
Points to Ponder:
- I bought this like 5 years ago @ 149.99 and I used my 20% off coupon from Bed Bath and Beyond to help with the cost. I am sure (not sure) the price has come down (or not).
- It is pretty easy to assemble and disassemble. Once you put it together...it's been a while since I used it last....and putting it back together and it's use of it....was like riding a bike.
- Cleaning....I rinsed off all the pulp and put most in the dishwasher! I used the brush they provided to clean the blade and the mesh strainer and those were the only ones that did not go in the DW.
- It's very quiet. "Hummmmmm" is what is said.
- The electrical base it heavy and if you make a lot of juice and want this to be accessible and want it on your counter....it will take up as much space as your KitchenAid mixer. I wish I had a storage room/pantry like Pioneer Woman to keep all my appliances for easy reach. So jealous!
Get Juicy y'all!
Oh BTW, don't think I haven't noticed that I've been remiss! I've been negligent on my Food Holidays! Sorry, I hope that I haven't ruined any of your past food planning! LOL
March 23, 2009 National Chip and Dip AND Melba Toast Day
March 24, 2009 National Chocolate Covered Raisins Day
March 25, 2009 National Lobster Newburg AND Pecan Day
March 26, 2009 National Nougat AND Waffle Day
March 27, 2009 National Spanish Paella Day
March 28, 2009 National Black Forest Cake AND Something on a Stick Day
Subscribe to:
Posts (Atom)


