Showing posts with label cookies. Show all posts

Sunday, May 22, 2016

Salted Caramel Cookies with Bacon Bites


I know I am slow on getting back to a regular schedule...but what is regular, right? Right now K-man is installing my back splash in the kitchen and I am so excited because it looks so nice! Don't worry pictures will come.

I am on class number 8 for grad school...pretty excited about that. The last two classes get done simultaneously.  I don't know how that will pan out but thank god it's over the summer! I should be done in September!


We had a little scare with our fur baby Bikini- one night we noticed she was slobbering like a Saint Bernard and knew that wasn't normal. K-man thought the worst because he had a kitty from his past that was slobbering and found mouth cancer was the issue.  However, we took her into the vet and she looked all over her mouth that she could see (looking into a wriggling cats mouth is no easy chore) and found no, sores, redness, oozing....anything.  She had not been outside for supervised play lately nor had any new plants been added in the house.  We could only speculate that perhaps her bug hunting got the best of her somehow and she was on 24 hour watch. Before any other invasive methods were going to be used next. Luckily it dissipated that night and she was back to normal by the next night. Phew! So now, she is all updated, weighing in at 13.8 lbs and on a "less treats" plan.  LOL. Yeah, me too. Next week Scooter's turn for his yearly visit....K-man and I have wagers on HIS weight...I say under 10, Kirk disagrees.


Onto my product review.  You may remember in my last post when I blogged about Primal Bake shop and their products? Today, I am trying out the Salted Caramel and adding bacon. I am going to use two types of bacon and test which tastes best.  I have noticed that when cooked bacon get added to something baked it loses it crispiness and/or bacon flavor disappears.  I noticed this phenomena when I made a frittata.  So I am adding to half of my cookies, chopped Paleo bacon and the other half with Epic Bites Bacon (both are uncured with no nitrites).


1.  First, this cookie rocks! For me being a chocolate lover. I am really surprised when I like a cookie better than a chocolate one.  

2. The salt on top REALLY makes a difference. Do NOT leave it off.

3.  The real Paleo chopped bacon tasted better and remained crispy. You can also see it.  The Epic Bites didn't add any smoky goodness as the paleo bacon did.  I did a taste test with K-man and gave him half a cookie of each and asked him if he tasted any difference. He tasted the Paleo bacon difference.

4. I did not conduct myself in a true scientist way and leave some cookies without bacon but oh well, I will have to order more to try them again!

5. The batch made roughly 18 cookies all that is needed to make the cookies is one stick of butter and 1 egg. You need to brown the butter first and you can make it with ghee but I will try the next batch with ghee. Although ghee doesn't really brown, it's the milk solids that brown and ghee has all milk solids removed. Then, I haven't tried to brown ghee, perhaps that is my next assignment?

6. You do have to chill the dough before you bake it and the 350 degrees for 9 minutes didn't seem long enough.  I don't know if my dough was too cold but I had to cook them more than 9 minutes because they didn't seem cooked enough. These were slightly crispy edges and VERY chewy.  Loved them. Although, they were "harder" the next day yet still chewy, let me explain why I LIKED this....Paleo cookies made with almond flour are very difficult to get that crispy chewy affect to last. After 24 hours all almond cookies tend to be soft, losing their crispy edges. I enjoy how these are staying firm.


7. Would I make these again and suggest you buy them too? Heck yes and yes.  These mixes are great to have on hand in the cabinet for when you want a quick treat and don't want the hassle of dragging tons of ingredients out. Especially when you find out that you thought you had tapioca flour and it was coconut....grrrrrr.

8. The ingredient list on this cookie bag was pretty simple: almond flour, tapioca starch, coconut nectar sugar, baking soda and Himalayan pink salt.  I would love to make more types of cookies with simple list of ingredients like this! Simple is better.

9. Be glad this mix only makes 18 cookies. More would be bad.  I ate 3 on the first night.

10. Here is the video of the Civilized Caveman-George making these cookies. Hence, who introduced primal bake shop to me. Thanks George!

#hugsandbacon
#primalbakeshop


You want a cookie?

Wednesday, October 29, 2014

Easy Fudgy Blossoms

Hey! Search no more...

I know you are looking for a quick and easy, last minute Halloween treat to whip up before Friday.

*SCREECH* Stop looking it's HERE!

Here is a very quick, insanely easy and intensely fudgy treat.  Suitable for Halloween or any holiday depending how you top it
PROMISE!

Easy Fudgy Blossoms
or Evil Witch's Hats
created by JennyMac's Lipsmack
published on Allrecipes.com

Ingredients:

1 box of chocolate cake mix (I used a dark chocolate variety-use what you prefer)
1-15 oz can pumpkin puree (NOT pumpkin pie mix)
1/2 c. mini chocolate chips
Dark Chocolate Hershey Kisses or any variety you prefer or nuts or BOTH


Directions:

1. Preheat oven to 350 degrees. 
2. Place chocolate cake mix in a bowl. Add pumpkin puree and mini chips. 
3. Mix well. Rubbing the mixture on the sides of the bowl to ensure there are no 'pockets' of dry mix. 
4. Line cookie sheet with parchment paper. 
5. Using a small cookie scooper put 12 scoops on parchment. You will fill two sheets and can still fit a couple of extra in between each scoop, they won't spread much. 
6. Bake for 15 minutes. 
7. Place sheets on cooling rack and place either a kiss or nut of choice on center and gently push. When cool, the cookie will hold the centered treat just fine.
Baker's Notes:
1.  I call these Evil Witch's Hat, because they are so moist and fudgy, you will think that they gotta be bad for you.  Nope, no oil, no egg.  They are dark so let everyone else think they are evil so that leaves more for you.
2.  ADDED BONUS!!! Kids can eat these and they will be getting some squash or veggies into their little tummies. *rubbing hands*  BWAHAHAHAHAHA! So now YOU are Evil but in a good way.

3.  You can store these in a tin because they have so much moisture you won't worry about them drying out. You can use the orange candy corn kisses to amp up the Halloween factor if you want. Or one of those new MEGA M&M's in the center....maybe for Christmas?

4. Published on Allrecipes.com!!!

Enjoy! I did!

Sunday, December 23, 2012

Ooey Gooey Chocolate Mint Crackles

If you want a sweet treat before the holidays that is easy to make.  Here is your recipe!!  These are soft, moist and taste just like a Girl Scout Thin Mint Cookie.  Not Paleo....but these can be your 'cheat' or think of the kids or visitors who would enjoy them.

Ooey Gooey Chocolate Mint Crackle Cookies
by JennyMac's Lipsmack

1 (8-ounce) cream cheese, softened
1 stick butter, softened
1 egg
1 teaspoon vanilla extract
1 (18-ounce) box moist chocolate cake mix
1/4 cup unsweetened cocoa
1 cup andes candies (I used the bag of them already chopped in the pink and white candy cane-you can use the green one and chop yourself)
Confectioners' sugar, for dusting

Preheat oven to 350 degrees F.
 In a large bowl with an electric mixer, cream the cream cheese and butter until smooth. Beat in the egg. Then beat in the vanilla extract.
Beat in the cake mix and cocoa.
Add in the chopped Andes Candies.
Roll the into tablespoon sized balls and then roll them in confectioner's sugar. Place on an ungreased cookie sheet, 2 inches apart. Bake 12 minutes.
The cookies will remain soft and "gooey." Cool completely and sprinkle with more confectioners' sugar, if desired.

Cook's Notes:
I came across one last cookie forgotten in the Holiday tins.  It was STILL soft.  SNARF.  Gone.   No one died eating a week old cookie.  LOL


Merry Christmas to you and yours!

Tuesday, December 18, 2012

Paleo Snickerdoodles and a Surprise?

I am on my holiday cookie treat making adventure.  It's an adventure because there is NO SUGAR and no FLOUR....aka Paleo Holiday Treats!  WOOHOO!!!
I am posting my Snickerdoodle Recipe first and a warning!  It's fun....once you get over the scary part....First recipe then explanation...lol.

Paleo Snickerdoodle Cookies
by JennyMac's Lipsmack

1/2 c. almond butter (I used sunbutter-part of the surprise)
1/2 c. coconut oil
1/2 c. maple syrup
2 eggs
1 Tbsp. vanilla
2 c. almond flour
1 tsp. baking soda (second part of the surprise?)
2 tsp. cinnamon
2 Tbsp. truvia
2 Tbsp cinnamon

1.  Beat together almond butter, shortening, syrup, eggs, and vanilla until smooth.
2.  Combine flour, soda, and 2 teaspoons cinnamon in a separate bowl.
3.  Slowly add dry mixture until combined with wet mixture.
4.  Mixture will be wet and sticky, drop tablespoons several inches apart (8 per cookie sheet) and use a circular motion to spread cookie out into a flat disk, about a 1/2 inch thick, onto parchment covered cookie sheet.
5.  In a separate bowl, combine sugar and cinnamon then sprinkle over cookies.
6.  Bake cookies at 375 for 8-10 minutes or until golden brown on the edges, centers should be slightly wet but will be spongy and bounce back if you press on them.
Now read on for the SURPRISE?!?

Baker's Notes:
1.   I made these they are spongy....ok, no worries they won't get dried out too soon.  I turned one over and it looked funny.  I shrugged it off but I kept looking underneath the cookies as they were cooling....'why are they looking funny?'  
I finally opened one up.  This is what I found....

Perfect for the HOLIDAYS!!!  Green Interior.  Or St Patrick's Day...What the heck is going on....GREEN?  Never in my life has this happened to me and I have a Cookie club after school for 15 years and NEVER seen a green interior in a cookie.  So I googled it.
2.  Phew, nothing evil.  Apparently it has to do with the alkalinity of the sunflower seeds and especially the use of baking soda.  Here's a link to more.
Problem solved if you don't use Sunbutter but in fact use Almond Butter.  It's what I had on hand so I used it.  Freaky scary if you don't know why it's happening...but if you take the time to research it....it's safe, no need to throw out perfectly good cookies.  Tomorrow will be fun when I give them to my Paleo Pals....

Stay Tuned for more Paleo Treats:
Chocolate Truffles
Chocolate Mint Truffles
Apple Caveman Bars

And two NON Paleo Chocolate Mint cookies for Neolithic cookie Eaters!


Enjoy!

Saturday, October 27, 2012

Vomit Piles


HHAHAHAHA!  Why not?  Halloween is coming!!!  What I absolutely ADORE about Halloween is that it is my opportunity to take a simple no bake treat with chocolate and oatmeal and rename it and it totally works!

I have this recipe elsewhere called a Raggedy Robin or Cow Patties.  I made this on Friday for my students, they loved it.  It worked nicely for our abbreviated periods (we had early release) for I was able to make it, chill it and they ATE.  Please tune in for more recipes to come or go to my link to ALL my Halloween recipes on my school web page.

Vomit Piles
by JennyMac Lipsmack

 1/2-cup milk
1 stick margarine
1/4 cup unsweetened cocoa
2 c. sugar
1/2-cup peanut butter
1 tsp. vanilla

3 c. oatmeal
 
Combine first four ingredients.  Cook on medium heat until boiling.  Rolling boil for 1 - 1 & 1/2 min.  Remove from heat and mix vanilla and peanut butter.  Mix well.  Pour over oatmeal in a large bowl.  Mix quickly in a large bowl.   Spoon out onto wax paper*.  Let cool for 10 minutes.
 
*Grosser addition: add some 'chunks' like raisins, dried apricots bits, nuts for more gross out value!!

My recipes to come that I am making at school are:
  • Spider Web Breadsticks
  • Hairy armpits
  • Spider Cake (made with a Zebra Cake base)
  • Used Tampons (don't worry, it's for a ALL girl class- only they could appreciate)
  • Ghost Cake 
  • Maybe a picture of my classroom kitchen decorated for Halloween (a FIRST!)


Enjoy!

Saturday, April 7, 2012

Looks like Oatmeal but is it?

We love cookies here and although K-man can eat whatever he wants, I am on the fun adventure of trying Paleo recipes.  Back in the day when I was using tons of splenda and other lowfat options....K-man always could tell.  He'd crinkle his nose after a bite and I'd end up having to all that I created or give it away.  With my new passion for finding tasty Paleo treats.  K-man is the standard...if he eats it and likes it then....WINNER!  I found these in my Primal Palate Cookbook. Tweaked a bit...they are awesome.

N'Oatmeal Cookies 
adapted from Food Lover's Kitchen (their new site)

2 cups almond flour (they used almond meal-makes the dough browner)
1/2 c. flax seed meal
1/2 unsweetened, shredded coconut (I toasted mine)
1/2 cup raw sunflower seeds
1/2 cup raw pumpkin seeds
1/2 cup coconut oil (I used grapeseed oil)
1/2 honey or pure maple syrup (I did 50/50 ratio)
2 eggs
1 cup raisins
1 tsp cinnamon (they suggest 1 Tbsp.)
1 tsp. vanilla
1 tsp. baking soda

1.  Preheat oven to 325 degrees.
2.  In a large bowl combine the dry ingredients.
3.  In a smaller bowl combine the eggs, honey, vanilla, extract, and oil with a hand mixer.
4.  Stir wet into dry ingredients
5.  Stir in raisins and seeds.
6.  On a parchment paper lined cookie sheet drop 1 Tbsp sized amount.  12 on a sheet will do. Slightly press each mound.
7.  Bake for 15 minutes.  Cool.

Cook's Notes:
-Remember the Paleolithic way of eating has NO GRAINS.  This is a fake out oatmeal cookie.  You are getting your fiber from the seeds and raisins.
-Parchment really works better here for they were harder to get off the silpat sheets.
-I would have used coconut oil but the current one I have in my cabinet smells and tastes of coconut.  I prefer the brand I used prior that was taste and coconut aroma free.  Sometimes I am in the mood for coconut flavor, sometimes not.  I didn't today.
-The difference between almond flour and meal is that the meal is brownish/beige and the brown almond skins are incorporated in it.  Almond flour uses blanched almonds where the skins are removed rendering a yellow/whitish flour.  No difference in taste or texture....


Enjoy!

Monday, March 14, 2011

Copycatting the DO-si-Do Girl Scout Cookie

Do-Si-Do Copycats

It's that time of year when the Girl Scouts are delivering their cookies...unless you have a forgetful Girl Scout dad who is supposed to be delivering the goods to your place of work and he misplaces the order form and there is a DELAY in your cookie order. Torture. I remembered some copycat Girl Scout recipes on Baking Bites and thought I'd give her Do-SI-Do's a try.

Homemade Girl Scout Cookie: Do-si-Do
from Baking Bites

Cookies:
2 1/4 cups all purpose flour
2 tbsp baking soda
1 tbsp baking powder
1/2 tsp salt
1 1/2 cups unsalted butter, room temperature
3/4 cup chunky peanut butter
1 cup brown sugar
1 cup sugar
3 large eggs
1 tsp vanilla extract
1 1/2 cups quick-cooking oats (not instant or regular)

Filling:
1 1/2 cups creamy peanut butter, room temperature
1/2 cup butter, room temperature
1/4 cup confectioners’ sugar

Preheat oven to 350F.
Start with the cookies. In a medium bowl, whisk together the flour, baking powder, baking soda and salt.
In a large bowl, cream together butter and peanut butter. Beat in the sugars until fluffy, then add in the eggs one at a time, waiting until each is fully incorporated before adding the next. Stir in vanilla extract.
Working at a low speed, mix in the flour, followed by the oats (if you don’t have quick-cooking, pulse whole rolled oats in the food processor to chop them up a bit).
On a parchment-lined baking sheet, drop teaspoonfuls of batter (roughly 3/4-in. sized balls), leaving about 2 inches between each to allow for spread.
Bake for about 10 minutes, until cookies are a light golden brown. Cool on baking sheet for 5 minutes, making small holes in 1/2 of the cookies (for the tops of the sandwiches) before they set up. Transfer to a wire rack to cool completely.

Once cookies have cooled, make the filling.
In a large bowl, cream together smooth peanut butter, butter and confectioners’ sugar until very smooth. Spread 2-3 tsp onto half of the finished cookies and sandwich with the remaining halves. If you chose to make yours with GS-lookalike holes in some of the cookies, use these as the tops of the sandwiches.
Store in an airtight container.

Makes about 48 sandwich cookies.

Note: Use unsalted butter with this recipe, as different brands of peanut butter can vary hugely in salt content and it’s possible you’ll end up with a too-salty cookie with the salted butter, salted peanut butter and added salt. If you must use salted butter and are using brand of peanut butter that seems a bit salty, you can always reduce or eliminate the added salt. Personally, I like the salty sweet combination with peanut butter, but it’s only fair for me to give a little warning just in case!

Copycat Do-si-Do's

Cook's Notes:
1. These were really good to me for I liked how the cookie wasn't overly sweet. With a sweet peanut butter filling a sweet cookie would have been too much.
2. If you bake the dough right away....it will spread so use a small disher to get a smaller thinner cookie. If you chill your dough, they will be thick as seen here. Do what works best for you.
3. Alot of work baking the cookies, making the filling, schmearing the filling, sandwiching the cookies....not a quick bake and eat cookie....but it's taste was worth the work.....once a year. lol

Got Milk?

Sunday, August 29, 2010

Blueberries and Cream Cookie and Ponderings

Ok, so it's been awhile since I've posted....I am really taking my summer off seriously. A vacation from everything? Including my lil blog?....apparently so. Don't worry, back to work on Monday and School after labor day and back to blogging.

Blueberry and Cream Cookie

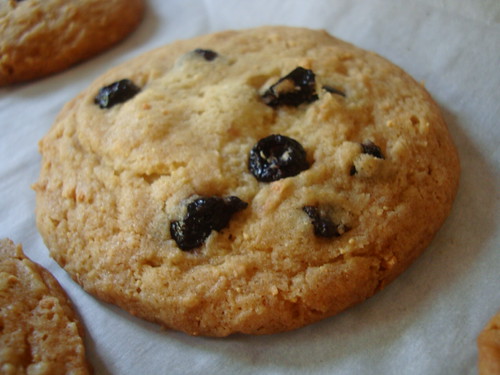
So I get the new Bon Appetit magazine this month. I see that some of the most popular recipes from Momofuku Milk Bar are being included. I can't rip through the mag fast enough....is it in here?...really?....drat no. I was looking for the coveted Compost Cookies everyone tries to copycat but what I did find is Christina Tosi's of Milk Bar popular Blueberry and Cream Cookies. I am open to a fruit cookie now and then...it helps balance out all the chocolate ones I seem to make most often.

I'd also seen this recipe from on my 'cookie of the day' email from Martha Stewart and had contemplated it (K-man loves blueberries!). But here is the pondering...

Are you like me and when you see a recipe that has a lot of steps... OR seems too complicated OR takes too long (overnight) - you lose interest in it? I am not the total 'easy breezy' cook here now. "Gimme a can of soup and cook five minutes....Bang -I am there".....NO, not quite. I like the happy medium recipes. But if it doesn't have a final picture to suck my interest in....and a long list of ingredients, too many steps I find that I put it off 'for some day' and I never come back to it. Does that ring any bells for you too?

So, it's my last hurrah for the summer. My time will be tight again. The lady of leisure's last laborious recipe for the summer. Yes, I know baking cookies in the summer does not seem appealing but we've been blessed with my last week of leisure with days in the 80's so I jumped on the opportunity...(next week will be back in the 90's when I am in an overly a/c'ed school all day)

The low down here is; the creator Christina Tosi was an odd duck growing up. She ate lima beans with ranch dressing. Doritos with miracle whip. Kraft's Mac and Cheese mixed with spaghetti-O's. Yes, the very one who created the compost cookie with pretzels, potato chips, coffee grounds and a other wacky things. Although her taste as a child was somewhat gross she developed into an risk taking/avant garde type of baker, that clearly WORKS.

I've included the original recipe as supplied by Bon Appetit, followed by Martha's recipe although it is 'tweaked' it is HALF of the recipe shown here. After the recipes is my review and more pix.

Blueberry and Cream Cookies
from Bon Appetit Magazine by Christina Tosi/Momofuku Milk Bar/NYC

2 cups (4 sticks) unsalted butter, room temperature
1 1/2 cups sugar
1 1/2 cups plus 2 tablespoons (packed) golden brown sugar
1/2 cup plus 2 tablespoons light corn syrup
2 large eggs
5 1/4 cups all purpose flour
2 teaspoons baking powder
1 teaspoon baking soda
1 teaspoon coarse kosher salt
1 1/2 cups Milk Crumbs (see below)
1 1/2 cups dried blueberries

Preparation

Combine butter, both sugars, and corn syrup in large bowl of stand mixer fitted with paddle attachment. Beat on medium-high speed until fluffy and pale, occasionally scraping down sides of bowl, about 3 minutes. Add eggs; beat on medium-high speed until mixture is very pale and sugar is completely dissolved, about 10 minutes. Add flour, baking powder, baking soda, and salt; beat on low speed just until blended, occasionally scraping down sides of bowl. Add Milk Crumbs; mix on low speed just until incorporated. Remove bowl from mixer. Stir in blueberries just until evenly distributed (dough will be very sticky).

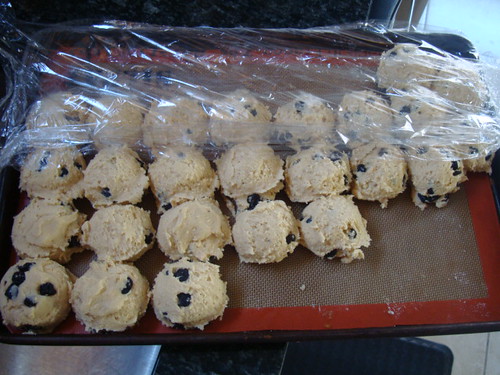
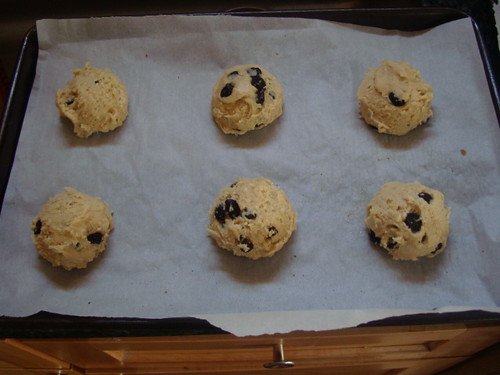
Using 1/4-cup ice cream scoop for each cookie, drop dough onto 2 large rimmed baking sheets. Cover with plastic wrap and refrigerate at least 24 hours. DO AHEAD Can be made 2 days ahead. Keep chilled until baking time.

Position 1 rack in top third and 1 rack in bottom third of oven and preheat to 375°F. Line 2 large (18x12-inch) rimmed baking sheets with parchment. Transfer 6 chilled dough scoops to each sheet, spacing at least 4 inches apart (cookies will spread). Bake cookies, 2 sheets at a time, until golden, reversing sheets halfway through baking, 20 to 22 minutes total. Repeat with remaining chilled dough, cooling and relining sheets between batches. Transfer cookies to racks; cool completely. DO AHEAD Can be made 3 days ahead. Store in airtight containers at room temperature.

Milk Crumbs

3/4 cup nonfat dry milk powder
1/2 cup all purpose flour
3 tablespoons sugar
2 tablespoons cornstarch
3/4 teaspoon coarse kosher salt
6 tablespoons (3/4 stick) unsalted butter, melted

Preparation of Crumbs

Preheat oven to 275°F. Line large rimmed baking sheet with parchment. Combine milk powder, flour, sugar, cornstarch, and coarse salt in medium bowl; toss to mix evenly. Add butter; stir with fork until clusters form. Spread mixture evenly on prepared sheet. Bake until crumbs are dry and crumbly but still pale, about 10 minutes. Cool Milk Crumbs completely on sheet. DO AHEAD Can be made 1 week ahead. Store in airtight container at room temperature.

~~~~~~~~~~~~~~~~~~~~~~~~~

Blueberry and Cream Cookies
inspired by Christina Tosi of Momofuku Milk bar but recreated by MarthaStewart.com

2 1/2 cups all-purpose flour
1/4 teaspoon baking powder
1/8 teaspoon baking soda
2 teaspoons salt
1 cup (8 ounces) Plugra European-style unsalted butter (please! regular will work here....sheesh)
1/2 cup plus 2 tablespoons granulated sugar
1/2 cup plus 2 tablespoons light-brown sugar
1/4 cup glucose (duh-corn syrup, why does MS gotta be all extra fancy?)
1 large egg
3/4 cup dried blueberries
1/2 cup plus 1/3 cup Milk Crumbs

Directions

1. Line two baking sheets with parchment paper; set aside.
2. In a large bowl, mix together flour, baking powder, baking soda, and salt; set aside. In the bowl of an electric mixer fitted with the paddle attachment mix together butter, sugars, and glucose until well combined. Add egg and mix until well combined.
3. Add flour mixture and mix until well combined. Add blueberries and milk crumbs and mix until well combined. Using an ice cream scoop about 2 1/8 inches in diameter, scoop dough into balls and place about 2 inches apart on prepared baking sheets.
4. Preheat oven to 375 degrees. Transfer baking sheets to refrigerator until dough is chilled, about 15 minutes. Transfer baking sheets to oven and bake, rotating pans halfway through baking, until cookies are golden brown and tops begin to crackle, about 15 minutes. Transfer cookies to a wire rack to cool.

Milk Crumbs

1/4 cup plus 1 tablespoon nonfat milk powder
2 tablespoons all-purpose flour
1 tablespoon cornstarch
1 1/2 teaspoons sugar
1/8 teaspoon salt
1 1/2 tablespoons unsalted butter, melted
1/4 cup white chocolate, melted

Crummy (lol) Directions

1. Preheat oven to 225 degrees. Line a baking sheet with parchment paper; set aside.
2. In a medium bowl, whisk together 2 tablespoons plus 1 1/2 teaspoons milk powder, flour, cornstarch, sugar, and salt. Stir in melted butter until well combined. Spread mixture on prepared baking sheet and transfer to oven. Bake until dried and crumbly, 8 to 10 minutes. Remove milk crumble from oven and let cool completely.
3. Transfer milk crumble to a large bowl and fold in remaining 2 tablespoons plus 1 1/2 teaspoons milk powder and white chocolate. Use immediately or transfer to an airtight container and keep refrigerated until ready to use.


Cook's Notes:
1. Very surprised and happy with the results. I am glad I exerted the effort.
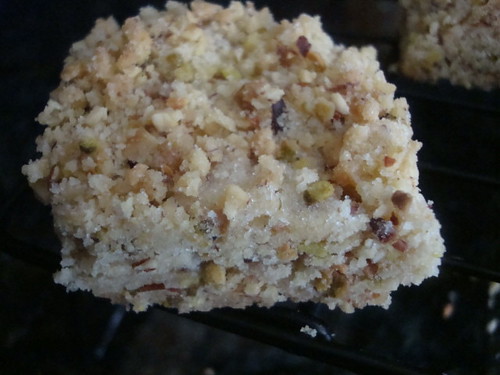
2. Crunchy edge....soft and chewy center. Those dried berries were working hard in that fridge by soaking up some of the moisture and were plumper and juicier than the ones I was snacking on while making the dough!
3. Recipe says makes 35...I got 37. I am sure it's because I added more blueberries near the end when I noticed less blueberries in the dough.

Blueberry and Cream cookie dough

4. Really watch when you are baking the crumbs...keep them light...keep mixing them to brown evenly. Stay by that OVEN!
5. If you don't have a oven thermometer, get one, you really need to make sure your oven is 375 degrees, no more, no less. Just two minutes extra (by accident) and I felt the cookies were overly brown.

Blueberry and Cream Cookies
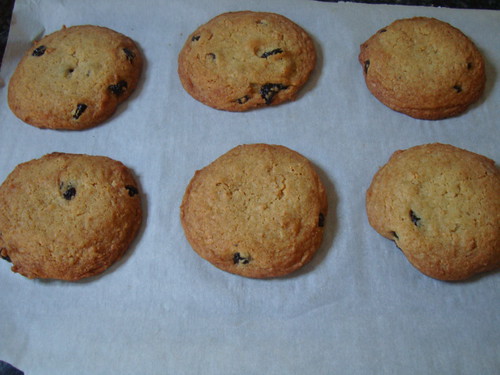
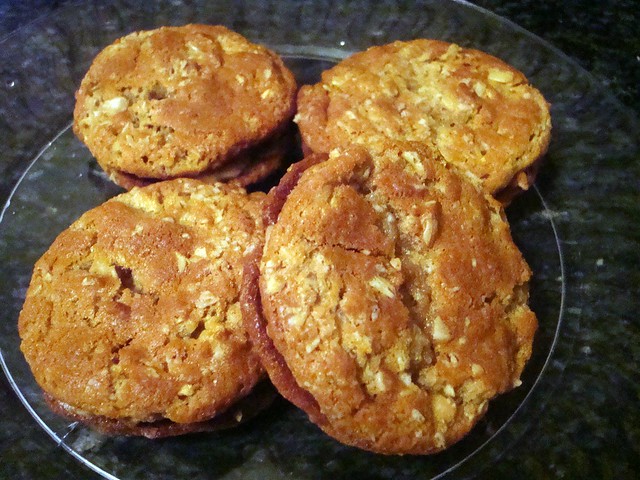
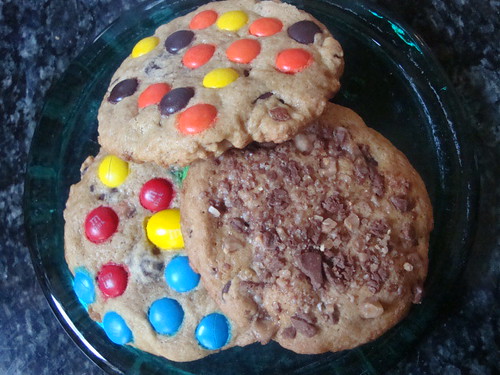
6. As you can see, don't squeeze any more than six. The recipe says 1/4 cup ice cream scoop (your standard one probably in your drawer).
7. Bon Appetit says from Christina to sit in fridge for 24 hours yet Martha's says 15 minutes chilled. I made some later that evening and this morning. It rendered the same result. I am not sure if 15 minutes would be enough. But one trial cookie being baked wouldn't hurt.

Blueberry and Cream cookie dough2
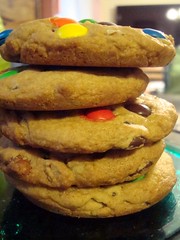
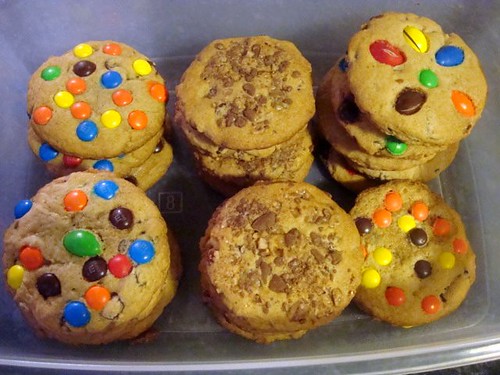
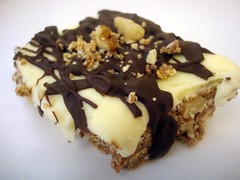
8. I included Martha's recipe only because I thought her 'tweak' using white chocolate in the crumbs was worth trying the recipe again. Good that her recipe is HALF the amount. I baked half of these cookies and put the other half in the freezer. These are THICK, chewy and hearty cookies. One will suffice unless you are REALLY starving. I like cookies that satisfy with eating ONE.
9. Very milky, creamy, buttery really. With two sticks in the recipe of course it's buttery. A nice change from what we normally have for cookies here. I felt it was worth the effort and time. Yummy cookie, give it a try for yourself.

Enjoy!

Tuesday, August 3, 2010

Spice Cake Mix Cookies

Sometimes other people in our lives move us to do something. I was wanting to make these spice cake mix cookies for two reasons.

1. K-man LOVES spice 'anything' especially with raisins. He also loves maple. I combined all these favorites of his in a cookie so he'd be very happy. However, summer time is not when we associate 'spicy' baked goods. We tend to think of fall or winter or the holidays for that kinda stuff. I didn't really care about that kinda like wearing white after labor day.

2. I have a friendship with a fellow food blogger. Ginger from Once Upon a Gourmet Gin, she is just a casual blogger just like me....nuthin' ferocious. One thing that we had in common was our love to create new cookies from cake mixes. I swear we both were chugging out like 1-2 a month for awhile there. I think we may have 20 creations between us. Anyhow, Gin has not been blogging lately but devoting more time with her family rather than blogging and I miss her. I made this cookie as a shout out to her. Miss ya Girl!

So if baking cookies NOW in the heat is not your thing....or the spice part of it is a turn off during the summer then perhaps print this out to use when you ARE in the mood for a soft spice cookie. Okay? Good. Let's commence the cookie goodness.

Spice Cake-Mix Cookies
JennyMac Lipsmack Creation

1/2 tsp. rum extract (substitute any extract you prefer)
1/2 cup raisins
very hot water
1 box spice cake mix
sprinkle of cinnamon
2 eggs
1/2 cup vegetable oil
1 tsp vanilla extract
1 cup powdered sugar
few drops maple extract
1 Tbsp. maple syrup
variable milk (approx 1 Tbsp)

Preheat oven to 350 degrees. Place raisins in a small bowl, cover with hot water; stir in rum extract. Let soak to 'plump' while you prepare the mix.

In a large bowl place the cake mix and sprinkle some extra cinnamon to your liking. Mix. In a short drinking glass, beat up the two eggs, extract then the oil. Pour into cake mix and combine.

Pour off hot water from raisins. Take your hand and squeeze the excess water and put the raisins into the cake mixture. Stir well.

Drop by Tablespoon (or small cookie scoop) onto parchment covered cookie sheet. Bake 12 minutes.

Prepare the frosting in a small bowl. Add powdered sugar, a few drops of maple extract and 1 Tbsp. maple syrup. Mix. Use milk to achieve the perfect consistency. Not too stiff not too soupy. Add drop by drop if need be. Set aside until cookies are cool or slightly warm.

Do not glaze cookies right out of oven or you will have more frosting on the counter than the cookie....

Frost cookies with approx 1 tsp of glaze. Swirling spoon around to form a small circle. Gravity will take care of the rest.

Moist, cakey, spicy, chewy....I tasted one for quality control. The rest go to K-man....I am a chocolate girl.

Gin, here's to ya! I've not forgotten about you my friend and cake-mix buddy!

Here is a link to my cake mix labeled cookie posts and Gin's Most Lemony Cookie of all time.

Enjoy!

Wednesday, July 21, 2010

Cowboy Cookies and New use for a Pan

I am always a sucker for good homemade cookie. If it's chocolate or got chocolate in it...done deal!
Of course, during the summer who wants to heat up the kitchen. Save these for one of those rainy days when it isn't so hot and want something to do with the kids!!!


Cowboy Cookies
3 dozen large cookies; 6 dozen small cookies

3 C Flour
1 Tbsp. Baking Powder
1 Tbsp. Baking Soda
1 tsp. Salt
1½ c. Butter (3 sticks), at room temperature
1½ c. Sugar
1½ c. Light Brown Sugar, packed
3 Eggs
1 Tbsp. Vanilla
3 c. Semisweet Chocolate Chips
3 c. Old-Fashioned Rolled Oats
2 c. Sweeten Coconut Flakes
2 c. Chopped Pecans (8 oz)

Directions:

1. Preheat oven to 350º

2. In a large bowl, combine flour, baking powder, baking soda, and salt. Set aside.

3. In a large bowl, beat butter on medium speed until smooth. Add sugar and brown sugar to butter and beat for an additional 2 minutes. Add one egg at a time and beat after each egg.
Add vanilla and beat.

4. Add flour mixture and stir until combined. Do not over mix.

5. Hand mix the chocolate chips, oats, coconuts and pecans and combine.

Place ¼C (use either a measuring cup or an ice cream scoop) of dough on ungreased baking sheet about 3 inches apart. Bake for 15- 17 minutes or until edges start to brown.

Remove cookies and let sit on tray for about 1-2 minutes before placing on a cooling rack. OR

For smaller size cookies use a regular size cookie scoop. My cookie scoop measures about 1 Tbsp. Bake for about 10-12 mins.

NOW FOR THE UNIQUE USE OF A PAN!!!!

I purchased one of those "Perfect Brownie" Pan sets. Ironically, I have not used them for brownies yet. LOL

I put one scoop of each cookie in each space. ( I put the remaining cookie dough formed in balls in a ziploc bag in the freezer for future cookie cravings) Baked @ 350 degrees for 10-15 minutes.

Lower pan on stand, lift dividers out come your squares. I loved how each square had it's own crusty edge. YUM.


Cowboy Cookies on Foodista
Delish!

Monday, May 24, 2010

Snickerdoodle Pie

Have you ever read someone's blog entry of the day and immediately made it? Cathy from Noble Pig has that effect on me sometimes.

Snickerdoodle Pie2

On May 5, I made this scrumptious snickerdoodle pie, took pictures, uploaded them, ate it all up and life interfered....'the wind down of the school year' is upon me and it's sometimes crazy for me. When I finally returned back to my blog, I said...."snap, I forgot to post this !!!" Sorry guys, I am awake now.

Snickerdoodle Pie
adapted from Noble Pig that she got from Better Homes and Gardens

1 rolled refrigerated unbaked piecrust or your favorite homemade pie crust (9")
1 Tablespoon raw sugar or coarse sugar
3/4 teaspoon ground cinnamon, divided
3/4 cup pecans, toasted and chopped
1/2 cup butter plus 1 Tablespoon, divided (some softened, some melted)
1/2 cup packed brown sugar
3 Tablespoons water
2 Tablespoons light colored corn syrup
1-1/2 teaspoons vanilla, divided
1/2 cup granulated sugar
1/4 cup powdered sugar
1 teaspoon baking powder
1/2 teaspoon salt
1/4 teaspoon cream of tartar
1 egg
1/2 cup milk
1-1/4 cups all-purpose flour

Preheat oven to 350o F. Prepare pastry and line 9" pie plate. In a bowl combine raw sugar and 1/2 teaspoon cinnamon. Brush melted butter over crust. Sprinkle with 1 teaspoon of cinnamon-sugar mixture and pecans. Set aside.

For syrup, in saucepan combine brown sugar, 1/4 cup butter, the water, corn syrup and 1/4 teaspoon cinnamon. Heat to boiling over medium heat, stirring to dissolve sugar. Boil gently 2 minutes. Remove from heat. Stir in 1/2 teaspoon vanilla. Set aside.

In mixing bowl beat 1/4 cup softened butter with electric mixer on medium speed for 30 seconds. Beat in granulated sugar, powdered sugar, baking powder, salt and cream of tartar until well combined. Beat in egg and 1 teaspoon vanilla. Gradually beat in milk until combined. Beat in flour. Spread evenly in crust-lined plate.

Slowly pour syrup over filling in pie plate. Sprinkle with remaining cinnamon-sugar mixture. Cover edges of pie with foil.

Bake pie 25 minutes; carefully remove foil. Bake 20 minutes more or until top is puffed and golden brown and a toothpick inserted near center comes out clean. Cool 30 minutes on wire rack. Serve warm.

Snickerdoodle Pie1

OMG! Yummy, yummy, yummy. Very rich and something that could be served as thin as a cheesecake slice with some ice cream. Shhhhh, but I tucked an emergency piece in the freezer! Don't tell K-man! Pardon the 'darkish' picture, sigh.

Enjoy!

Saturday, May 15, 2010

Happy Chocolate Chip Day!

I found this recipe on Picky Palate's blog....oh boy! How appropriate with today being Chocolate Chip day! Let's celebrate with a big fat XXL cookie!!! Jenny from PP used M&M's....that was my springboard....so I hit the candy aisle....lookee what else I put on the cookie...

XXL Chocolate Chip Cookies1

What makes these cookies so large is that you use the muffin top pans. I have 3 of them at my school so I borrowed them for this recipe. Perfect! If you'd like more of a tutorial how to use these pans with these cookies check out Jenny's Picky Palate blog for more detailed pix...

XXL Candy Chocolate Chip Cookies
adapted from Picky Palate

2 sticks softened butter
3/4 Cup sugar
1 Cup packed light brown sugar (I used half dark brown and light brown)
2 extra large eggs
2 Tablespoons pure vanilla
3 3/4 Cups all purpose flour
1 1/2 teaspoons baking soda
3/4 teaspoon salt
12 oz bag chocolate chips
1 bag M&M’s, Reese's Pieces, Almond or Peanut M&M's, Heath Bar Bits

1. Preheat oven to 350 degrees F. In a stand or electric mixer beat the butter and sugars until well beaten. Beat in eggs and vanilla until well combined. Place flour, baking soda and salt into a large bowl; mix. Slowly add to wet ingredients along with the chocolate chips. Do not mix in M&M’s!!

2. Scoop 1/4 Cup of dough and press into a muffin top pan (or just press onto a parchment or silpat lined cookie sheet) using your hands or the bottom of a moistened glass. Now, press your M&M’s onto pressed cookies. I did a pan of M&M's (dark) and a pan of Reese's. Another pan of Heath Bar bits....Bake for 12-15 minutes, until edges just start to turn golden brown. Let cool for 10 minutes on muffin top pan or cookie sheet before transferring to a cooling rack.

About 18 XXL cookies!

XXL Chocolate Chip Cookies3

I made a DOUBLE batch to take to my GIRL's weekend at the beach. I know we all needed to have some homemade chocolate lovin' from the oven.

Don't worry....I left a few (like 10) for K-man to enjoy while he spends the weekend alone. Care to guess how many will be left when I return after 3 days?

Thanks Jenny....this XXL ROCKED....I hope we don't eat them all on the drive over to the beach!

Friday, April 2, 2010

That's the way the cookie crumbles...

And a HUGE one at that!

I saw these one my Cookie a day email from MarthaStewart.com. I love simple-quickie-like cookies but I also love a shortbread cookie. This was perfect.

Giant Nut Crumb Cookie
adapted from MarthaStewart.com

1 1/2 sticks unsalted butter, room temperature, plus more for pan
1 1/2 cups finely ground nuts, toasted slightly (I used almonds and pistachios)
1 3/4 cups all-purpose flour
3/4 cup sugar
1/4 teaspoon table salt
1 1/2 teaspoons pure vanilla extract

  1. Preheat oven to 350 degrees. I put the nuts on a cookie sheet while the oven preheated to get a little 'toast' on. Butter a 10-inch springform pan; set aside. In a large bowl, whisk almonds, flour, sugar, salt, and vanilla. Cut in butter with a pastry cutter until mixture is crumbly. Work in butter until completely incorporated with no dry crumbs.
  2. As you start to smell the nuts, take them out of the oven and whirl them around in the food processor until fine. Mix into crumb mixture.
  3. Transfer all but 1 1/2 cups of mixture to pan. Press mixture into pan to compress dough (I used the bottom of a custard cup to make it easily even). Sprinkle with reserved 1 1/2 cups of mixture; transfer to oven.
  4. Bake, rotating pan two to three times, until cookie begins to turn golden, about 25 minutes. Reduce temperature to 300 degrees. bake until golden brown and fairly dry, 15 to 20 minutes more. Transfer to a wire rack to cool completely. Remove from pan. Store in an airtight container for up to 3 days.
The recipe suggests to serve whole and break into chunks when serving for affect. I knew crumbs would be 'flying' all around if broken at the table. I used a pizza cutter to make it a bit neater.

Can you tell how many pieces above are missing that I had to sample for quality control?

I love the little bits of pistachio. So simple yet so delicious!

Enjoy!

Monday, March 29, 2010

It's that time of the year...

When my after school program Cookie Club comes to a close! Our big event at school is called Celebrate Gunston and this year it was scheduled earlier than it's usual late April date.

Normally we make the traditional fare of cookies like Chocolate Chip, brownies, snickerdoodles, etc. Since we had an international theme going on it seemed only appropriate to research the country origins of some of the cookies we bake or look up countries and learn what cookies are indigenous there. Do you know how difficult this was? We wanted to make EVERYTHING! 'Oh that looks good....mmm, that sounds like a good one.'

Here's our list of cookies and their origin, following by their pictures and recipes.

Nanaimo Bars (Canada)
Brownie Nut Biscotti (Italy)
Russian Tea Cakes, Mexican Wedding Cakes, Kourambiethes (Greece) (nutty, butter cookie coated with powdered sugar)
Scottish Oat Cakes (did you guess Scotland?)
Rosettes (Scandinavian regions)


Nanaimo Bars
from allrecipes.com

CRUST:
1/2 cup butter, softened
1/4 cup white sugar
5 tablespoons unsweetened cocoa powder
1 egg, beaten
1 3/4 cups graham cracker crumbs
1 cup flaked coconut
1/2 cup finely chopped almonds (optional)
FILLING:
1/2 cup butter, softened
3 tablespoons heavy cream
2 tablespoons custard powder
2 cups confectioners' sugar

TOPPING:
4 (1 ounce) squares semisweet baking chocolate
2 teaspoons butter
  1. In the top of a double boiler, combine 1/2 cup butter, white sugar and cocoa powder. Stir occasionally until melted and smooth. Beat in the egg, stirring until thick, 2 to 3 minutes. Remove from heat and mix in the graham cracker crumbs, coconut and almonds (if you like). Press into the bottom of an ungreased 8x8 inch pan.
  2. For the middle layer, cream together 1/2 cup butter, heavy cream and custard powder until light and fluffy. Mix in the confectioners' sugar until smooth. Spread over the bottom layer in the pan. Chill to set.
  3. While the second layer is chilling, melt the semisweet chocolate and 2 teaspoons butter together in the microwave or over low heat. Spread over the chilled bars. Let the chocolate set before cutting into squares.
Cook's Notes:
Extremely rich, cut into small bars for sure. K-man's favorite of the bunch. We opted to drizzle the chocolate on top after we cut them. I know that chocolate has a tendency to 'crack' when on top of a bar cookie. We like the results this way.


Brownie Nut Biscotti
from allrecipes.com
1/3 cup butter, softened
2/3 cup white sugar
2 eggs
1 teaspoon vanilla extract
1 3/4 cups all-purpose flour
1/3 cup unsweetened cocoa powder
2 teaspoons baking powder
1/2 cup miniature semisweet chocolate chips
1/4 cup chopped walnuts
1 egg yolk, beaten
1 tablespoon water
  1. Preheat oven to 375 degrees F (190 degrees C). Grease baking sheets, or line with parchment paper.
  2. In a large bowl, cream together the butter and sugar until smooth. Beat in the eggs one at a time, then stir in the vanilla. Combine the flour, cocoa and baking powder; stir into the creamed mixture until well blended. Dough will be stiff, so mix in the last bit by hand. Mix in the chocolate chips and walnuts.
  3. Divide dough into two equal parts. Shape into 9x2x1 inch loaves. Place onto baking sheet 4 inches apart. Brush with mixture of water and yolk.
  4. Bake for 20 to 25 minutes in the preheated oven, or until firm. Cool on baking sheet for 30 minutes.
  5. Using a serrated knife, slice the loaves diagonally into 1 inch slices. Return the slices to the baking sheet, placing them on their sides. Bake for 10 to 15 minutes on each side, or until dry. Cool completely and store in an airtight container.
Cook's Notes:
Using a white chocolate drizzle would have been a better 'eye-popper' but we were using up what we had. Good flavor, very chocolatey.


Russian Tea Cakes, Mexican Wedding Cakes and Kourambiethes (Greece)
-the same cookie but from different countries -allrecipes.com

1 cup butter
1 teaspoon vanilla extract
6 tablespoons confectioners' sugar
2 cups all-purpose flour
1 cup chopped walnuts
1/3 cup confectioners' sugar for decoration
  1. Preheat oven to 350 degrees F (175 degrees C).
  2. In a medium bowl, cream butter and vanilla until smooth. Combine the 6 tablespoons confectioners' sugar and flour; stir into the butter mixture until just blended. Mix in the chopped walnuts. Roll dough into 1 inch balls, and place them 2 inches apart on an ungreased cookie sheet.
  3. Bake for 12 minutes in the preheated oven. When cool, roll in remaining confectioners' sugar. I also like to roll mine in the sugar a second time.
Cook's Notes:
I have seen these using pecans, walnuts and almonds. Just pick whichever nut appeals to you. I prefer them with almonds. Be sure to always TOAST your nuts before putting them in your recipe.

Scottish Oat Cakes
from Cooks.com

1 1/2 c. flour
1 1/2 c. rolled oats
1 c. sugar
1 tsp.
1/2 tsp.
1 c. Crisco
1/4 c. cold water

Mix dry ingredients by hand. Mix in Crisco until well mixed. Add cold water to form sticky dough. Roll out fairly thin on well floured board. Cut into 1 1/2 inch squares. (I use a pizza cutter). Bake on ungreased cookie sheet, 2 inches apart, for 15-18 minutes at 350 degrees. Remove to rack immediately.


Cook's Notes:
I really was pleasantly surprised by these. Simple easy...low in sugar. Not complicated with several different flavors competing with each other (like the Nanaimo bars) K-man said you should NOT eat these after eating a Nanaimo bar. Those were so rich and sweet that these were almost tasteless in comparison. I guess I just enjoy a simple, hearty, grainy, less sweet cookie every so often. So these were my favorite.

Rosettes
recipe from Allrecipes.com

2 eggs
1 tablespoon white sugar
1 cup sifted all-purpose flour
1 cup milk
1 teaspoon vanilla extract
1/4 teaspoon salt

  1. Combine eggs, sugar and salt; beat well. Add remaining ingredients and beat until smooth.
  2. Heat a rosette iron in deep, hot oil (375 degrees) for 2 minutes.
  3. Drain excess oil from iron. Dip in batter to 1/4 inch from the top of the iron, then dip iron immediately into hot oil (375 degrees).
  4. Fry rosette until golden, about 30 seconds. Lift out; tip upside down to drain. With fork, push rosette off iron onto a rack placed over paper towels.
  5. Reheat iron 1 minute; make next rosette.
  6. Sprinkle rosettes with confectioners' sugar.
    Norpro Rosette Timbale Maker


Cook's Notes:
Shown above are the IRONS you need to make these. Not too expensive to have in your cooking tools for a fun treat for the kids every so often. BUT.....These were the overall winner of our customers. Despite our signs in front of the cookie trays (with descriptions!!) the customers would come to the table and ask for 'funnel cakes'. LOL Everything was pre-made except for the rosettes, which I was making at the table. They smelled exactly like funnel cakes (oh please....just a hot oil smell) and they resembled funnel cakes except for they were smaller and not at ALL cakey. Very light, airy, crispy and guaranteed to leave you with a dusting of powdered sugar on your chest! Great way to make money for nobody had a problem paying 3 for 1.00 (if they only knew that this stuff was PENNIES to make!)

Next year, I think we are nixing the making so many different cookies. FUNNEL CAKES are the way to go. Put on your calendar: Funnel Cake Sale, spring 2011- 1 small for a 1.00 - 1 large for 5.00....place your order now!


That's the way the cookies did not crumble....