Showing posts with label pie. Show all posts

Monday, May 24, 2010

Snickerdoodle Pie

Have you ever read someone's blog entry of the day and immediately made it? Cathy from Noble Pig has that effect on me sometimes.

Snickerdoodle Pie2

On May 5, I made this scrumptious snickerdoodle pie, took pictures, uploaded them, ate it all up and life interfered....'the wind down of the school year' is upon me and it's sometimes crazy for me. When I finally returned back to my blog, I said...."snap, I forgot to post this !!!" Sorry guys, I am awake now.

Snickerdoodle Pie
adapted from Noble Pig that she got from Better Homes and Gardens

1 rolled refrigerated unbaked piecrust or your favorite homemade pie crust (9")
1 Tablespoon raw sugar or coarse sugar
3/4 teaspoon ground cinnamon, divided
3/4 cup pecans, toasted and chopped
1/2 cup butter plus 1 Tablespoon, divided (some softened, some melted)
1/2 cup packed brown sugar
3 Tablespoons water
2 Tablespoons light colored corn syrup
1-1/2 teaspoons vanilla, divided
1/2 cup granulated sugar
1/4 cup powdered sugar
1 teaspoon baking powder
1/2 teaspoon salt
1/4 teaspoon cream of tartar
1 egg
1/2 cup milk
1-1/4 cups all-purpose flour

Preheat oven to 350o F. Prepare pastry and line 9" pie plate. In a bowl combine raw sugar and 1/2 teaspoon cinnamon. Brush melted butter over crust. Sprinkle with 1 teaspoon of cinnamon-sugar mixture and pecans. Set aside.

For syrup, in saucepan combine brown sugar, 1/4 cup butter, the water, corn syrup and 1/4 teaspoon cinnamon. Heat to boiling over medium heat, stirring to dissolve sugar. Boil gently 2 minutes. Remove from heat. Stir in 1/2 teaspoon vanilla. Set aside.

In mixing bowl beat 1/4 cup softened butter with electric mixer on medium speed for 30 seconds. Beat in granulated sugar, powdered sugar, baking powder, salt and cream of tartar until well combined. Beat in egg and 1 teaspoon vanilla. Gradually beat in milk until combined. Beat in flour. Spread evenly in crust-lined plate.

Slowly pour syrup over filling in pie plate. Sprinkle with remaining cinnamon-sugar mixture. Cover edges of pie with foil.

Bake pie 25 minutes; carefully remove foil. Bake 20 minutes more or until top is puffed and golden brown and a toothpick inserted near center comes out clean. Cool 30 minutes on wire rack. Serve warm.

Snickerdoodle Pie1

OMG! Yummy, yummy, yummy. Very rich and something that could be served as thin as a cheesecake slice with some ice cream. Shhhhh, but I tucked an emergency piece in the freezer! Don't tell K-man! Pardon the 'darkish' picture, sigh.

Enjoy!

Tuesday, April 27, 2010

Impossible Coconut Pie

Do you like coconut? Do you like creamy custard like pies? Do you like EASY!!!!

Nah, I didn't think so.

I haven't made an impossible pie in years. They have many versions now. I stumbled upon this coconut one and I was happy because, less crust means less fat and calories.

So tasty and light!

Easy Impossible Coconut Pie
adapted from bettycrocker.com

1 cup flaked or shredded coconut
1/3 cup splenda
1/2 cup Original Bisquick® mix (reduced fat type)
1/4 cup butter or margarine, softened
2 cups fat free evaporated milk
1 1/2 teaspoons vanilla
4 eggs

1. Heat oven to 350°F. Grease 9-inch pie plate with shortening or cooking spray.
2. In medium bowl, stir all ingredients until blended. Pour into pie plate.
3. Bake 50 to 55 minutes or until golden brown and knife inserted in the center comes out clean. Cover and refrigerate any remaining pie.

Impossible Coconut Pie1

Cooks Notes:

  • I made the original version and the second time with splenda and the FF evaporated milk. I couldn't get over how still rich the FF evaporated made this pie...I find skim milk doesn't cut it richness-wise in some recipes.
  • I didn't want to get TOO extreme by using egg beaters and smart blend butter.....perhaps another time.

Enjoy!

Friday, November 13, 2009

Schweeetttttt!


We just finished studying Soul Food in my eighth grade classes. For each cuisine they learn about; they do one lab experience (cornbread) and after their mini quiz on Friday they get one more demonstration of another food for them to see the preparation of it and to sample it. I've done grits, hoppin' john, jambalaya, fritters, hoe cakes and I wanted to try something new. I wanted to make sweet potato pie.

Here's the problem I can't make a pie, bake it, chill it and have them eat it all before they leave in 45 minutes. I had to do the TV magic thing and make one before to pull out when I put it in the oven. Then I thought of another thing...ugh...the slicing....the need for forks and plates and cutting one pie into 12 slices, etc. So I thought....why can't I make them into mini sweet potato pies?


And I did....

Here was my recipe adapted from allrecipes.com

Mini Sweet Potato Pies

Vanilla Wafers
1 (16 ounce) can mashed sweet potatoes
3/4 cup evaporated milk
3/4 cup packed brown sugar
1/2 cup light corn syrup
2 eggs
1 tablespoon butter, melted
1/2 teaspoon salt
1/2 teaspoon ground cinnamon
1 pinch ground nutmeg
Marshmallow Fluff

Preheat oven to 400 degrees.

Line each a 2 muffin tins with 18 muffin papers. Spray lightly with non stick spray. Put a vanilla wafer in each cup.

In a mixing bowl blend sweet potatoes, milk, sugar, corn syrup, eggs, butter, cinnamon, salt and nutmeg and beat with a electric hand mixer until smooth. Scoop filling into muffin cups with an ice cream scoop. Bake for 20 minutes or until set.

While pies are still hot place a dollop of fluff on each pie to melt. Place in refrigerator to chill.


The kids RAVED over these. I didn't like the fact that these looked more like pumpkin pie (being brown) and not orange from the sweet potatoes. When I do these again, I am going to use real sweet potatoes and not the canned ones which tend to be a dark brownish orange. The fluff was a bit sticky to peel off the paper....but most remained on the mini pie. Sadly, I wasn't able to taste them since my "plan" doesn't allow this kinda stuff....but if the kids were happy and begging for more, it worked for me.

Try your own favorite pie recipe filling as a mini version for the holidays!

Enjoy!

Saturday, August 8, 2009

Better Than Store Brand for SURE!

There are a few bloggers out there who've made their own pop tarts.

Although I appreciate making homemade dough, etc. I wanted something easy and to use up the prepared pie crust I had in the freezer.

Seeing this recipe on Chez Pim got me started...So if you want the old school version to make your own pop tarts...click on her link. If you want an easier way...continue reading.


K-man's favorite condiment is orange marmalade. You see all types of filling for those poptarts but no orange filled ones.


Until now....


Orange Poptarts

1 prepared pie dough, to room temperature
1/4 c. orange marmalade
1 small can of mandarin oranges, drained

Preheat your oven to 400 degrees.

In a small bowl, put in your mandarin oranges and use a spoon to break them up a bit. Stir in your orange marmalade. Set aside.

Roll out your dough a bit more on parchment paper. Carefully cut your dough into quarters. Spoon your marmalade mixture onto half of the triangle (envision you folding the large quarter in half to make a narrower triangle) After all the quarters have their fillings, fold them over and use a fork to crimp the edges. (Chez Pim cut all her edges to make them neater...I didn't feel the need)

Take a pair of scissors and clip a small vent on the tops or your edges will ooze filling (like mine, I didn't make my cut deeper enough with my knife)

Bake for 18-20 minutes. Check after 15 just in case. Bake until golden brown.


Simply yummy!


These were even better with a little chocolate drizzled on top!


K-man was dancing around when he got his own personal orange "hand pie"!


Enjoy!

Thursday, August 6, 2009

Appetizer Memories Restyled


When I was younger we went to the restaurant Bennigan's a lot. It was new to us at the time and the food was pretty decent. One of things I remember loving was their broccoli bites appetizer. It was a deep fried ball with chopped broccoli, oozy velveeta like cheese and bread crumb outside. Crunchy on the outside and gooey cheese on the inside. It was healthy cuz it had broccoli in it, right? HA! That was my rationale back then. Now I know better. I haven't had those in a long time...boy I'd kill for one now.

In reading two blogs, I kinda made this up from their influence. Eating Well...living Thin had a broccoli and cheese quiche bite recipe. Girlichef yesterday was making a recipe with broccoli and she HAD to go and say "choppin' brocco-lay" (visions of Dana Carvey singing in my head now) and today she used some phyllo (delish looking maple walnut tartlettes!) So I got to thinking....I have some broccoflower and some phyllo and cheese...hmmmmmmm.

This is what I came up with....
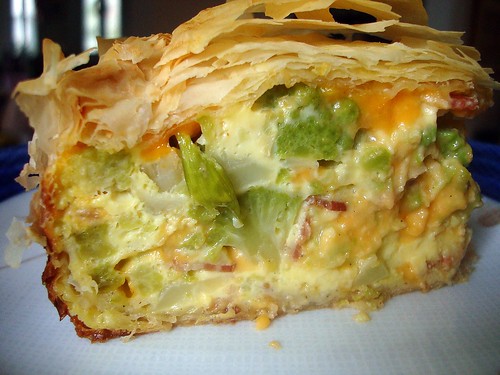
Broccoli and Cheese Phyllo Pie

1 head of broccoflower, cut into 'florettes'
4 eggs
8 strips of bacon, cooked and chopped
1/2 tsp. salt
3 T. flour
1 cup milk
2 Tbsp of mayo (I used this since I was using skim milk)
1/4 cup green onions, chopped
dash of cayenne
1/2 tsp. pepper
1/2 lb smoked cheddar cheese, shredded
1/2 package of phyllo dough sheets (1 of the 2 cylinders in the box), at room temperature
6-7 Tbsp butter, melted (you may or may not be heavy handed with this)

Preheat your oven to 350 degrees.

Put your broccoflower in a pot with a enough water to cover and cook for 5 minutes. Drain and set aside. In a large bowl put your chopped bacon, green onions, shredded cheese, mix well.


In a medium bowl put your eggs, salt, peppers, flour, mayo and milk beat well. I used an immersion blender for the mayo tends to 'seize in little pieces from the cold milk. The immersion blender made it all smooth.

Unroll your phyllo dough and cover with a damp paper towel. Either grease your 8 inch springform pan with cooking spray or melted butter. Uncover your dough and remove two sheets of phyllo (replacing the damp towel) and lay into your springform pan. Take your pastry brush and coat it with butter. Making sure the phyllo 'sticks' to the sides. Rotate pan a bit and repeat with two more layers and butter. Keep rotating and layering and buttering until you have quite a thick 'phyllo' nest. Roughly about 3/4 of the roll. Since there are 20 sheets to a roll and you are putting down 2 layers at a time; this will be about 14-16 sheets)

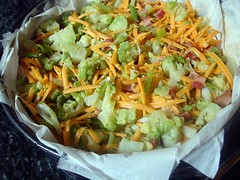
Since your broccoli is cool now, roughly chop it and mix it in with the bacon and cheese mixture. Put the broccoli/bacon/cheese mix into your phyllo nest and gently pat down. Remix your egg mixture (pepper and flour may settle a bit) and pour over your broccoli mixture.


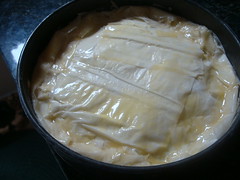
Take your remaining phyllo sheets and put on top 2 layers at a time coating with butter in between. Roll your over hanging edges with the phyllo sides to create a 'crust edge'. Brush top with butter.


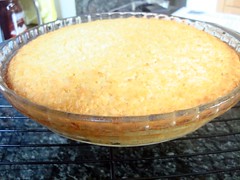
Bake in 350 degree oven for 1 hour and 15 minutes. You may need to cover the phyllo after an hour to keep it from overbrowning. Let sit 15 minutes before cutting (you don't want everything to ooze out on you).


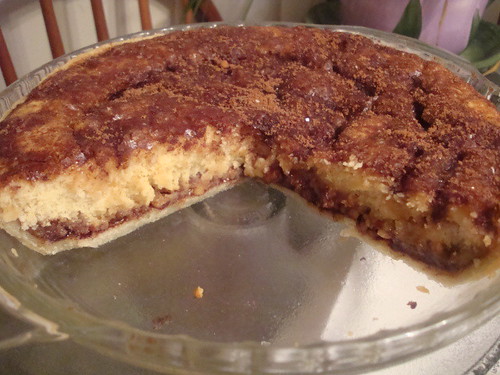
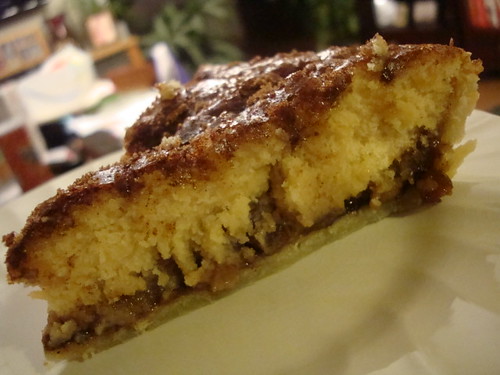
Be careful cutting very gently so you don't MASSACRE your phyllo dough. Use a serrated knife and gently saw. When you get to the bottom where the phyllo is more thick....you don't have to be so gentle.


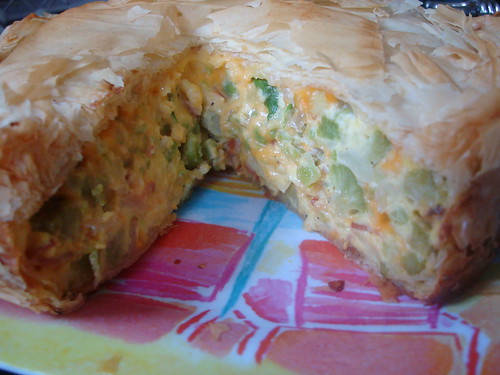
I tell ya, the smokey cheese, soft yet still firm broccoli and the bits of bacon. This is ON POINT! Granted there is no bread crumb coating....but the crunchy phyllo worked.

Don't be afraid of working with phyllo. Like riding a bike...the more you work with it, the more comfortable you get. For example when I was putting the layers on the bottom....I didn't worry about any tears or total even coverage of butter. I knew once the filling was in....it was all good. This was a total risk from fusing two ideas....and man, it paid OFF!

BTW, as I was making this with eggs....thought I'd show you this...

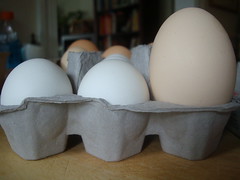
Notice anything? Does the Sesame Street song "one of these things doesn't belong here" come to mind?

My neighbor gives me some farmer's market 'rejects' every so often. By law, the farmer can't sell 'double yolked' eggs apparently? I know I've gotten plenty of them in 'store bought' eggs before...but these eggs must be laid by ginormous chickens. I laugh when I get them for I can't put them in my egg carton with the others. Here was Big Bird's baby picture next to regular birds....LOL


Enjoy!

Wednesday, February 11, 2009

Easy Peasy Apple Pie

applecrostada

NO, I am not talking about the ones from the bakery at your grocery store or even Mrs. Smiths. This is easy, yet you can take all the CREDIT cuz you MADE it with your own two little hands and SLAVED all day making it....(heh, heh, heh....that is what you want THEM to think!)

I've heard this called Crostada or Gallette. Whatever.
It's freakin' ___(enter name of filling here)____ Pie LOL. I first came to know this as a Crostada when I saw Ina Garten prepare it. So there, Apple Crostada.

I am not going to use any recipe here just a process cuz it's so freakin easy!!!

EASY PEASY PIE


Pre-made Pie Crust
Whatever fruit you have in your fruit bowl that you need to get rid of NOW. (I used my two partly shrivelled Gala apples)
Lemon juice (to prevent browning)
Cinnamon
Sugar
Some instant Tapioca
Nuts of choice or not
1 beaten egg

Bring pie dough to room temperature. Roll it out a little more onto your parchment paper, silpat or the non stick foil is what I used. Preheat your oven to 350 degrees.

Prepare your filling of the chopped fresh fruit you have on hand. I usually use like 4 apples but today I had only two little sad apples and it was just fine. Mix in your lemon juice, your sugar, cinnamon and tapioca (my box of instant tapioca called for only 2 Tbsp for apples -more for blueberries cuz they juicier!). Either mix your nuts (if you are nutty people like us) or put them on top.

Place mixture in center of dough, leaving 1-1/2 inches around edge. Whether it is a flat pile or a huge mound, does not matter. Fold up sides all around to 'hug' the fruit mixture. Brush folded edge with egg.

Slide pie/crostada onto your baking sheet. Place in oven and bake for 30 minutes or until crust is browned.

Makes depending on how you cut it into 6 slices or 8. We were having a hankering and since the apples were on the thin side....we opted for the 1/4 pie pieces. GREAT with ice cream or fresh whipped cream!

So there you go....pie in a FLASH. NO making of a crust, no rolling dough into a perfect circle, NO easing it into the pie pan without stretching, NO cutting the excess off the edges. NO crimping, NO venting of dough top.

Just roll out premade dough, fill, fold and bake. BAM-PIE! Once you make this...you will find it hard to back to the old way....I've made this with apple and blueberries, peaches and almonds, apples and pears with pecans, apple and raisins. The possibilities are endlessly easy!