Sunday, February 28, 2010

Slider Redux!

I have posted about White Castle Sliders and they were ROCKIN'!!!!

Then one day you find yourself with some leftover small dinner rolls. You start thinking about the mushrooms in the veggie bin and remember that you have some swiss cheese hanging. BOOM, you get the CRAVING......


Mushroom and Swiss Sliders

1/4 cup dried onion (but I used 1 cup frozen chopped onion)
1 Tbsp. minced dried garlic
1 lbs of ground beef
1 Tbsp ground black pepper
salt to taste (approx 1-1/2 tsp)
1 pint chopped mushrooms, sauteed
swiss slices
pickles
ketchup
mustard
dinner rolls (I used Sara Lee)

Preheat oven to 400 degrees


Line cookie sheet with foil and sprinkle with onions and garlic. Press ground beef on onions and season with salt and pepper.

Bake for 15-20 minutes.

Saute your mushrooms.


Blot beef with paper towels. Count out how many rolls and the size you need and take a pizza cutter and cut out the squares. These photo made 10.

Sprinkle sauteed mushrooms on cooked beef


Top with sliced cheese (yes, you see some American....I didn't have as many of the swiss cheese as I hoped!) You will need 6 -8 slices. So stock up!


Return to oven for a minute just to melt cheese. Since you already cut beef all you have to do is use a spatula to lift each piece. Cutting through the cheese will be very disasterous!


Load up your bottom buns with two bread and butter pickles. Lay down your loaded mushy and swiss beef patties. Squirt a little ketchup and mustard, and the top bun.


BANG! Slider time!


Enjoy!

Saturday, February 27, 2010

LIMEY! These are cookies are GOOD!

And these good cookies are LIMEY too!

I warned you I was gonna try these and yummmmmmmmmmmmmm!

K-man who loves anything lemon or lime, LOVES these. If you a lover of things TART and buttery (like the lemon squares) then give these beauties a TRY!

Lime Glazed Cornmeal Cookies
adapted from marthastewart.com

1 cup (2 sticks) unsalted butter, room temperature
1 cup sugar
1 large egg
4 teaspoons freshly grated lime zest
2 tablespoons freshly squeezed lime juice
1/2 teaspoon vanilla extract
1 1/2 cups all-purpose flour
1 cup yellow cornmeal, plus more for coating glass

  1. In the bowl of an electric mixer fitted with the paddle attachment, cream butter and sugar until light and fluffy, 3 to 4 minutes. Add egg; beat until just blended. Add zest, lime juice, and vanilla.
  2. With the mixer on low speed, add flour and cornmeal. Continue beating until well blended. Transfer dough to a piece of plastic wrap. Shape the dough into a log, wrap, and chill until firm, about 1 hour.
  3. Preheat oven to 350 degrees. Line two baking sheets with Silpats or parchment paper. Fill a small bowl with cornmeal. Roughly slice from chilled cookie log 1/4 inch slices. Dip bottom of a medium drinking glass into cornmeal. Smooth slices slightly with the bottom of glass until dough is about 1/4 inch thick.
  4. Bake cookies until crisp and light-golden brown around the edges, 14 to 16 minutes. Transfer baking sheets to a wire rack, and let the cookies cool completely.
Lime Glaze

1-1/2 cups confectioners sugar
4 tablespoons fresh lime juice
2 teaspoons freshly grated lime zest

Sift confectioners' sugar into a medium bowl. Add lime juice; stir until smooth. Stir in lime zest. Use glaze immediately.....

Cookies placed a wire rack on top of a piece of parchment paper. Spoon the lime glaze over the cooled cookies, allowing the excess to drip off the edges. Let glaze set. Store cookies in an airtight container for up to 1 week.

If you are a Key Lime Pie Lover with a buttery crust....print out this recipe. Yes, now!

Cook's Notes:

  • The original recipe said 6 limes for this recipe including glaze. 4 limes made more than enough than I needed. I omitted the orange zest from the original recipe for I wanted it to be LIME, not anything else conflicting with its flavor.
  • I halved the recipe for the lime glaze and you see how much I put on. This was PLENTY. Making the full recipe would have been wasted dripped down off the cooling rack.
Enjoy!

Monday, February 22, 2010

Winner, winner Chicken Dinner!

I've posted for recipes on here about my using my "Sunday Special roasted chicken that my grocery sells for 4.99". Now I realize...BIG WHOOP!

When my store has whole chickens on sale for 49 cents a pound. This chicken was 2.49! Divide THAT for 2 dinners for 2 people and my roasted chicken for dinner is 62 cents per serving instead of $1.24. I am seriously getting a freezer for the basement now! Stocking UP!

Then I was making something yummy that needed lots of lemons.....they are zested and all juiced. How oh How can I still utilize these fragrant lemons.....? How about....

Lemon Herb Chicken

1 whole chicken (check for bag of "innards" and a neck in its cavity)
5-10 whole garlic cloves, peeled (how garlicky do you want it?)
4-6 lemon halves (they can be zested and juiced)
preferred herb mix (italian, herbes de provence, Mrs. Dash, etc)
salt and pepper to taste
canola or olive oil for rubbing

Preheat your oven to 325 degrees.

Rinse and blot dry your chicken.

Use a 11 X 7 baking dish instead of a 13X9 (if you can). I like how 'secure' my chicken is in the pan rather sliding all around in the TOO large 13X9. But use what you have!
Rub your chicken with "used" lemons. (I had a recipe that needed lots of zest and juice and I wanted to utilize these) Put half of the garlic inside your chicken. Slide some of the cloves underneath the skin where the hip joints are. Put some garlic in the neck cavity. Anywhere, everywhere! Put the lemon halves inside the hollow cavity and a few underneath your chicken.
Rub your chicken with oil and lightly salt and pepper. Cover with herbs of choice (use fresh if you have them, mine are covered with snow) until heavily coated. Tie your chicken legs together with twine.

If chicken is cold let sit for 1/2 hour on counter so the salt will permeate the skin and tenderize. Bake in 325 oven for 1 and 1/2 hours or until temperature registers 180 degrees in the leg meat.

Now for the fun part!!! Making parts instead of slicing like the T-day turkey!


You DO own a pair of sharp kitchen shears right? OXO are awesome, if you don't own a pair. Turn over your chicken and cut close to each side of the chicken backbone.

See my garlic inside?

Put a paper towel under your chicken to absorb grease and so it won't slide on you when you cut the next part.


If you want to use your shears again go ahead, now cut through the cavity in the middle of the breastbone. Or you can use a large chef's knife for this. Here you have 1/2 a chicken. I can't get over how some restaurants make this a dinner....too much for me!


Take your shears/scissors and cut the leg off from the breast at the thigh. Now you have two quarter chickens. One white meat and one dark meat. Perfect. I like white meat, K-man loves the dark. See how we are made for each other?


Quarter of a chicken is still too much for me. I cut off the wing and give it to K-man with his leg and thigh. I still can barely eat a chicken breast depending on the 'sides' I have.

I peel off my skin and slice my breast piece. K-man likes and wants the crunchy seasoned skin on his pieces.


So there you have it. Making your own roasted chicken is REALLY not that difficult. We pay SO MUCH for the convenience of some Perdue chicken part herbed and injected with chicken broth (and the breast is sliced in half, you know!). Once I paid attention to the price I was paying and the effort I am putting into it...on a weekend it's not a big deal. You could prep this on Sunday for a week night as well. It's awesome. TRY IT!

Enjoy!

Sunday, February 21, 2010

ITs or Nips?

Whatever ! Mmmmmm, Cheesy!

If you remember last year I had made my own cheese it/nips from scratch? That was fun (not) but these were REAL easy! I saw these on Rocquie's blog Sage Trifle. I thought they were real cute.


I did a some tweaking, you know for fun....and for another reason....read on....

Cheese Crackers

adapted from Sage Trifle

2 sleeves saltine crackers
1/4 c. melted butter
8 oz. shredded cheddar cheese
Cayenne pepper
Onion powder or garlic powder

Preheat oven to 350 degrees.

Place the crackers, salted side up, in single layers on baking sheets. Brush with melted butter (I didn't use all the melted butter, I wasn't being heavy handed), then spread the cheese evenly over the tops. Sprinkle with cayenne pepper, to taste (one third had cayenne, one third had onion powder and one third garlic powder, trying for variety).

Bake for 10 minutes and shut off oven. Keep in oven for half an hour more, until crispy and light.

Sage Trifle version: Place under the broiler until the cheese is bubbly, but not brown. Remove the trays and turn the oven to 180 degrees. Bake the crackers for 2 hours until very crispy and light. I have a gas oven. I had a problem with using 2 hours of gas for a snack like thing. Wanting to be a bit more resourceful in this economy I baked it higher (checking that they weren't over browning) and just let them dry out in the oven.


Are they the same as Rocquie's? I wouldn't know but they were light and crispy to me...and they tasted very cheesy like the nips/its! Thanks Rocquie, yummy! And K-man raved when I served these to him with some homemade Minstrone Soup!

Enjoy!

Tuesday, February 16, 2010

I heart you

My sweetheart loves chocolate, he loves chocolate chip cookies and he loves oatmeal raisin cookies too. He especially loves it when I make him fun stuff.

I got this idea shortly after I saw Lisa's recipe on Cutting Edge of Ordinary. She made an Oatmeal Chocolate Chip Cookie Pizza that she found a recipe in a old Good Housekeeping Magazine. Since this recipe didn't involve plopping 5 dozen cookies down on a cookie sheet and the ingredient amounts indicated that we weren't going to be eating this for weeks....so I printed it out.

Then I got a delivery of a warehouse sized package of Raisinets I got for K-man. Then it hit me....Oatmeal Chocolate Chip.....Oatmeal Raisin....Oatmeal Raisinets instead of Chocolate Chips.....and not Pizza shaped but a heart!
Wheeeeeeeeeeeee!

Oatmeal Raisinet Chip Pizza or Heart
adapted from Cutting Edge of Ordinary/Good Housekeeping

¾ cup all purpose flour
¼ teaspoon baking soda
¼ teaspoon salt
6 tablespoons butter
1/3 cup packed brown sugar
1/3 cup granulated sugar
1 large egg
1 teaspoon vanilla
1 cup old fashioned oats
¾ cup raisinets
½ cup walnuts, toasted and chopped

Oven to 375. Line large cookie sheet with parchment. Form heavy duty foil strips into heart shaped form, spray lightly with cooking spray. Toast walnuts on small cookie sheet while you prep the cookie dough. Set aside to cool.

In a small bowl, mix the flour, baking soda and salt until well blended.

In a medium bowl, melt the butter in microwave for 30 seconds. Add both sugars and mix with a wire whisk, until blended. Whisk in the egg and vanilla. With a wooden spoon, stir in the flour mixture, then oats, then raisinets and walnuts till combined.


Spoon the batter into the center of the prepared foil heart on the parchment lined cookie sheet. With a spatula spread the batter. Decorate with extra raisinets if desired. Bake 18 minutes or until cookie is golden brown. Let cool on a cookie sheet on a wire rack for 15 minutes. Transfer to a cutting board lined with waxed paper. Cut the cookie into wedges and serve warm.


TADA!

My heart cookie turned out much thicker than Lisa's but I only added 3 extra minutes for I knew that it cooling on the cookie sheet it would still do some 'carry over' cooking. Nothing worse than a dried out cookie. I like the outside crunchy and the inside gooey and chewy.

Thanks Lisa, the recipe was awesome and K-man loved it with raisinets!

Peanut Butter cookies with Goobers next?

Enjoy!

Monday, February 15, 2010

Deja vu Dinner?

Maybe, but with bigger and better enchilada details! K-man always gets a childlike face of excitement over enchiladas. And Valentine's Day is all about making favorites for our HUNNY!

I thought I'd make this post more of a tutorial with more photos on how to make some EASIER enchiladas that will make the process easier to understand.

Normally, you have to make a filling for your enchiladas. Then make an enchilada sauce. Then you have to fry the corn tortillas to soften them (sorry, nuking them in the microwave doesn't work for me, they always split on me). Then you have to lay each oily circle in the enchilada sauce, fill the tortilla, roll them and carefully line your baking pan with your enchiladas, pour on your sauce and bake them until the sauce is soaked up and melt your cheese last. And I didn't even mention anything about the how messy your fingers/hands get!

Now I am exhausted just writing/thinking about it! LOL

I have some shortcuts to tell you about to make this hearty dish kinda Sandra Lee's Semi Homemade way but I think better and no one I think could tell the difference if you didn't tell them!


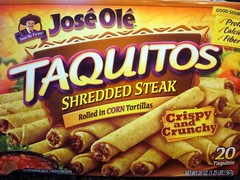
Find some taquitos in the freezer section of your grocery. The corn tortilla'ed ones not the flour ones. Pick your favorite meat filling.


I know El Paso brand makes a perfectly good enchilada sauce in two sized cans. But but when I found the the seasoning came like this....I could use the seasoning with.....


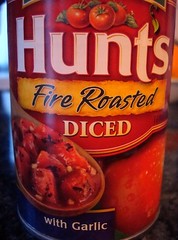
some rockin' CHARRED tomatoes!

I don't know if you've tried FIRE ROASTED tomatoes yet....but they are AMAZING. It really adds more to a dish. The have many different versions and many companies make them....but I find they are SLOW coming into the regular grocery stores. Hope you have them!


Here is the envelope of sauce, with the can of tomatoes and 1 full and half cans of water poured in. Cook for 5 minutes. Taste to make sure it is how you like it. If you want more cumin or chili powder, cayenne or just salt and pepper; now is the time to do it.


Put your taquitos in a greased baking dish. This is an 11X7 glass dish. You can use a 13X9 if that is the only size you have. Notice I am not cramming any extra on the side.

Also I always have some extra ground beef in my freezer. Cooked with just salt, pepper and garlic powder. On hand for emergencies or creative genius moments!


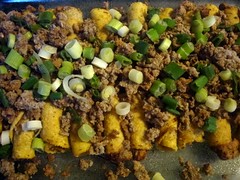
I know these taquitos are already beef...but lets be for real. It's not going to be enough.

Throw in some green onions or regular ones (I had plenty of the green to use) You certainly can add peppers, or jalapenos, corn, beans, whatever you want to add to JAZZ them up.


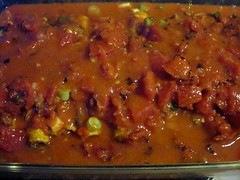
Very carefully pour your sauce on top. You don't want all your beef and onions falling to the sides! I know it looks like a lot of extra liquid but that is OKAY. You want the taquitos to soak up all the liquid. Cover with foil.

Can I just say? LOOK at all those charred bits of tomato! I love it.


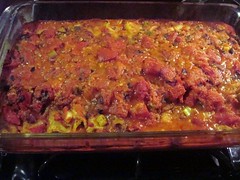
Bake at 350 degrees for 45 minutes to an hour or until the house smells wonderful and most of the liquid is soaked up.


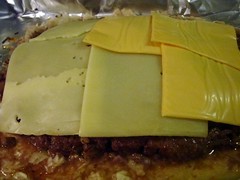
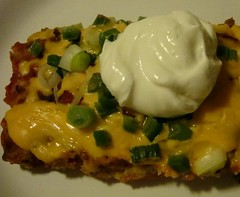
Remove the foil and sprinkle on cheese and green onions and a few minced jalapenos if you'd like. Replace foil lightly while you set up your plates, etc.


and VOILA!

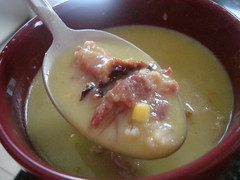
OMG, the smell, my mouth watering...I can't scoop them out fast enough! Top with sour cream and or guacamole....I made some Fiesta Rice to go with this....also very easy!


Shortcut Enchiladas
no fuss recipe by JennyMac

Frozen taquitos (whatever filling, make sure with corn tortillas, not flour)
14 oz canned FIRE ROASTED tomatoes + 1 1/2 cans water
1 envelope McCormick's enchilada sauce
1-2 cup(s) precooked meat (cooked ground beef or shredded chicken)
1 cup green onions
1 cup shredded cheese
1/2 jalapeno, minced (optional)
sour cream for garnish

Preheat oven to 350 degrees and grease 11X7 baking pan.

In a saucepan put tomatoes, enchilada seasoning and 1 and 1/2 cans (from tomatoes) into pan and heat to boiling. After boiling, reduce to simmer for 5 minutes or until thickens slightly. Be sure to taste that the seasoning is to your liking.

Lay out taquitos into greased pan. I fit 14 in the pan. Throw the rest in a baggie and back into the freezer for a snack another time. Put your cooked beef or chicken on top. Add chopped 1/2 cup onions or any other veggies or beans you want to add.

Pour your sauce on top and cover with foil. Bake for 45 minutes to one hour or until all juice is soaked up by taquitos.

Remove from oven and sprinkle with all the cheese and the remaining 1/2 cup green onions. I threw in some chopped up jalapenos in there too. Loosely cover with foil to retain heat and to melt cheese. Garnish with dollop of sour cream and/or guacamole.

Serves 4 hungry people


Sunday, February 14, 2010

Heart Shaped Fun

Happy Valentines Day (blowing kisses all around)

I don't know if you remember last year but I made a GIANT heart shaped grilled cheese and bacon sandwich for K-man. He was THRILLED.

Where does one buy a heart shaped loaf of bread?

You don't buy it, you have to make your own....


Seriously people, you need to get a heart shaped pan.


For dessert you can make a flourless chocolate cake....


Well almost flourless, it does have 1 Tbsp of flour.

But how cute is that? Verybestbaking.com has the free stencils but you will have to register to the nestle site. No biggie...just name, email, password...nothing major.


So for breakfast this morning K-man will be getting a Raspberry Buttermilk Cake with his coffee....


Can you read my message? I had no idea that if you place the raspberries with the hole up they won't sink! Well one did, on the "I" but he may have smaller than the rest. I found this from being a fan of Simply Delicious Recipe Swap on Facebook. Add it, if you do the FB thing.

Raspberry Buttermilk Cake
from Simply Delicious Recipe Swap on Facebook

Ingredients:
1 cup all purpose flour
1/2 teaspoon baking powder
1/2 teaspoon baking soda
1/4 teaspoon salt
1/2 stick unsalted butter
2/3 cup plus 1 1/2 tablespoons sugar, divided
1/2 teaspoon pure vanilla extract
1 large egg
1/2 cup well-shaken buttermilk
1 cup fresh raspberries (about 5 oz)


Directions:

Preheat oven to 400 degrees F. Sift together flour, baking powder, baking soda, and salt. Set aside.

Beat butter and 2/3 cup sugar with an electric mixer on medium-high until pale and fluffy, about 2 minutes. Beat in vanilla. Add egg and beat well. On low speed, mix in flour mixture in 3 batches, alternating with buttermilk, beginning and ending with flour, mixing until just combined. Pour batter into greased pan, tapping bottom of pan on hard surface to level batter.

Scatter raspberries evenly over top with the 'hole' side of the raspberries facing up (they stay afloat this way). Sprinkle with 1 1/2 tablespoon of sugar. Bake for 20-25 minutes or until skewer inserted into center comes out clean. Cool in pan for 10 minutes, then invert onto a plate to cool completely.

I did not take a picture of how to put the berries in but if you go to the FB page they have a picture of it with the recipe.

I forgot to add the extra sugar on top but I did sugar the greased pan. I don't know about you....but buttermilk just is awesome in cake!


Stay tuned for the next thing I made into a heart shape for dessert later on....

I will give you a hint if you check out Cutting Edge of Ordinary. When you see Lisa's recipe....maybe you can figure it out....but I don't think you will get it TOTALLY correct!

Enjoy!

Friday, February 12, 2010

Cookie or Cracker?

I subscribe to Martha Stewart's Cookie of the Day emails. I swear that woman (or her flunkies) will make cookies from about anything. These daily emails will be either annoying or interesting depending on your mood. Recently, the cookie recipe sent was made from cornmeal and it intrigued me. Was it going to be sweet or savory? Was 3/4 cup of sugar going to be too much or too little? I wanted to find out.

Made with our super bowl fare as an 'alternative' to the sweet Rocky Road Whoppers I baked. Here's was my thought process: You know how there are two schools of cornbread eating? Some people like it savory and some people like their cornbread sweet. Of course there are other who like their cheesy or spicy....These 'cookies' would be great with chili! I liked the slight sweetness of them. I rubbed a little butter on the tops which provided a salty edginess that complimented the sweetness. I found that I couldn't stop eating these cookies. They were so different that they were really really good. They weren't salty/savory or overly sweet either. I am definitely making these again since the snow is keeping me homebound.


Cornmeal Cookies
adapted from Martha Stewart.com

1 1/2 cups all-purpose flour (spooned and leveled), plus more for shaping
1/2 cup yellow cornmeal
1/2 teaspoon salt
3/4 cup (1 1/2 sticks) butter, room temperature
3/4 cup sugar (I used splenda)
1 large egg
1 teaspoon pure vanilla extract
melted butter for cookie tops

  1. Preheat oven to 350 degrees. In a medium bowl, whisk together flour, cornmeal, and salt; set aside.
  2. In a large bowl, using an electric mixer, beat butter and sugar until light and fluffy. Add egg and vanilla; beat until smooth. With mixer on low, gradually add flour mixture, mixing just until combined.
  3. Drop dough by heaping tablespoons, about 2 inches apart, onto two large baking sheets; flatten slightly with floured fingertips. Bake until edges are golden, 14 to 16 minutes, rotating sheets halfway through. Transfer cookies immediately to a wire rack; brush with melted butter and let cool completely.
Again, these were uncommonly good....I am thinking about checking out her recipes for Lemon Zucchini Cornmeal Cookies and Lime Cornmeal Glazed. Hmmmm.

Thursday, February 11, 2010

Do certain foods evoke memories for you?

This recipe has a funny story. I helped my step mom Pam make these no bake cookies for us to snack on for a week-long trip we were taking. They were easy to make and very yummy. We did long legs of driving every few days, so yes; we all were snacking on these all the time during the trip. Pam thought it was a good thing DOUBLE the recipe to ensure we had enough of the treats to eat that week. Not only were they snacks or dessert but we were eating them as breakfast to save time in the morning. By the end of the trip we were renaming them cow pies (while making a face) and just not eating them with any zeal anymore because we had become just sick of them.

My advice is to NOT double the recipe BUT DO make them for a special event where many people will be eating them, so you will enjoy them and not get sick of them like we did. This trip was over 20 years ago (I wasn't even teaching yet!) and I still have not made them since until today.

Why? It's been that long that I have forgotten how they taste....so it's time for....

Pam's Raggedy Robins

2 cups white sugar
5 tablespoons cocoa
1/2 cup butter or margarine, unsalted
1/2-cup chunky peanut butter
1-teaspoon vanilla extract
3 cups quick cooking oats
1/2 cup chopped nuts
1/2-cup milk


Directions:

1. Cover baking sheets with wax paper and set aside.

2. Combine sugar and cocoa in a large saucepan. Stir in milk, butter and peanut butter. Cook and stir over medium heat until butter melts and mixture is combined, about 5-20 minutes. Remove from heat.

3. Stir in the vanilla, oats and nuts, and mix thoroughly. Take a teaspoon and scoop out a spoonful of the mixture; drop the spoonful onto the waxed paper-covered baking sheet. Repeat with the rest of the mixture. Place in the refrigerator until the cookies are cooled and set. Store the cookies in an airtight container.

But they were really good but I recommend NOT eating them all day long for several days in a row....LOL

As I remember these....they were on the flat side like cow pies. I am not sure why mine stayed firm after I put them down with a mini ice cream disher. I also don't remember ours having any nuts in them back them. So perhaps the addition of nuts here made them keep their shape after they were scooped.

To ensure no replay of raggedy robin revulsion I've been bagging up these yummies for my 'snow bound' neighbors. Afterall, they aren't teachers with days off from work like me....so they don't have all this time to cook as I do.

Chewy, nutty and chocolatey. Who doesn't love a no bake treat?

Enjoy!

Wednesday, February 10, 2010

SNOW-ver it!

SOOOOOO over all this snow! Those of us in the DC area are being POUNDED with another MAJOR snow storm. We had around 12-18 inches. before the holidays, a few inches on last Wednesday (schools closed), snow on Friday (sch's closed again), 22+ inches the following day (Saturday) and today we could expect another 15 inches. School was closed Mon-Wed and it's not looking good for tomorrow or Friday. And we are supposed to have President's Day off? Yeah, it's crazy down here. We are 1/2 inch away from breaking the 1889-99 winter's total snowfall record of 54 inches (and winter is NOT over yet!)

So what does one do when cooped up inside? COOK of course! I've made several things but there is something about a hot, hearty HOMEMADE soup after you've been shoveling for hours. The smell hits your nose when you walk in the door and the first spoonful going down your cold throat just makes you want to pour the whole bowl on your head you are so chilled to the bone!

One of the things I like to do after the holidays is put the HAM bone (and substantial meat on it)
in the freezer. Shortly after I make sure I grab a bag of split green peas from the grocery store and toss it in the cabinet. Tick-tock. I wait for that pivotal moment for when I need some ham
and split pea soup. Does getting over 3 feet of snow in one week seem pivotal enough? LOL

I love making soups. Why is that? Because there is no exact science to it. You add, mix and taste all along the way until it is to you/your family's liking. I don't have a problem with no soup ever being the same. Variety is the spice of life.

There is no reason for eating canned soups anymore when boiling up the carcass or bones from any leftover dinner can render such a hearty soup....

Split Pea and Ham Soup
a recipe guide by JennyMac

1 ham bone from your spiral sliced ham (keep the ham on the bone that isn't sliced on the bottom 1/3)
1 tsp thyme
1 tsp black pepper
1 lb. bag of split peas
1 Tbsp. chicken base (or more to taste)
1 whole onion, chopped
2 cloves garlic, minced
1 small bag of baby carrots, chopped or whole
1 cup of corn
1 cup of barley, uncooked


Put frozen ham bone in large pot. Cover with tap water. Add your thyme and pepper. Bring ham bone to a boil. While waiting on the bone to boil...prepare your add-ins. Chop your onion, mince garlic, chop carrots (if desired), measure corn, measure barley (or just pour from bag guessitmating one cup is ok). Be sure to rinse and check over your peas for stones. No need to soak them the night before!
When all your prep work is done. Add the chicken base, onion, garlic and peas. (The package of peas says to not add salt until done, I am thinking that it breaks the peas down in the process. No problem less blending I will have to do then!) Cook on medium heat for a moderate boil. Stirring occasionally, I am looking for the ham to fall off the bone. When this happens put meat in a small bowl to cool. Whip out that immersion blender and blend the onions and peas until smooth. Add in your barley, carrots, corn. Cut up your ham into bite sized pieces, removing any visible fat. Put back into your soup. Cook until barley is puffed into little pearls. This process took about 3 hours. But I was snowed in so what's 3 hours?

Serve with warm crusty bread

Enjoy!