Saturday, January 31, 2009

Hearty Soup that is Super Bowl worthy

One of my students gave me for Christmas one of those '18 bean soup' mixes. I used it today. I had the perfect thing waiting for me to use it with this mix, a leftover ham bone in the freezer (if you read one of my past posts on the copycat ham, this is the bone from that!)

The beauty about making soups is that your heart is your leftover meat carcass and using whatever veggies, starch, etc that fits your whimsy. This turned out great and I will provide for you the process...(you may need to taste along the way)

18 Bean Soup

  1. Get from your grocery your brand of 18 bean mixture of choice (some have a ham flavor packet or cajun seasoning packet, you decide if you want to use it....my mix had a bouquet garni in it...so why re-create the wheel...I used it.)
  2. Gather all the veggies you like in your soup. (I always start with a chunky 'holy trinity' of celery and the leaves, onions and carrots)
  3. Also needed: large chicken broth, 29 oz canned of whole tomatoes and garlic cloves. If you are not using your provided flavor packet, create your own "garni"...place your favorite combo of fresh herbs in a cheesecloth and tie it closed with butchers twine.
  4. My recipe said to soak beans overnight. I didn't. I filled my large stock pot with water to cover my ham bone. Since I know beans take a long time to soften and so does the ham to 'fall off the bone'....I cooked the ham off the bone, beans and herb garni at the same time. I was boiling it, not simmering. I stirred it several times and about 1-1/2 hours.
  5. While the bone and beans (that sounds funny) were cooking I prepped my veggies, opened my tomatoes, readied my broth, mashed my garlic.
  6. Take out the bone when you can see when the meat is starting to separate from the bone. Put it to the side to cool off (trust me, it's way too hot to pluck the meat off now) while your meat is cooling add all your veggies.
  7. Stir in your chicken broth, tomatoes, garlic. I threw in some canned hominy since K-man loves it. Now is the time to adjust your salt, pepper and any other herb flavors you want. Taste the broth as you add. I could not tell you what was in my bouquet garni...but it definitely had something like allspice or nutmeg, nice addition.
  8. Cook your veggies until they are about to soften. Pick off your meat from the bone, making to sure cut away all the extra fat that comes with ham and any other inedible mystery pieces. As you cut them off, dump them back into your pot to simmer.
  9. By the time you are done cutting your meat....your veggies should be soft enough. Since your meat is already cooked....you are ready to eat.
  10. Serve with some crusty rolls and you are good to go!!!
I think this soup is not only man-food worthy but totally suitable for Super Bowl. Oh yes....it was a super bowl of soup for sure!!!

Friday, January 30, 2009

Do you use these?


After I finished my blog about my favorite things....I had thought about my Debbie Meyer's Green Bags (afterward, of course). And since I liked them I got the deli meat ones AND the bread ones. Then I remember how The Homesteading Housewife was telling us about her appearance on Wife Swap....and I thought 'I should share my TV appearance with everyone too'.

My step mom Pam sent me a new sclip from the internet and they gave it two thumbs down. I didn't really agree with their findings and I searched our Consumer Reporter on NBC4's archive for her input on the product. She didn't have one. I emailed her...and the rest is history.

My students, my school and my program got some great publicity.

View more news videos at: http://www.nbcwashington.com/video.


It was a great experiment. The kids did great. Overall, I think the use of those bags extend your product for a few extra days...but never expect miracles!!

Thursday, January 29, 2009

Highly Suggested Reading...

I found this book online (of course @ Amazon) many months ago and it seemed interesting. Not only did I get it but I also got the 'kids' version for school and can I just say....OMG! It's an eye opener. So many hidden things like fat, trans fat, sodium or salt.

So, after I purchased this book (even did an activity with my 8th grade class on food choices)...it was popping up everywhere. I saw it being used on Biggest Loser, K-man found an article on it in his bike magazine, the author was on one of those early morning shows (can't remember which one I was watching) and on 1/27/09, David Zinczenko was on Oprah. This was a follow up on her show on childhood obesity. Trust me since I am a teacher....the sizes I see of my middle school students today is shocking!!! The girls even think their gut hanging off their pants is sexy (here I am doing everything I can to HIDE mine!!) And when I have classes about nutrition...they shrug and don't care what the eat is bad for them....'but it tastes good'....very sad, I tell you.

Now that I bought this book on whim many months ago, now.... IT'S HOT! I am seeing this book and the author David (from Men's Health magazine) everywhere. And I am sure there are plenty other shows/places I have not seen this book being discussed.

The reason I am bringing up this gem to you? It hit me like a brick, when I was reading one of my foodie blogs that I subscribe to (not telling who...LOL) and this recipe was being showcased as healthy... the blog author used turkey bacon. I immediately said "UH-OH!" If you read the book or even saw on Oprah....the misconception is the regular bacon is awful and turkey bacon is the 'HEALTHIER' option....sorry but not true. They BOTH have to EXACT same CALORIE and FAT but it's the SODIUM that makes the turkey bacon the worst choice. Also remember that bacon is more natural for it's not 'processed'. So, you aren't really eating healthier and anything processed over things obtained naturally...can't be good over time.

To tease you with some subjects from his book that may convince you to get it....

  • 8 foods you should eat everyday
  • 20 foods to avoid at all costs
  • Best and worst meals at your favorite restaurants
  • Eat this, not that Menu decoder (at your favorite restaurants)
  • Holidays and Special Occasions (the better choices to make, that is)
  • At the supermarket
  • Drink this, not that
  • What to eat when you are...tired, stressed, etc
  • Eat this, not that for KIDS
It's highly pictorial and chocked FULL of information. If you THINK you are pretty knowledgeable about nutrition (I did, being a college educated FACS teacher) then think again. Even I, queen of the classroom, learned TONS!

Wednesday, January 28, 2009

Comfort Food

Everyone has one type of food that comforts them. Many may say Macaroni and Cheese is their comfort food yet there are so many different recipes. I cringe when I hear someone say they only eat the brand in the blue box....(yuck- I guess I O.D.ed on them while in college). I have tried many recipes of Mac and Cheese. Some schools of thought say....add cheese to a white sauce, mix pasta and bake. Others don't use a roux-based sauce but just eggs, shredded cheese, evaporated milk and pasta. I guess it's the North vs the South. I grew up eating southern foods but I prefer the creamy versions not the congealed ones.

SO, not only do I love Mac and Cheese but I also love the store inside the restaurant Cracker Barrel. The food there is southern based (ham, biscuits and gravy, mashed taters etc.) It's pretty good when you are traveling along the highway and are starving!! So when I found this recipe on Recipezaar, thought it be fun to try their copycat. Click on the link if you'd like the recipe.

There are many things I don't use a recipe for....I know the framework of certain recipes and use recipes like these for my 'tweaking'. Of course I tweaked it along the way.
I did my roux of butter and flour. The cut the fat I used my favorite chicken base in a 1-1/2 of skim milk rather the broth and cream. I added a 1/4 tsp dry mustard. Lastly, again to cut the fat I used 3/4 cup regular cheddar cheese and 3/4 fat free cheddar cheese. Of course....I gotta have my Durkee Onions on top!!!

I give this recipe a B- because I've realized that since I used cheddar cheese....I really don't like it this way. K-man said it rocked but I don't think the cheese melts as well and that TANG. I should have used the colby...(but it's what I had in stock) The recipe my 8th graders use is:

Macaroni and Cheese Lab
(from my school website)

NOODLES
1. Bring 3 cups of water to boil. Add a drop of oil. (I only use salt when I cook pasta now)
2. When water is boiling add 1 cup of macaroni and cook for 7 minutes.
3. Drain noodles in a colander.
4. Add macaroni to cheese saucer when it is ready.

CHEESE

1. Over medium heat, melt 2 Tbsp. of butter/margarine.
2. Remove pan from heat:


Stir in: 2 Tbsp. flour
1/2 tsp. dry mustard
1/2 tsp. salt
dash pepper

3. Turn on heat. Gradually add 1 c. of milk. (warming it in the microwave is much better)
4. Bring to a boil, THEN REMOVE FROM HEAT.
5. Stir in 3/4 c. cheese and add cooked pasta.
6. Pour into shallow casserole dish (we always use the disposable 8X8 pan from the grocery) and sprinkle with remaining 1/4 c. cheese.

*Bake @ 375 degrees for 10-15 minutes or until slightly brown and crusty around edges. YUMMY!!

*Keep in mind for class use, we have to prepare the recipe, cover it and store it in the fridge. Two days later, I put them in the oven before class starts, they set their tables and eat their hard work. I find their projects having been in the fridge for 1-2 days produce better product (that whole marrying of flavors thing!)

NOW SPEAKING OF THE SUBJECTS OF CHEESE AND CRACKER BARREL RESTAURANT...

This other copycat from Cracker Barrel, I have made before and I DON'T tweak it cuz it ROCKS as is!

Cracker Barrel Copycat Hash Browns Casserole (also from Recipezaar)

* 1 (2 lb) package frozen hash browns
* 16 ounces sour cream
* 1 (10 3/4 ounce) can cream of chicken soup
* 1/2 cup butter
* 1/2 cup chopped onion
* 2 cups shredded sharp cheddar cheese

1. Preheat oven to 350 degrees.
2. Place potatoes in a greased 9x13 baking dish.
3. Season with salt and pepper.
4. Melt butter.
5. In a bowl stir together soup, butter, sour cream, and onion.
6. Pour soup mixture evenly over hashbrowns.
7. Sprinkle with cheese.
8. Bake in 350 degree preheated oven for about 45 minutes.

There are some recipes.... you just don't mess with perfection....

Tuesday, January 27, 2009

Easy Peasy

BTW....Happy Chocolate Cake Day!!!


Scene: Girl, hankering for some thing chocolate....nah, handful of chocolate chips won't do. Want something cakey. Nah, brownies too fudgy and rich. Want spongy. Baking a whole cake....too much hanging around after, then I will be sick of it OR gain 10 pounds eating it all....


"I need Chocolate cake NOW" cake


Was that scene familiar to you? How about cake in 7 minutes? And I know you have all these things in your pantry!! Makes 4 good sized servings or one huge chocolate craving serving.

3 Tbsp. butter, softened
¼ c. white sugar (I used 1/4 c. splenda)
1 egg (I used only the white)
1 tsp. vanilla
¼ cup milk (skim was fine)
½ c. flour
2 Tbsp. cocoa powder (I used the 3 T of 'special dark')
¼ tsp. baking powder
1 pinch salt
1/8 tsp. instant espresso powder

1. Spray a medium microwave-safe bowl with non-stick spray and set aside. Those disposable plastic ones work just fine too.

2. In a mixing bowl, combine the butter, sugar, egg, vanilla and milk.

3. On top of wet mixture in a pile, put the flour, cocoa powder, baking powder and salt. Blend until smooth.

4. Pour into greased bowl.

5. Cover with plastic wrap and cook in the microwave on high for 2-1/2 minutes, or until cake springs back when touched. CAUTION: Bottom and Sides of bowl touching the cake will be HOT. Use top edge to remove or pot holders if you must.

6. Let cake sit 5 minutes while you wash dishes. Inhale the fudgy goodness.

7. Over turn onto plate, frost if you need to but if you are REALLY having a chocolate craving...you don't have the patience...you want to eat it NOW!

The notations I did in green was what I did today. I usually follow the recipe as written, both are great. Why this picture has a green drizzle was me melting some Guittard Mint Chocolate Chips with a little milk and powdered sugar. Now it's a Thin Mint Microwave Chocolate Cake!!! (and it was moist and fabulous!)


___________________________________

The students are in training for their Cooking Unit. Since today is Chocolate Cake Day I will share one of my no-fail, easy, absolutely too good to be true recipe that I use for the 6th graders. This demonstration is what I do to show them how to measure properly. If this recipe seems familiar it is because it's called also 'dump' cake (ugh, how nasty) everywhere on the internet but when I first got this recipe in college it was called:

Crazy Chocolate Cake


Sift the following into a 8 X 8 inch ungreased pan. No bowl? How crazy is that?

1 cup sugar
1 1/2 c. flour
1/2 tsp. salt
1/4 c. unsweetened cocoa
1 tsp. baking soda

Then add the following:

1 tsp. vinegar
1/3 c. vegetable oil
1 tsp. vanilla
1 c. cold water

Stir until smooth. Be sure to get the scraper out to check all the corners!

Bake 35 minute* at 350 degrees. Warning, your cake is NOT burned...it will be a VERY dark brown, almost black....but it's soooooo good.
*Due to time constraints in class I can't demonstrate this, bake it AND have the kids eat it before they leave (try explaining to a group of kids that the chocolate they see and smell won't be eaten until tomorrow!! Heart-wrenching I tell you!) SO this recipe makes 12 cupcakes perfectly and for only like 10-15 minutes (please check @ 10 first in case your oven doesn't cook like mine).

Frost in pan when cool. Also just a dusting of powdered sugar is lovely enough.
_________________________

While I have you here looking at Chocolate Cake...I've also used this recipe....if your kids like hot fudgy, gooey things possibly with some ice cream involved.....

Hot Fudge Cake*

* 1 cup flour
* 3/4 cup sugar
* 6 Tablespoons unsweetened cocoa, divided
* 2 teaspoons baking powder
* 1/4 tsp salt
* 1/2 cup milk
* 2 Tablespoons vegetable oil
* 1 tsp. vanilla extract
* 1 cup brown sugar
* 1 and 3/4 cups hot water

Preheat oven to 350 degrees. In medium bowl, combine flour, 2 Tbsp. cocoa, sugar, baking powder and salt. Stir in milk, oil and vanilla until smooth. Spread in ungreased 9" square pan. Combine brown sugar and remaining cocoa in separate bowl. Sprinkle over batter. Pour hot water over all. (When I made this the first time I used 1-3/4 and I felt the sauce amount was TOO much- I tried it again and 1-1/4 seemed to make it not as soupy) Do not stir. Bake for 35-40 minutes. Serve warm or cold.

*After time is up...cake surface will 'wobble' as though it is NOT cooked. But it is. The cake is cooked on the top and a thick fudge sauce is on the bottom. Use a spoon to scoop out portions and spoon out extra fudge sauce to top it with. This would be great warm with ice cream. Warning...this is SUPER sweet! The kids thought this was AWESOME!

____________________________

Post Script Note:

WHHEEEEEEE....it Snowed Today. FINALLY.
We also got out of school early too. Wow what chaos that was....too long of a story to repeat.


I think we have about 1.5 inches and it's only 1 pm. Snow day tomorrow? Hmm....we shall see.


My cute little lavender plant looks like it got dusted with powdered sugar!!!

Sunday, January 25, 2009

Kitchen Fun!!!

with KITCHEN TOYS!!!

Today I thought I'd share with you some of my favorite cooking gadgets!!! They make our lives a little easier and make our cooking even more fun!!!

Starting on the left going clockwise:

(Red) Tab Grabbit- On the days I have a freshly manicured hand and don't want to ruin my nails, this magneted tool is on my fridge for when I get my Diet Coke...it's there for me to POP open the tab of my can for me. It also has circle underneath for when you have to twist off those nasty beer bottle cap that seem to want to rip off your skin!!!
Where'd JennyMac get it?-
grocery store hanging in aisle designed for impulse buy.

(Purple) Top Popper- Everyone has those stubborn jars that are so vaccuumed sealed that you are literally grunting as you try to open it. (that is if your man isn't around to open it for you....such ego boosters for them...LOL) This popper you put on your lid (just like you were going to pop it open like a bottle opener. You will break the seal and hear a little "whoosh" and BING....jar opens without a fuss. Love this little guy!!!
Where'd JennyMac get it?- grocery store hanging in aisle designed for impulse buy but found a link for you here @ Walter Drake.

Dry Measuring Cups: These aren't your squared bottom types. Lord knows I've gone through many different styles and end up taking them to my school kitchens for I can't stand them. These are nice for scooping right out of your bins. For an added bonus each handle is a measuring spoon too!!!
Where'd JennyMac get it?-Amazon.com

Measuring Spoons: Okay, now I am talking LOTS of sets of these I've purchased. Looking for the set that works for me most. But these recent ones were obtained SOLELY for getting into those spice jars when your normal measuring spoon wouldn't fit. Those days are gone. LOVE THESE!!
Where'd JennyMac get it?-Amazon.com

Lemon Juicer: This little guy is just too cute. You press the serrated bottom onto your lemon end while twisted and pushing. He goes into the lemon where you can squeeze your lemon juice out (with no seeds) onto your measuring spoon just like those little fake plastic lemons that carry juice in the grocery store!!! You can keep it in the lemon it if you don't use it up and put it in the fridge (in a ziploc of course)
Where'd JennyMac get it?- I believe it was found at BedBath and Beyond with all the other kitchen gadgets, but I've had it for a long time, I searched there online and didn't see it...but that doesn't mean you can't find it in the store.

My favorite Super Sharp Knife: It's non-stick, super sharp (yeah it's gotten me a few times) and I love it cuz it never fails me when I need something sharp.
Where'd JennyMac get it? -I've seen them all over online but for some reason today I could only find it for you on Cooking.com where I did not get it nor at that price.

Meat Thermometer: K-man's parents gave this to us for Christmas when they heard about our constant grilling during the year (just not winter - too dang cold). Put the probe in your meat, connect it to the transmitter(black). The receiver (silver) is where you tell it what type of meat you are cooking how you want it cooked or the temperature. Beeps when done. Fabulous new toy!!!
Where'd JennyMac get it? -They purchased it at Linen's and Things since they were closing and everything was on sale. I found it for you here @ Amazon

Meat Tenderizer: Some days you just want to beat something up!!! I love this to help get those marinades into your meat. I especially like this one for the sharp points are covered so when you are rummaging through your gadget drawer it won't stab you.
Where'd JennyMac get it? - I can't remember but since I was already searching on Amazon...

Mini Grater: Just in the pic, cuz it's just too cute....I don't really use it anymore. Maybe for fresh nutmeg but I don't have any right now. But what I do use for my grating needs....

Microplane: I LOVE this tool.... Garlic, hard cheeses, zesting oranges, lemons, chocolate shavings, so many things...just not my doors that stick!!!
Where'd JennyMac get it? -Hmm, not sure I've had it so long...but it's here @ Amazon

Reynolds Handi-Vac: Total impulse buy at the store....'wonder if this works?' It was on-sale and it had some starter bags in it....why not? Glad I did it... OMG....love it!! I've had it since last summer ('07) and still on the first battery it came with. I buy all the different bags they sell and it's competitors bags work with them too (theirs you have to use a hand pump vacuum...hahahaha). The machine sucks out all the air and you pop it in the freezer and keep out the ice and freezer burn! Run out and get one NOW!!!
Where'd JennyMac get it? - Come on now, you haven't seen these at your grocery yet?
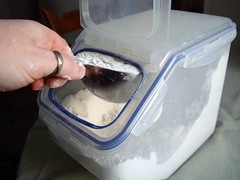
My Flour Bin: This I've spent some time looking for the right container but I didn't know ALL that I wanted for one until I found it by accident....it was on one of those endcaps of the aisle where they are highlighting some dishes, cookware, etc. That particular month it was all these storage containers. I walked by it for weeks. Never paid any attention to it until it was almost bare...so empty, this bin jumped out at me.....there it was staring at me all by its lonesome.

I wanted a bin that I didn't need two hands to get my flour ( meaning: grab the lid and put it down, scoop the flour and level off). The opening had to be big enough for my measuring cups AND I wanted an opening that had a level edge so I wouldn't have to use my finger, spatula or knife to level off. I also didn't want to get flour all over the place while I got my flour...FOR THE ADDED BONUS!!! ...the whole lid can be unsnapped so you can dump your whole bag of flour into it!!! Then you snap all the sides back down and use the opening to get your flour....see me? I am leveling off my flour with ONE hand!!! Love it.
Where'd JennyMac get it? - My grocery store Harris Teeter, brand Name: Lock and Lock....I found the link on Amazon...but they are out of stock....and I didn't want you all to get any ideas....

Ok, just so you know. I am NOT being paid by Amazon, LOL. I've been shopping there for years online. I check there first....search in other sites and I seem to always come back to it. Depending on the amount of stuff I buy...I don't have to pay shipping. I think their prices are pretty good, sometimes I've found it cheaper elsewhere. But to be fair...since they AREN'T paying me....some of the other online places I do shop for fun stuff...

The Home Marketplace
Kitchen and Much More
Harriet Carter and Walter Drake (pretty inexpensive and have lots of clearances)
Brylane Home and Kitchen

I know that there are millions more places....these are just a few of my favorites and the prices are pretty good. If you know of better....for godsake....tell me!!!! LOL.

There you have it....these are a few of my favorite things....(humming tune in head now) raindrops on roses and whiskers on kittens....

___________________
I noticed that many of you post something on the day that celebrates these foods. Many of you don't realize it until that day and SHUCKS, if I only knew, I could have made something.....from cdkitchen....Coming this week are:

Monday- January 26, 2009 National Pistachio Day
Tuesday- January 27, 2009 Chocolate Cake Day
Wednesday- January 28, 2009 National Blueberry Pancake Day
Thursday- January 29, 2009 National Cornchip Day
Friday- January 30, 2009 National Croissant Day
Saturday- January 31, 2009 National Popcorn Day
Sunday- February 1, 2009 National Baked Alaska Day

All days are linked to their recipe suggestions for making some of these treats!!! Have fun!
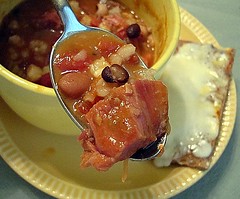
Saturday, January 24, 2009

I think I am onto something...

First let's just say my picture taking needs some work. (it's my first month of blogging, so you'll cut me some slack, right?)

Secondly, the pictures I take during the daylight are def. much nicer (as the tip pages tell you to do!) but let's face it...I cook all hours of the day and can't always snap the pic when it's light out. (BE 4 Real, right? LOL)

Lastly, the whole thing food styling thing with the color plate that it is on or the background, some type of garnish....is a pain in the butt. (just venting)

BTW, I can't figure out foodgawker and tastespottings REAL criteria for pic submissions. I submitted 3 to both sites. Foodgawker declined the first two; said were 'dull and unsharp' yet tastespotting published both that foodgawker declined. The last of the trio (the burger one)...tastespotting 'passed' on it...yet now foodgawker accepted it! GEEZ. I guess the best thing is just submit and not worry about it, the love it or don't....their loss.

OKAY, these photos...AREN'T being submitted but as I said...I think I am onto something....

I've done the apple crostata thing. I LOVE:
taking the premade crusts,
rolling them out a little,
putting on chopped apples with cinnamon and sugar,
folding up the edges,
brushing with egg,
baking for 1/2 hr on 350
BAM...apple pie....easy peasy!!!

My mom went to that Amish market place (latter post talked about the hotdogs she keeps getting me there) and she brought me this long tube thingy with Lemon pie filling. She was thinking of K-man who loves key lime pie and other tart things...that perhaps I could take this lemon tubey thing and squirt it into a pie shell.

S00000, I am thinking about how I do that apple crostata thing....I have this lemon tube of filling. I so don't want to make the TRADITIONAL pie with the whole meringue stuff....*hands on chin....hmmmmmm....thinking* This is what I came up with:

Inside Out Lemon Meringue Pie

1 all ready pie crust
1 egg
half package of large marshmallows
Prepare lemon pie filling

Roll out thawed pie crust. Fold over about an inch of the edge and crimp. Brush with egg. Place marshmallows all over crust. Bake 1/2 hour @ 350. Remove from oven and place a few marshmallows to melt slightly from heat of pie crust. Cool throughly.

Place pie filling on top of melted and crusty marshmallows but around those slightly melted ones. Luckily since my pie filling came in a tube like bag, squirting the filling on the crust was quite easy. Refrigerate until cold. Serves 6-8

Since the marshmallows underneath are melted they totally taste with the lemon like a lemon meringue pie...but UPSIDE DOWN....

I am going to do more pies like this, so easy....I think I am onto something.

Friday, January 23, 2009

Burger Night!!


Yeah, like to see you bite into this!!! Well I used a fork. K-man did the 'smoosh' thing when he ate his!

Often times when I buy the econo-size ground beef, I put the rest in pre-made patties in my ziploc bags (the ones that you suck out the air) and we always have burgers for a quick meal.

Mega Muenster Burgers

1. Mix some ranch dressing with your prepared bag of cabbage/coleslaw mix. Not too much you want it still crunchy and not wet and mushy. Place in fridge.

2. Saute up some peppers and onions. Again, cook them until slightly wilted not totally soft. Remove from pan and cover in a bowl/plate.

3. Cook your burgers as you like. If you don't have Old Hickory Smoked Salt from Spice Islands, get some. This is great when you are cooking inside during the winter and your meats taste like they came off the grill. For REAL! A few minutes before they are the way you like them, place your cheese of choice on it. Tonight we used muenster. Cover pan and turn off heat.

4. Toast your buns, we used whole wheat ones tonight.

5. Place your slaw on the bottom bun...Pile it high.

6. Put your burger with the gooey melty cheese on the slaw.

7. Squeeze your ketchup on the burger. We use the Tabasco/hot and spicy Heinz Ketchup.

8. Put on your still warm sauteed pepper and onions. Again pile it high.

9. Put on your top bun. Serve with lots of napkins and watch the eyes of who you give this burger to get HUGE when you hand them the plate!!

K-man: OH MY HONEY!!!

Happy Friday!

Thursday, January 22, 2009

"Tweaking"


Yup, that is me. I tweak. Sometimes I tweak recipes too much. One story I tell all the time is that I was hosting our monthly FACS meeting at my school. I prepared a white chicken chili recipe. I tweaked it. I tasted it....tweaked some more. So after the meeting one colleague asked for the recipe. I gave it to her....not even thinking. A few days later she called me and yelled.

Irate FACS teacher: " THAT WAS NOT THE SAME RECIPE!!"
JennyMac: 'what?'
IFT: The chili you served at the meeting.
JM: 'Oops, I may have added a few things here and there'
IFT: "Well I made the recipe you gave me. It didn't even come close to tasting like the one you prepared. It was so bland and your version was so tasty. So you better tell me exactly what you did to it, if you know what is good for you"
JM: *Looking above and schrunching eyes, trying to remember exactly my additions to avoid a pounding at my next meeting*


So the yummy picture you see above...the recipe I was following.... or going to use.... or the suggestions of ingredients that I planned to prepare....LOL. Ok another TWEAK!!! I had leftover panettone bread in the freezer from the holidays. I needed some room (I am not of those lucky ones who have a spare freezer in the basement or garage) and the bread pudding was a great way to use it up.

I didn't have a full pound loaf. I had about half of one. AND I also didn't want to bother with making a cinnamon syrup when I always have a stash of cinnamon/sugar. This mixture was brown sugar, cinnamon, a touch clove/nutmeg from some cinnamon buns I made awhile ago.

Panettone Bread Pudding with Cinnamon Syrup
adapted from Giada de Laurentiis

Serves: 8 servings

(this I skipped)Cinnamon Syrup:
1 cup water
1 cup (packed) dark brown sugar
2 tablespoons whipping cream
1/2 teaspoon ground cinnamon

Bread Pudding:
Butter
1 (1-pound) loaf panettone bread, crusts trimmed, bread cut into 1-inch cubes (I didn't trim...I like crusts)
8 large eggs (I used only half of everything here cuz I only had a 1/2 loaf remember?)
1 1/2 cups whipping cream
2 1/2 cups whole milk
1 1/4 cups sugar
(I added this)about 1 cup of cinnamon and brown sugar mix
( I am a nutty girl)your favorite nuts

To make the syrup: (again I skipped)

Combine 1 cup of water and brown sugar in a heavy medium saucepan. Bring to a boil over high heat, stirring until the sugar dissolves. Boil until the syrup reduces to 1 cup, about 10 minutes. Remove from the heat and whisk in the cream and cinnamon. Keep the syrup warm. (The syrup can be made 1 day ahead. Cool, then cover and refrigerate. Re-warm before serving.)

To make the bread pudding:

Lightly butter a 13 by 9 by 2-inch baking dish (I used a deep dish pie plate). Arrange the bread cubes in prepared dish.

In a large bowl, whisk the eggs, cream, milk, and sugar to blend. Pour the custard over the bread cubes, and press the bread cubes gently to submerge. Let stand for 30 minutes, occasionally pressing the bread cubes into the custard mixture. (Can be prepared 2 hours ahead. Cover and refrigerate.) Before baking I took the cinnamon/sugar mix and put teaspoons here and there on top and flipped a cube of bread. I wanted the cinnamon stuff between the cubes here and there. The remaining cinnamon I sprinkled on top with the pecans I used.

Preheat the oven to 350 degrees F.

Bake until the pudding puffs and is set in the center, about 45 minutes. Cool slightly.

Spoon the bread pudding into bowls, drizzle with the warm Cinnamon Syrup, (since I skipped the syrup, ice cream and/or whipped cream was nice with it) and serve.

ALSO HIGHLY SUGGESTED is Panettone made into THICK french toast. Giada has one of those too...but I figured I slaughtering one of her recipes was enough. I mix my heated syrup with melted butter.....THUD!!!

Tuesday, January 20, 2009

Closing the Biscuit Book

Happy Inauguration Day!!

" 'Tis the gift to be simple, 'tis the gift to be free, 'Tis the gift to come down where you ought to be, And when we find ourselves in the place just right, 'Twill be in the valley of love and delight. When true simplicity is gain'd, To bow and to bend we shan't be asham'd, To turn, turn will be our delight, Till by turning, turning we come round right."

-Simple Gifts by Elder Joseph Brackett

What a beautiful song.....What a great day to be locked in at home and do some cooking of something simple, my last biscuit entries. There is NO WAY I would be out amongst those crowds in DC today. I am content with my most perfect view from my warm home. Thanks to our Superintendent for changing his mind at the last minute and giving the teachers the day off. Driving would have be insane....Thank you Dr. Smith (like you are reading this....lol)

ANYWAY...I was thinking what could I do for today....hmmmm....something red, white and blue? Nah, I don't have any blueberries left in my freezer. Then I remembered.... Gotta finish up my cans of biscuits!!! Even though K-man and I are trying to eat healthier until Spring....I told myself, no worries having this evil stuff around, I will just take it to school....those kids will eat anything!!!

So in honor of NOT going down to DC today....GOOF BALLS (lol)


Goof Balls

2 (10 count) packages refrigerator biscuits
20 chocolate candy kisses
2/3 - 3/4 cup miniature marshmallows
1/4 cup sugar
2 teaspoons cinnamon

1. Preheat oven to 350F.
2. Flatten biscuits with palm of hand.
3. Place one chocolate kiss and 3 or 4 marshmallows in the center of each biscuit.
4. Bring edges of biscuit up and around to enclose, pinch well to seal.
5. In small bowl combine sugar and cinnamon.
6. Roll each biscuit ball in sugar mixture to coat.
7. Place on ungreased baking sheet.
8. Bake at 350F for 15 minutes or until bottoms are golden brown.
5. Serve warm.

Your kids will love making this one!!!

______________________________________

"Bake-In" Oozy Bread
From the Rachael Ray show

Bacon (“Bake in” get it?) and maple syrup baked right in.


* 1 package bacon, chopped
* 1 8-ounce jar maple syrup
* 1 stick butter
* 1 package (8 biscuits) home-style buttermilk biscuits, preferred brand Pillsbury


Yields: 4 servings

Step 1
Preheat oven to 375°F.

Place a medium skillet over medium-high heat and add bacon. Cook until crisp, about 8-10 minutes and reserve.

Place a small saucepot over medium heat and add the maple syrup and the butter -- do not bring up to a boil. Cook until butter is melted, then turn the heat off and reserve.

Step 2
Butter or spray a 3x9 loaf pan. Pour a couple tablespoons of the maple/butter sauce in the bottom. Layer 3 of the biscuits in the bottom of the pan. Tear up one of the biscuits and fill in any open spaces with the pieces. Don't worry if any still remain, the ooze will fill those in.

Step 3
Sprinkle half of the reserved bacon onto of the biscuits and top with about a 1/2 cup of the butter/syrup mixture. Place the remaining biscuits on top, sprinkle the rest of the bacon over them and top with the remaining maple sauce.

Step 4
Transfer to oven and bake for 25-30 minutes. Remove and immediately turn over onto a serving dish.


OMG....these were sticky, buttery, salty, ooey, goeey, crunchy....THUD.


LASTLY....


The reason for my whole ODE TO BISCUITS....
Me-mom's Biscuits. I didn't realize that I had two of her recipes when I went to my recipe box. I had a Buttermilk Biscuit and Master Biscuit Mix (below in her handwriting - which you can see is very difficult to read)

Me-mom's Buttermilk Biscuits

1 stick of butter
4 c. flour
2 T. baking powder
1 t. salt
2 T. sugar
1-1/2 c. buttermilk

Cut butter into sifted dry ingredients. Add liquid. Knead a few times. Roll out and cut into biscuits. Bake @ 450 for 10-12 minutes.

Master Biscuits

9 cups of flour
1/3 c. baking powder
1 T. salt
1 t. cream of tartar
1/4 c. sugar
2 cups shortening

Stir dry ingredients and sift 3 times. Cut in the shortening until it looks like cornmeal. Store and keep at room temperature. When making biscuits: use 3 cups mix, 2/3 c. milk. Bake @ 450 for 10 min.

Thank you Me-mom, I know I never was able to tell you how I appreciated your culinary influences on me when you were around. I hope they have internet access in heaven by now!!!

Monday, January 19, 2009

GEEEZ Moment #1


Here is the culprit. My automatic hand soap dispenser. I've had the myriad of "pump" hand soap dispensers that you throw away when you are done with them. But since my kitchen is mostly stainless I wanted something that blended rather than stuck out. So I searched my favorite go-to website for shopping and that is Amazon. I peruse the many different products to see which I like best and mostly I go over the reviews. I don't want a lemon product, you know.

So there was some discussion about this product. Works well, doesn't work well. Dispenses too much soap. Hard to coordinate the timing. Blah, blah, blah. But I took in all that I read. More importantly there were many reviews and overall, it had a high rating. Done. I am getting it.

I read the instructions, gotta do this, gotta do that. Special syringe to suck out air in system....(deep sigh, what did I get myself into here?) Got it set up. Soap came out. Wheeeeeee. It works.

Yes, some times it gave a little more soap than I needed. But I took it as God's way of telling me that I needed the extra soap. Afterall they say we don't clean out hands enough, right? Sometimes I'd wave my hand under and nothing happened. Ok, it worked the second or third time. So I think it's a pretty good product. I've had it for a few months and no real problems. I like it. Until yesterday.....

I was running around in the house 'doing stuff'. I came back into the dining room (next to the kitchen of course) and I hear ....Rrrrrrrrr, Rrrrrrrrr.

What was that noise? (earing perking like a dog toward strange noise) Wait a minute that noise sounded familiar. Waiting......

Rrrrrrrrr, Rrrrrrrrrr.

I look into the kitchen and I see this.


AND a whole sink FULL OF SOAP!!!
The sponge I had hanging on the faucet was 'tricking' my hand soap dispenser and it was emptying into my sink like every 5 seconds for at least an hour!!!!

My kitchen gets a lot of sunlight. I was cleaning and you see the big flat 'sponge' that I wanted to hang up to dry. Little did I know that it was going to INTERFERE with my automatic hand soap. GEEZZZ.

Yup, the soap dispenser was empty. Sigh.


Do you have GEEZ moments?

Sunday, January 18, 2009

Sunday Blues - Week #3

No blues today!!! Why you ask? Well brownies certainly UNblue anyday AND because I don't work tomorrow (MLK holiday) or the next day for it's Inauguration day. Whhheeeeeeeee!!! I know many of you don't have that day off but me living in VA, all the bridges are closed going into and from DC and our teachers would have difficulty arriving to work. Our school is also very close to the Pentagon and the beltway, so traffic is going to be 'hellish'. The superintendent claimed 'emergency' closure (kinda like what he does for snow days and since we haven't USED any days for snow....)
Back to the brownies....
Do you have these in your stores? They are great. NO Pudge Fudge Brownie Mix. They provide the mix and you just add a contain the yogurt (flavor of your choice) The are moist and fudgy, fat free and only 2 WW points! I can still feel like it's the holidays!!

Now, if you don't have this brand in your stores you can use a regular family size brownie mix and blend in the food processor a whole can of black beans (juice and all) mix them together and bake as the box instructs. Cut the 9X13 pan into 24 and those brownies are only 2 points as well. And I SWEAR, you won't taste the black beans at all!!! I know this because I demonstrated this brownie recipe with my students. Due to time restraints I made the brownies beforehand. Told them I was demonstrating brownies (insert cheering) and I handed them each a brownie. Snarf....gobble, slurp. Then as I am going through the ingredients I whip out the can of black beans I am going to use and inform them why I am using it (better nutrition, more fiber, lower calories, etc). You should have seen their faces. You would have thought I told them I have POISIONED each of those brownies!!!!

Of course afterward I had say to them..."Now, why are you all acting like that? Not one of you have your brownie left, you scarfed them down, not one of you said, that these taste funny. Didn't they taste good? (insert sheepish faces saying quietly 'yes, Ms. MacK) That should tell you something, that just because you try something and don't like it doesn't mean it will forever always taste bad!!!" [I use the pizza comparison: Do all pizzas taste alike, restaurant, frozen, homemade? No, you eat the ones you prefer the taste of] I asked if some of them would have tried the brownie if I had told them prior that black beans were in the brownies. Some said "NO!!" They learned my lesson intended...don't pre-judge...always try....then make your decision.


SO as I am pre-planning my blog in my head...I realized that you have another alternative that I use with my students. What is great about this recipe is that the CONTROL factor. You know how after the brownies are made you you just are so enamored by the smell, the texture, the taste that you aren't putting them in the freezer (like you said in your head) and after a few days they are all gone? Or you can't get your kids from eating the brownies so quickly (I know, I know....but they will get stale and dry, LOL). I use this recipe with my students to help demonstrate moderation and self-control. To have one brownie every so often and be happy. Or have a friend over on Saturday and make brownies just for the two of you.

Microwave Brownie Cups

2 Tablespoons of brownie mix

1 Tables spoon of liquid (water, milk, soda, yogurt)


Place measured brownie mix in a custard cup or microwaveable small dish. Stir in the 1 Tbsp. of liquid of your choice. Place in microwave and heat on high for 30 seconds. Take out of microwave carefully from top not bottom and place a scoop of ice cream or whipped cream....jazz it up with chopped nuts, sprinkles, caramel sauce....however you'd like.

Of course, I have to explain that they ASK for permission from Mom to open a box of brownie mix and immediately put it in a ziploc bag, mark it Microwave brownies. Keep it in the fridge and pull it out when you get the 'brownie jones' I didn't want my students being sneaky and opening the brownie mixes at home and leaving a hole and Mom coming to it later (screaming child's full name here). My students love making their own individual brownie. Especially when the class occurs during 1st period and they think they are being bad by having brownies for breakfast!!! Breakfast of Champions I say!!!

Saturday, January 17, 2009

Happy Birthday Mom !


Jenny Mac -9 months, Mom- 21

So I am busy as a beaver getting things ready for tonight. Dessert is all ready to go. As I said Mom didn't want your typical birthday cake. I understand. When it's your birthday sometimes you want something sweet that you REALLY love rather than birthday when we get opportunities to eat cake all year. Mom wanted me to make my Strawberry Pretzel Dessert. I got this from one of those 'church spiral bound' cookbook from my first year of teaching (like 19 years ago). I have only made it a handful of times for it's a bit laborious but SO WORTH IT.
I am one of those people who love the combination of sweet and salty. If that is your taste palette, then you will love this too.


Strawberry Pretzel Dessert
Makes 12 servings

JennyMac's favorite summer indulgence. OMG, this is the best dessert!

1 1/2 cups crushed pretzels
4 1/2 tablespoons white sugar
3/4 cup butter, melted
1 cup white sugar
2 (8 ounce) packages cream cheese
1 (8 ounce) container frozen whipped topping, thawed
1 (6 ounce) package strawberry flavored gelatin
2 cups boiling water
1 (16 ounce) package frozen strawberries

Directions

1. Preheat oven to 350 degrees F. Mix together the pretzels, 4 1/2 tablespoons sugar and melted butter. Press into the bottom of a 9x13 inch pan. Bake for 10 minutes, or lightly toasted. Set aside to cool completely.

2. In a medium bowl, beat the sugar and cream cheese until smooth. Fold in whipped topping. Spread evenly over the cooled crust. Refrigerate until set, about 30 minutes.

3. In a medium bowl, stir together the gelatin mix and boiling water. Mix in frozen strawberries, and stir until thawed. Pour over cream cheese mixture in pan. Refrigerate until completely chilled, at least 1 hour.

Note: The first cut is difficult as like pies. When cutting the pretzel crust will be harder to cut through and will not bend when lifting. Often the first piece, the crust will break somewhere. After the first cut, lifting from underneath, than the side will go much easier. Enjoy, I know we will!!!

Friday, January 16, 2009

Birthday Prep!!


So I am in the midst of food preparation for my Mom's birthday celebration tomorrow evening. Her birthday is really today but since she works odd hours 9-9 (she's a nurse) the festivities will be tomorrow when she is off.

So finally after two years of K-man and I living in our new house, we finally got a living room put together (long story) and when Mom and I were planning what to do for her, I thought it would be nice to 'break-in' the living room with a dinner for them here rather than go to a restaurant (my G-mom also lives with Mom and uses a walker). So I here I am thinking that I'd be putting together my own menu...little did I know that when she realized I was making dinner she was going to request her favorites that I make. (of course this discussion occurred after we went to the grocery store). But I didn't say anything or convince her otherwise....after all it is her birthday and the rule is the birthday girl gets what she wants!!!


The first dish she wanted is an appetizer called Fiesta Cheesecake. It a savory dish that I made for a work party awhile back and instead of making one large cheesecake I made two smaller ones. After the party I gave the second one to Mom and she loved it.

I am giving you the PRE-preparation pictures today and when I do my spread tomorrow night you will get the party-prepped pictures then. K?

Fiesta Cheesecake
9" cheesecake (I used two 6 inch springforms)

1 1/2 cups finely crushed tortilla chips (they make cans of this like bread crumbs now)
1/4 cup melted margarine
2 (8-oz) plus 1 (3-oz) pkgs cream cheese, softened
1/2 Tbsp chopped jalapeno peppers (I used fresh jalapeno)
1 tsp liquid from the jar of jalapeno peppers (I used lime juice)
red pepper, cumin, onion powder, garlic powder, and paprika to taste - start with 1/4 tsp each
2 large eggs
8 oz Pepper Jack cheese, shredded
2 oz cheddar, shredded fine
for garnish: 2 Tbsp sour cream, and 1 tsp each finely chopped red, yellow, and green peppers


Combine the tortilla chips and margarine. Press onto the bottom of a lightly-greased 9" springform pan. Bake at 325 for 15 minutes. Cool.
Beat the cream cheese until light. Add the jalapeno peppers and the 1 tsp of liquid, combine thoroughly. Add the red pepper, cumin, onion powder, garlic powder, and paprika, tasting to adjust before adding the eggs. Beat in the eggs, one at at time. Stir in the cheeses.
Pour the cheese mixture onto the crust. Bake at 325 for 30 minutes.
Cool for 10 minutes. Run a knife around the edge and remove the side of the pan. If not serving within a couple hours, cool completely, wrap airtight, and store in the refrigerator (let it stand at room temperature for an hour before serving). Garnish with a dollop of sour cream in the center and the finely-chopped red, yellow, and green peppers.

Notes: The original recipe suggested covering the top with sour cream, but I think it is too pretty for that. Place on a bed of fresh cilantro or parsley, if desired.
"Spicier Nacho" tortilla chips will give the crust a lovely reddish or blue color(depending on the type of chip you bought) A 7-oz bag will yield about 2 1/2 cups of crushed chips.

In making the two pans, I took the opportunity to make one mild cheesecake and one spicy. In both cheesecakes I added a couple of tablespoons of the bell peppers to the total mixture. I felt the cheesecake being called 'fiesta'...I thought it needed some color. I put half of the mixture in one pan, the remainder I mixed in the finely chopped jalapeno and put in the other pan. I used the pepper stems to indicate which is spicier of the two.


Lastly Mom didn't want a traditional birthday cake. Alas, another thing I need to finish tonight. Tune in tomorrow to see what I made for dessert!!!
IT ROCKS!!!

Thursday, January 15, 2009

Man Food


As K-man had suggested, I am making 'man food' tonight. PIZZA. I tend to make Pizzas on Thursday after his man activity, band practice. Somehow pizza doesn't seem as bad when you make it yourself.
AND since his bike riding doesn't happen very often during winter he's concerned about weight gain so I tweaked it, making it healthier for us.

Barbecue Chicken Pizza

Whole Wheat Tortillas
Leftover grilled chicken (or any chicken you have leftover)
Assorted Julienned Veggies (I used peppers and red onion)
2% Mozzarella Cheese
Barbecue Sauce

Preheat oven @ 400 degrees. I laid out 4 tortillas, I squirted about a Tbsp. of barbecue sauce on each tortilla and spread it around with a pastry brush (if you want a 'saucier' pizza, use 2 Tbsp). I chopped up the leftover grilled chicken (we had about 1-1/2 breasts leftover) and portioned it out on all 4 tortillas. I used a whole package of cheese (about 2 cups) and put all of it on the pizzas. Arrange your veggies on your pizzas nicely. Bake until crispy about 10 minutes (our ovens vary of course, so watch them) Make 4 thin crust pizzas (the size of your pizzas are dependent on the size of your tortillas).

Wednesday, January 14, 2009

Great-full moments

Have you ever had one of these? Yes, you can be grateful. But have you had a great-full moment? I had one today. I wanted to share it with you.

If you have read my profile or even the subtitle to my blog page, you know I am a teacher, a Family and Consumer Science teacher AKA Home Ec. teacher. I'd love to go into the depths of my struggles to be taken as a serious discipline but that is not today's subject. Today was a day that in receiving a note, it made me smile and think to myself THIS is why I teach.

At the workplace, we all sometimes question ‘what the hell made us choose this line of work?’ When things weigh heavily on our shoulders questions like these arise. But when you get a note from one of your 'groupies' like I did, it all makes sense; you make peace again with your career choice.

Sometimes teachers get groupies. Don't confuse teacher groupies with teacher's pet. I am not talking about the kids who have all the right answers for teacher. Teacher groupies can be quiet in class for they know their time to shine is when you are having one on one time. TG's are kids who want to eat lunch with you. They want to hang out in their room after school. They want to talk about nothing important, really. They are eager to help you when you need them to just because they WANT to be a help to you, no matter what the task…even cleaning out a closet and organizing it. (She even came back the next day and asked if I had another closet that needed organizing. LOL)

NOW, if you are a parent look at my ‘groupie’ for a minute from my perspective. What astounds me is that this is not one of those at-risk students who have no one at home. Her parents get home between 4-6. She gets great grades. She does swim team and track. She designed the phone directory cover for our school. She tells me of the many wonderful social and recreational things her family does. She also has a great relationship with her 6th grade sister who hangs with us at times. She plays with the young children in her neighborhood and makes money babysitting. She was showered with wonderful gifts at Christmas; they have a farmhouse in the country where the family grows grapes to sell for wine. She still listens to Radio Disney, they have only basic cable, has dial-up for Internet, yet has a cell phone (as does her sister). They are in the process of renovating their home as they explain why they still have basic cable/dial up. Yeah a real problem child, right?

When I see and hear about all the things she makes (foods, her clothes/dolls clothes, baby blankets, sock monkeys, ipod covers, phone holder….) I immediately am impressed and say “wow, what did you mom or dad think of what you made?” She shrugs and says “they aren’t impressed with my skills anymore, I guess nothing surprises them anymore as to what I can do” I thought to myself how sad. She does such extraordinary things for a kid her age and she isn't getting the recognition she deserves. She has this wonderful life and the family is so busy doing “things” that perhaps my groupie is not getting the affirmation she needs and seeks it from me. We had a conversation about her future career choices she had in mind for herself. She said she wanted to be a PE, math or FACS teacher. My only advice at the time to her was to be DOUBLE certified in two areas for job security. I’d work on converting her to be a FACS teacher later. LOL When I asked her if she has conversation with her parents about her career ideas she told me that her dad said that being a FACS teacher was fine….BUT she would probably change her mind after college. She said, she could tell her dad wasn't supportive. Sigh.

So my groupie wrote this thank you note to me (BTW, a thank you note is something WE had to do when we were kids…. Today’s generation isn’t note writers. They’re texting these days, not emailing like the adults do and certainly NOT writing handwritten notes.) listing all the things we’ve worked on after school and she wanted to express her gratitude for it. She included a P.S. how her dad was speechless over the apron we made after school and that she was becoming quite a woman. I told her 'maybe your dad is seeing that your FACS teacher plans are serious now.'

Bottom line…. Any of you parents out there, keep in mind…. that whatever you give and provide for your child…it doesn’t matter…what they want is YOU, your time, your conversations, your attention …your positive reinforcement. It’s not the fancy cell phones or trips to amusement parks. It’s the relationship WITH you they want. Who’s to know what would become of my groupie, if I thought ‘oh she’s going to be fine' and didn’t give her the time she wants from me after school.

What I DO think is what I have here is a Future FACS teacher. I can only hope. But more importantly, she is the biggest sweetheart and I can't possibly look her in the face and not do things with her after school. Just telling her I have a meeting and can't meet with her breaks my heart. We have a mentor/mentee program at our school and I always have an 8th grader for a mentee. My groupie asks me if I would be HER mentor early this year and I said without hesitation, “For next year, ABSOLUTELY. But this year you are going to be my ‘mentee-in-training.’ What she doesn’t realize yet, that I am already her mentor- have been since her first year.

Relationships like this are GREAT…. Doing whatever you can to make a child’s transitional pubescence years become FULL of experiences and precious memories!!!

Find YOUR ‘great-full’ moment today!!!

Tuesday, January 13, 2009

Holiday Remorse

All the cookies, candies, fancy dinners, the drinks....the biscuits...LOL. Then you realize it's time to go back to eating healthier again. The holidays and all that caloric eating can't last forever, time to eat the good stuff again, otherwise it will catch up with you later on, right?

So we loaded up the grocery cart with some some fresh veggies. I am not ready to go back to the lettuce salads for those I prefer those in the summer when it's hot. So I grilled up some chicken (that had been soaking in seasoned buttermilk) on my George Forman and while those were sizzling I made some confetti salad. Of course, you can use whatever veggies float YOUR boat but I will tell you what I used tonight:

Confetti Salad

Chopped Red Onion (amounts up to what you need)
Chopped Yellow pepper (amounts up to what you need)
Cubed hydroponic cucumber (amounts up to what you need)
1 clove of garlic, rubbed with 1/2 salt on cutting board to mash
Halved grape tomatoes (amounts up to what you need)
3 handfuls of precut coleslaw (in your salad bag section)
4 shakes of Zesty Italian Salad Dressing (fat free of course)
2 shakes of Balsamic Vinegar
Basil leaves, finely minced
Freshly ground pepper

Super crunchy, sweet and sour...It was great with our grilled chicken, and it's even better the next day after the veggies marinate more!!!

Monday, January 12, 2009

Two evil words for you....

FRIED CHEESE!!!!!

Oh yes, I said it. And I ATE it too!!! I heard of this a few years ago and didn't really believe it. But I finally noticed the cheese in the store and decided to give it a go. Very easy and...OMG!!! Scrumptious.

Depending on where you are...some of you may have International Section (you know like: El Paso, Far East, Thai/Chinese food stuff...) in your store BUT if your grocery is really ethnic-oriented (usually due to your demographic of people who live in your community), they will also have refrigerated/frozen ethnic things too. This is the brand I used....


Just slice off a few thick slabs....heat up some oil in your favorite pan. This is my new George Forman 360 grill I got for Christmas (I highly suggest it...love it). If it starts to spatter that is great about having a cover with the GFG.


Just in a minute or two (look for 'melty' edges). Flip them over.

OMG! YESSSSSS!!! It's just like those few crusty, chewy edges from your grilled cheese sammies.
Put them on your plate as a side with your main course of choice. These are my spicy/sweet meatballs. Just some brown sugar, butter and hot pepper flakes sauteed for a bit before the cheese was ready. Interesting 'throw' together meal. We have the sweet, hot, chewy, salty, crunchy. Dang missing something cold and mushy....applesauce? Oh well.

Sunday, January 11, 2009

Sunday Blues - Week #2

Good Gawd. Can I take a break from canned biscuits? I still have 3 left on my list to prepare….(WTH was I thinking?…LOL) I will do those later on (only because I still have cans of biscuits to use up!)….stay tuned.

Another Sunday Blues….

What do I have to do to get it to SNOW around here!!!! I am so bummed reading some of my fellow foodies about how they were cooking this on a snowy day or….cooked this dinner for their kids who came to visit and shoveled the driveway….GRRRRR. Can’t YOU people SHARE? I want some snow TOO…(sniffle, whimper)

What the problem is really, that the DC area has a protective screen most times….called the Appalachian Mountains. If the snow does venture over it seems to trickle over to western Maryland. Now don’t get me wrong….we’ve gotten POUNDED a few times. And this teacher was dancing around in her jammies when she got snow days but we’ve also had to make up our ‘too many days’ off with workdays becoming school days, extending the school day hours, tacking on extra days in June. Now that we’ve gotten extra days plugged in our school year calendar, we don’t ‘get them back’ like we used to if we didn’t use them up and got out a few days earlier in June. Sux. They’ve been calling for some icy mix days…..bah…nuffin! Just freakin' rain.

BUT.....Next week is our last week for the grading period and my students are just sewing like crazy. I am so proud of them. Now watch….I am pressed to get all our projects completed….THEN WE’LL GET MY SNOW….

Cooking always helps to ‘unblue’ me….

Awhile ago, I saw this recipe on the Food Network with Sunny Anderson’s Cooking for Real and I thought it was a nice ‘tweak’ It’s not meatloaf really or stuffed peppers but when you put the two together…


Pan Fried Meatloaf in Tricolor Peppers
Serves: 4 to 6 servings

1 green bell pepper
1 red bell pepper
1 yellow bell pepper
1/2-pound ground beef
1/2-pound ground turkey
2 slices white bread, cut into cubes
1 (28-ounce) can crushed tomatoes with basil
2 cloves garlic, minced
1 egg
1 small onion, chopped
1 tablespoon chopped sage leaves, plus 6 to 8 whole leaves, for frying
A few dashes Worcestershire sauce
A few dashes hot sauce
Salt and freshly ground black pepper
1-tablespoon oil
Vegetable oil, for frying

Preheat oven to 400 degrees F.

Remove core and seeds from peppers. Slice into 1 inch rings and place on nonstick baking sheet. You should get about 3 rings per pepper. In a large bowl mix together beef, turkey, bread, 1/2 cup of the tomatoes, garlic, egg, onion, chopped sage, Worcestershire sauce, hot sauce, and season with salt and pepper. Press meatloaf mixture evenly into pepper rings. In a skillet over medium-high heat, add oil. Sauté meatloaf rings on both sides until golden brown, about 5 minutes per side. Add remaining tomatoes to skillet and bake until cooked through, 20 to 25 minutes. Garnish with sage leaves.