Sunday, May 31, 2009

Spana-FAKE-ita


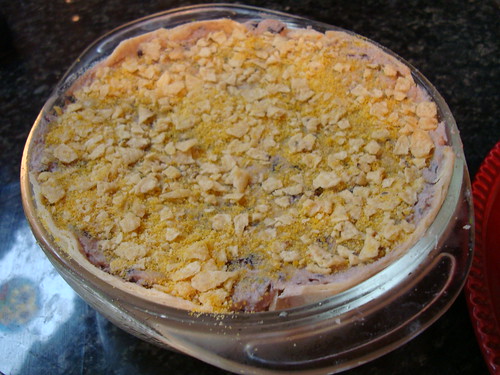
Oh I love a good spanikopita....I had the phyllo dough and spinach but NO FETA. So what is a girl to do? Make a fake one. I used four cheeses I had in the house and proceeded to make it the best that I could.

Four Cheese Spinach Pie

One roll of phyllo dough (two come in a package)
1 stick butter, melted
14 oz spinach microwaved and squeezed dry.
1/2 cup green onion, chopped
1/4 c. parmesan, grated
1/4 c. jarlsburg cheese, shredded
1/4 c. white cheddar cheese, shredded
1 package of boursin cheese
1 clove garlic, pressed
salt and pepper to taste
1 egg, beaten


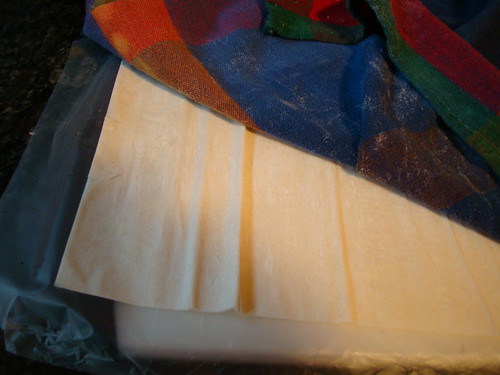
Unroll the phyllo and cover with a damp towel. Melt butter in a small dish. Mix your remaining ingredients in a larger bowl. (the spinach, cheeses, garlic, egg, etc.) and set aside.
Grease a 8/9 inch baking dish. Peel off one sheet of phyllo and lay in greased baking dish. The edges will hang off the edge on two sides. Lay another sheet of phyllo going the other way in the dish. Butter with basting brush.

Don't worry about tears or edges not lining up or the sides falling down. Relax, you are doing so many layers it won't really matter.

You should put at least half of all the sheets on the bottom alternating the direction of the sheet. Ends going east and west....ends going north and south. After two sheets you butter the layer. Again it doesn't need to saturated with butter. Swipes here and there to get the sheets to stick to each other essentially. After about 10-12 sheets, put your spinach mixture on the phyllo....

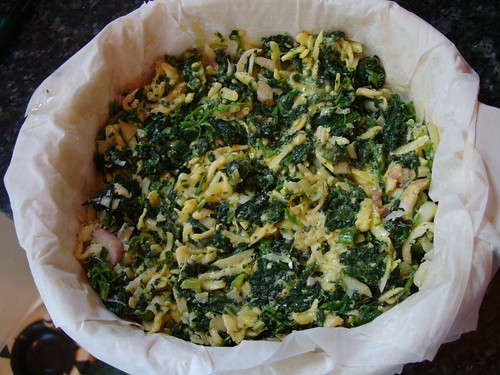
Take your next sheet and roughly fold it so it fits on top of the spinach...you DO NOT want the sheets to overlap the edges. After you place the square, butter the edges of it and fold down just one layer of each side. Repeat folding the sheets, laying on top butter surface and edges and folding down one layer of the edge.


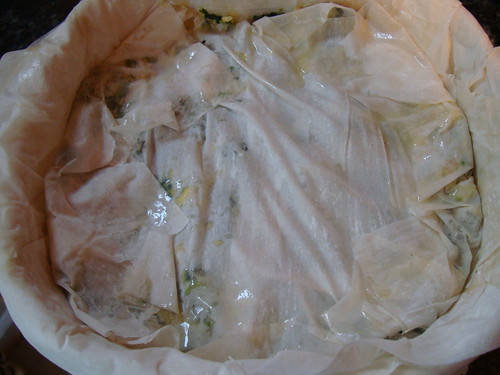
Keep repeating process until you have no edges to fold down. Place the remaining phyllo sheets folded in half on top and butter.
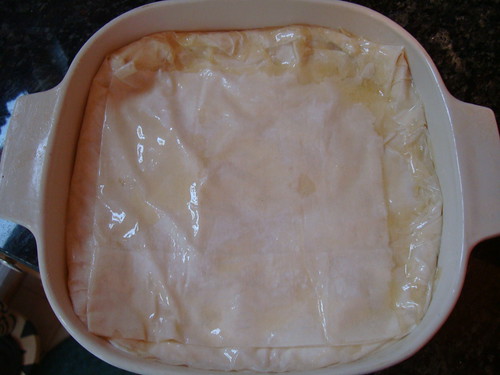
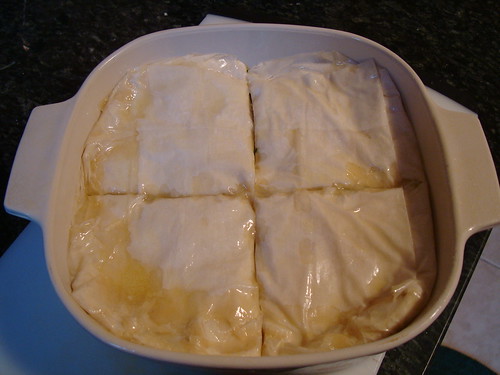
Use knife to cut through only the surface phyllo or the top. If you don't do this important step when it's cooked and you must cut the pieces you phyllo crust will SHATTER into smithereens!


Bake @ 375 degrees for 30 minutes or until golden brown on top.

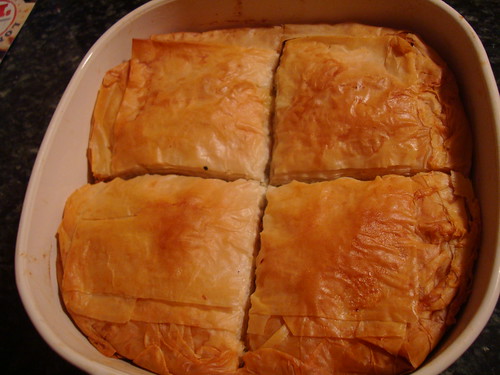
These were good but I guess I am spoiled and prefer the feta over any other cheeses. If it ain't broke don't fix it....FETA is BETTAH

Saturday, May 30, 2009

A little Bean-o would be Keen-o!

A very refreshing bean salad for summer to accompany any meat you are grilling up for dinner!

Summer Bean Salad

1 can of cannelini beans, drained and rinsed
fresh herbs, finely chopped (your choice)
1 large tomato, chopped
2 green onions, chopped
handful of pea pods (from my farmer's market and used for some crunch factor), chopped
1 garlic clove, minced
juice of one lemon
2 Tbsp white wine vinegar
1/4 cup olive oil
salt and pepper to taste

Finely chop your herbs, coarsely chop your tomato and slice your green onions...

The herbs I selected from my garden were basil, thyme, and rosemary. Notice I put 3 leaves of basil and just a bit of thyme and rosemary. I wanted a delicate flavor of herbs, not an overpowering one. You can taste your salad and always add more if you like.


Put your drained, rinsed beans and herbs in a bowl. Add all your remaining ingredients. Mix to coat all ingredients. Chill in fridge until you are ready to serve.


So light and fresh. Just a wonderful side dish that tastes like summer.


Summer Bean Salad on Foodista

Friday, May 29, 2009

Who's your Daddy?

*biscuit speaking* I AM!

I love biscuits and when I saw some posts for biscuits out there I got a hankerin' for some. I'd thought I'd share with you a recipe I demonstrate to my 7th graders when they are learning to measure....

Big Daddy Biscuits

This recipe will produce the biggest biscuits than you can get in any store! Serve these gems with butter, preserves, honey, gravy or they can also be used as dinner rolls...you get the picture. The dough can also be prepared several hours, and up to a day ahead of time. If so, turn dough out onto aluminum foil that has been either floured, lightly buttered or lightly sprayed with cooking spray. Roll up foil until it is sealed, and refrigerate. Don't be surprised if your biscuits rise even higher because the baking powder has had more time to act in the dough.

3 cups all-purpose flour
1 tablespoon baking powder
¼ tsp. baking soda
1 teaspoon salt
2 tablespoon white sugar
1/3 cup shortening
1 cup buttermilk

Directions

Preheat oven to 425 degrees F (220 degrees C).

In a large bowl, whisk together the flour, baking powder, salt, and sugar. Cut in the shortening until the mixture resembles coarse meal. Gradually stir in milk until dough pulls away from the side of the bowl.

Turn out onto a floured surface, and knead 15 to 20 times. Pat or roll dough out to 1 inch thick. Cut biscuits with a large cutter or juice glass dipped in flour. Repeat until all dough is used. Brush off the excess flour, and place biscuits onto an ungreased baking sheet. Brush with butter and sprinkle with onion salt or cinnamon and sugar (depending your purpose for the biscuit).

Bake for 13 to 15 minutes in the preheated oven, or until edges begin to brown.

K-man and I were making the Homer Simpson noises (awggghhhggghh) when we opened these and put some butter on them....THUD!


Buttermilk Biscuits on Foodista

Thursday, May 28, 2009

Dip into THIS terrine...


*Layered Avocado Bowl

This is basically a terrine and is best when made a day ahead. It can be eaten with a fork or used as a spread on tortilla chips. Serves 12-14.

For the bowl:
6 corn tortillas

For the chicken layer:
2 cups cooked, shredded chicken
16 oz jar chunky salsa
salt to taste
1 Tbsp chili powder

For the avocado layer:
3 avocados, cut into 1 inch cubes
2 Tbsp. lime juice
12 oz. queso blanco, grated
1/4 c. chopped green onions (both green and white parts)
1/4 c. chopped cilantro

For the red pepper layer:
2-17 oz jars roasted peppers, drained (I just bought 2 peppers and roasted my own)

For the black bean layer:
2-15 oz cans black beans, rinsed and drained
2-5.2 oz pkg boursin cheese (I used the pepper flavor)
1 small jalapeno pepper, finely chopped
1/4 c. cilantro
1 clove garlic, crushed

For the topping:
1 cup sour cream
2 cups finely crushed cheese flavored tortilla chips such as Doritos

For the bowl: Line a 9 inch (10 cup) stainless steel bowl with plastic wrap. Layer with the corn tortillas, placing 1 tortilla in the bottom of the bowl and then lining the side of the bowl with the other 5 tortillas, overlapping the concentrically.


For the chicken layer: In a medium bowl, combine the chicken, salsa, salt and chili powder. Spread the mixture evenly in the tortilla lined bowl and press down.


For the avocado layer: Rinse out the bowl used earlier for the chicken and combine the avocados, lime juice, queso blanco, green onions and cilantro. Spread the avocado mixture on top of the chicken mixture, pressly lightly again.


For the red pepper layer: Slice the roasted red peppers into very thin strips and dry them well on paper towels. Spread the peppers over the avocado layer.

For the black bean layer: In a food processor or blender, combine the black beans, boursin cheese, jalapeno pepper, cilantro and garlic and proces the mixture until smooth. Spread the black bean puree over the red pepper layer.

Using kitchen shears, trim the tortillas lining the bowl so they are flush with the rim of the bowl. Sprinkle 1 cup of the crushed cheese flavored tortilla chips over the black bean layer. Cover the bowl with plastic wrap and refrigerate overnight.

When ready to serve, invert the layered bowl onto a large round serving plate.

Remove the plastic wrap and discard the corn tortilla 'base' from the terrine.


Press paper towels over the terrine to absorb any moisture if necessary. "Frost" the terrine with a thin layer of sour cream and sprinkle the remaining cup of crushed tortilla chips into it. (Below, I just sprinkled it with some Chipotle Chili Powder)

Carefully cut the terrine in wedges using a long serrated knife. Serve with additional sour cream and tortilla chips.

*My terrine does NOT reflect how EXACTLY this should look like. K-man and I did not want to be eating this for weeks and I wanted to try this out before I used it for entertaining. My layers are thin since my amounts are less and I used a smaller bowl. But the FRESH flavors and taste was AWESOME!

Wednesday, May 27, 2009

Winner, winner, chicken wing dinner!

If you have read some of my past posts about chicken you will know that I am a HUGE believer of the chicken in the BUTTERMILK thing. You chicken will never be over dry or tough anymore. No real recipe here.... Just some pictorial steps for you ....


Quart size ziploc with about 10-12 wingettes and drummie chicken wings (not the full size wings!) Doesn't matter if they are fresh or frozen it will thaw in bag until you ready for them.


About 2 cups of buttermilk.


Now here is the easy part...season your chicken HOWEVER you want. You can use fresh herbs, season from the bottles in the combo you like or you can CHEAT and use the premade seasons in a packet. Today I chose a pesto flavor. The key is to OVER season here for this will be poured off later.

Let soak all day while you are at work or overnight is best I think!


Drain and pat dry. Coat with a little vegetable oil and...

Get those babies on the grill now! Grill for 15-20 minutes depending on your heat level.


When they are still hot put them in a mixing bowl with about 1-2 Tbsp of jarred pesto sauce. Stir them to coat.


Mmmmmmm Pesto Wings.....


OH... so finger lickin' good


Chicken Wing on Foodista

Rejected!  Lighting/white balance issues  AND unflattering composition. not sharp. dark. blue/cyan color  LOL

Tuesday, May 26, 2009

Killah Kookies


I see why these cookies won a prize...$1000 bucks! That is like $5 a chocolate chip kinda stuff. I found this recipe on My Wooden Spoon, who had a guest poster showcase her prize winning cookies. I hope Lynn who's an 'at home mom' bought herself something nice! Check out her site, she's got some cool recipes!

Chocolate Toffee Pecan Cookies
adapted from Lynn's Kitchen Adventures

These cookies are large cookies. They are made to be like a cookie you would buy in a coffee shop or bakery. I have tried making them smaller, but it changes the texture. You want these large.

INGREDIENTS

  • 2 c. plus 2 Tbsp flour
  • ½ tsp. baking soda
  • ½ tsp. salt
  • 12 Tbsp butter, melted
  • 1 c. brown sugar (I used 1/2 c. brown sugar splenda)
  • ½ c. sugar
  • 1 egg, plus 1 egg yolk
  • 1 teaspoon vanilla
  • 1 cup chocolate chips (I used half chips half chopped chocolate)
  • 4 ounce English toffee bits
  • 3/4 cup chopped pecans, very finely chopped (mine were more coarse, cuz you can see them on the cookie!)

DIRECTIONS

Preheat oven to 325. In a bowl, mix dry ingredient. In mixing bowl, combine butter and sugars until well blended. Add egg, yolk, and vanilla. Batter will appear slightly greasy. Add dry ingredients, until blended. Add chocolate chips, pecans, and toffee pieces. Scoop in ¼ c. balls onto cookie sheet. I use an ice cream scoop. Place 6 on each cookie sheet. You should only place 6 per sheet because these are large cookies and they spread out. Bake for 15 minutes.

These made 17 cookies. (well 17 and 1/2 but I didn't want the 'little' one to overcook)


Wonderful cookies. Next time I think I will put more toffee bits in them....I think they were hiding in the chocolate!

Monday, May 25, 2009

Which came first?

The egg poacher or plastic wrap?


Hmmmm, I am unsure about that one. We had a egg poacher when I was growing up and it had 3 'divots' for the eggs. It had that old 'brown' non stick coating that got scraped off from using a knife to scrape around the egg edges. That was the first way we learned how you don't use metal with non-stick surfaces. Now they are making the silicone forms for you to drop into hot water. Those puppies are NINE bucks for only two! Then they have the plastic containers for the microwave....can you say EXPLOSION?

Trust me when you try this way you will be not only amazed but wondering what took so long for this information to get around?

I found this trick on Dutch Girl Cooking. Kay has many great recipes yet she's limited a few times since she lives in the Netherlands...but she writes often keeping her American friends in mind.

The poaching set up:


Have a small dish and line with plastic wrap. Spray with non-stick spray or brush with vegetable oil.


Crack egg in dish and gather around plastic wrap edges.


Clip around gathers ends. Don't worry about whether or not there is air or not. You can get these clips in a bag from Amazon. I have also seen them at BBB but they aren't sold online.


Gather your chicks on a plate until the water comes to a boil.


Gently place them in the boiling water. Roll them a bit with tongs. Don't obsess about this....they will roll right back. Set timer for 2 minutes. These were large eggs and 2 min was perfect for a 'runny' center.


When the are done, use your tongs to place them on a dishtowel. Keep them close together to keep them hot while you prep your plates for the eggs.


Open the clips and gently take out your eggs. There will be a nice rounded side and a 'not so nice' side. Put the rounded side up.

Here I am using a Arnold's with some bacon slices for a little Eggs Benedict Twist....no english muffin or canadian bacon...but this works!


Of course you have to have the hollandaise! Scroll down to the bottom of this post for another incredibly EASY way to make hollandaise!


Oh, a thing of beauty!


No Fuss Poached Egg
from Dutch Girl Cooking

Egg(s)
*Plastic Wrap for each egg
**Clip(s)
Oil or non-stick spray

Bring enough water to a boil to fully immerse the egg and drop it into the water. Flip it over every minute or so and cook it for about 3 minutes, depending on the size of the egg. My egg was fairly large so I had to boil it for 3 and a half minutes. (I had large eggs and they were perfect @ 2 minutes)

*You can use a ziploc bag if you want but if you poach alot....this could get costly and your egg will be oblong. Shapes are only a concern when you consider what you are putting it on. My mexican dish the oblong was fine....on a round muffin for egg benedict the plastic wrap would fare better. Whatever works for you!

**If you don't have these clips, you can certainly use butcher's twine. The plastic coated 'twisties' may melt ....dunno

Insanely Easy Hollandaise Sauce

3 egg yolks
2 Tbsp. fresh lemon juice
dash hot pepper
1/2 cup butter

Add egg yolks, lemon juice, pepper sauce to blender. Blend about 5 seconds.

Melt butter in microwave until very hot and bubbly. With blender running with egg yolk mixture, pour in bubbling butter in a steady steam. (This is when you turn and remove that little clear knob on the blender top; to keep the mixture from splattering when you add while blending.) Blend until thickened about 30 seconds. Serve immediately!

Great breakfast! I love this cool way to poach eggs! So glad I didn't buy those stupid silicone egg poachers. Thanks Kay!

OMG, this is one of the most controversial posts I've ever written. Half of the comments are rejected from the rudeness!.... so unnecessary.

Be aware of my career.....
I am a F.A.C.S. teacher....so I've poached many eggs. This is a suggestion for it to be 'easier' for those who many have difficulty. Am I not allowed to provide alternatives to people? Is comprehension of reading difficult these days?

I am thrilled you that many of you are the master of poached eggs. Realize that so am I. I have to teach to all different levels of cooks in my job....same here. Exactly, what do you accomplish by telling me "Poaching eggs isn't hard" you might as well add YOU IDIOT at the end of your comment.

Those who opt to be "Negatively Anonymous"....you will not be posted.

Sunday, May 24, 2009

A Doggie Bag Make Over

Ok admit it, you have no shame in taking home a doggie bag. I don't either. But most times you heat it up in the microwave in the same container the next day for a snack or for a meal when you are eating alone. Or do you schlep them to work the next day for lunch cuz it's easier than 'making' a lunch. Am I right?

Well, your leftover deserve a 'make over'....don't make your leftovers ho-hum. Jazz them up...

Last night's fare was a mexican combination platter. So my doggie bag consisted of a half eaten chile releno, half eaten chicken enchilada, a few grains of rice and most of my refried beans. How are you supposed to facelift THAT, you ask? Easy peasy....

You are getting two bangs for your buck here.....makeover for your doggie bag PLUS a new way to poach eggs!!!!

My Mexican Brunch con Heuvos

Mexican Leftovers
2 eggs
non stick spray
ziploc bag
shredded cheese

1. Chop everything into bite sized piece and gently combine. The beans provided moisture so I didn't worry about the food getting dry when reheated. You can use some salsa or enchilade sauce to give your leftovers more moisture if needed. Plate your leftovers.
2. Boil water in a pot.
3. Spray non-stick spray in a ziploc bag
4. Place 1-2 eggs in it. Seal.
5. Dip bag into boiling water for 2 minutes (or until the egg yolk is to your desired doneness- runny/hard). While egg is cooking warm up leftover in microwave.
6. Gently mix leftovers after one minute to distribute heat. Continue heating one more minute.
7. Place poached egg on top of hot mexican leftovers.
8. Sprinkle with shredded cheese....

Ole! This is our way of having our leftovers the next day for breakfast or brunch. K-man loves a fried egg or poached on top....the more runny the better! Try jazzing up your doggie bags...it's fun!

Saturday, May 23, 2009

Chicken and Waffles?

Or hot chicken salad? Hard to decide...


I love buying the rotisserie chicken and shredding it up (@ 4.99 on sundays) and making fun stuff with it (enchiladas, pot pie, white lasagna). But as much as we love chicken salad...my creativity wants to kick in. I heard of Hot Chicken Salad casserole and as I searched around on allrecipes for some ideas one thing stood out....I like celery but I am not a fan of it hot and mushy. I enjoy the crunchiness of it but I guess having it in stuffing is the only way I do like it hot....

Easy Hot Chicken Salad and Waffles

2-3 cups chicken, cooked and shredded
1 can cream of chicken soup
1 cup mixed vegetables, cooked
1/4 cup mayonaisse
1 cup cheddar cheese, shredded
French's onion rings
waffles

Using your leftover waffles from breakfast or the premade toaster variety will work here, get them heated and ready to go.

In a small dish, cook your mixed veggies in the microwave (these take a little longer to cook, hence why they are not included in the next step). In a medium bowl, put your shredded chicken, soup and mayo in a bowl to mix. Nuke this creamy mixture to get it warmed through. When the veggies are cooked enough....add them to the creamy chicken mixture. Continue micrwaving the mixtures until hot. Add cheese and stir through. Heat for another minute until cheese melted.
Arrange your waffles and pile on your creamy chicken mixture and top with onion rings. Place under broiled until browned (I cheated here and used the kitchen "blow torch") lol