Friday, April 30, 2010

Lime Thyme Chicken

Need another recipe idea for an easy grilling marinade? Here you go....

Lime Thyme Chicken

Lime Thyme Chicken


Ingredients:
2 tbsp. lime zest
1/3 cup freshly squeezed lime juice
2 cloves garlic, crushed
2 tsp. fresh thyme leaves
1 tsp. salt
1 tsp. black pepper
2 lbs. boneless chicken breasts
2-3 tbsp. melted butter
sliced avocados

Directions:
Combine the lime zest, lime juice, garlic, thyme, salt and pepper in a large zipper-lock plastic bag. Seal the bag and shake well to blend. Place the chicken in the bag with the marinade, pressing out excess air and sealing once more. Refrigerate and let marinate for 2 hours.

Remove the chicken pieces from the marinade and place on grill, reserving the leftover marinade. Brush the top of each piece of chicken with melted butter.

Grill chicken until juices run clear. Halfway through grilling, pour/brush the remaining marinade over the chicken. Once fully cooked, cover loosely with foil and let rest 10 minutes before serving. Transfer to a serving platter, garnish with slice avocados and serve.

Lime Thyme Chicken1

Sprinkle a bit of lime on top of your avocados as well....great flavor of chicken with the creamy avocado. YUM!

Enjoy!

Thursday, April 29, 2010

Brownies on Steroids?

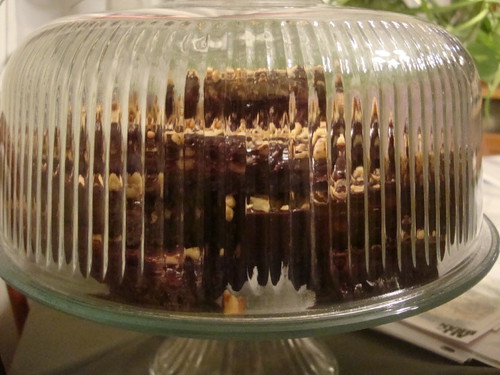
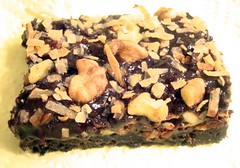
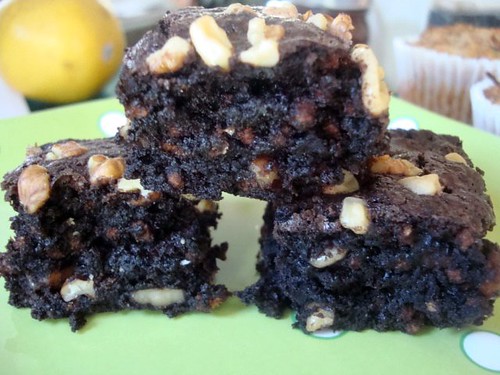
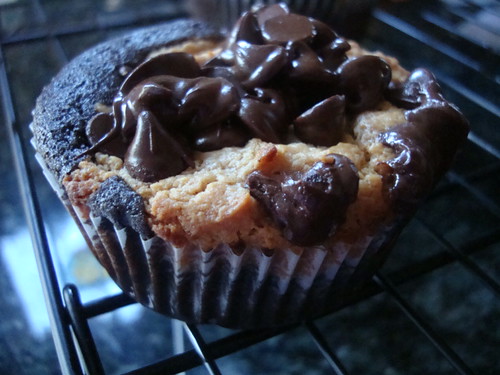
The Incredible Hulk of Brownies needs to be put in a glass jail for your safety?

Mystery Goodie!

Um, that is a definite YES....for the safety of your waistline....keep under lock and key. I found this recipe on the 
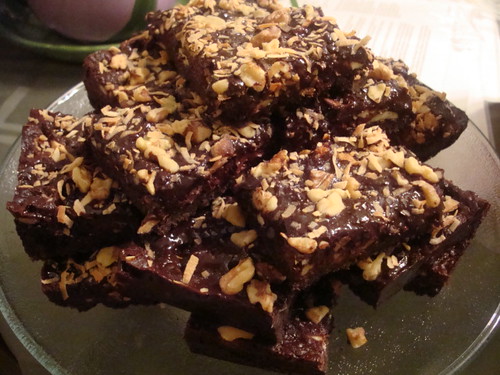
Cutting Edge of Ordinary. I saw them and said "these look a lot like those Magic 7 layer bars made with sweetened condensed milk".... Sure enough...they are. OH MAN a chocolate version of an already decadent bar cookie? My waistline is in TROUBLE.

Brownies on Steroids?

I was in trouble alright when I was in the middle of making it and realized what I thought was sweetened condensed milk in the pantry was evaporated milk. OH SNAP! Quick run to the computer to look up how to make your own sweetened condensed milk (I'd seen it before yet never tried it).

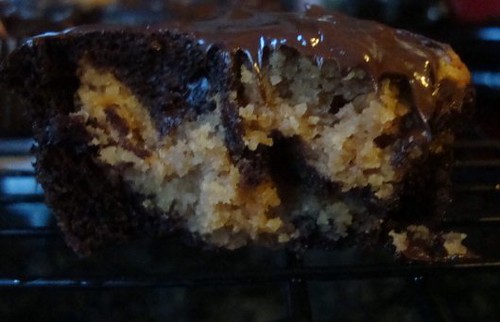
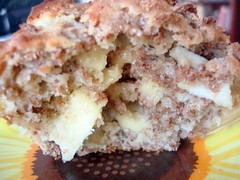
These babies are rich. See the size of these squares?....Half of that will suffice a sweet tooth.... unless you are having a super stressful day, then eat TWO big ones.

Death by Black Magic Bars

adapted from Lisa's The Cutting Edge of Ordinary recipe

1 & 3/4 cup all-purpose flour
3/4 cup confectioner’s sugar
1/3 cup baking cocoa (I used the Hershey's Dark)
3/4 cup cold butter (1 & 1/2 sticks), cut into 1-inch squares
14 ounce can sweetened condensed milk *(see recipe for emergency below)
1 teaspoon pure vanilla extract
1 cup Coconut Cream Hershey's Kisses, chopped
1 cups semi-sweet chocolate chips
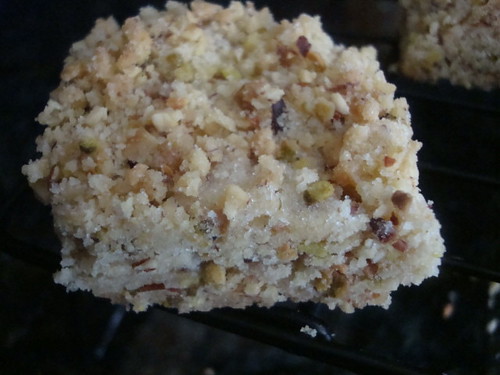
1 cup coarsely chopped toasted pecans
1/2 cup shredded, sweetened coconut
1/3 cup English toffee bits or Heath Bar bits (toffee with chocolate)

Oven to 350. In a food processor, combine the flour, sugar and cocoa. Add the butter and pulse just until the mixture resembles coarse crumbs. Press into the bottom of a well-greased 13×9″ baking dish. Bake on center rack at 350 for 10 minutes.

While crust is baking, combine condensed milk, vanilla extract and 1 cup of chopped Coconut Cream kisses in heavy-bottomed saucepan and cook over low-medium heat, stirring constantly, until mixture is smooth. When crust has cooked for 10 minutes, remove from oven and pour chocolate mixture directly over crust, spreading gently with a spatula if necessary.

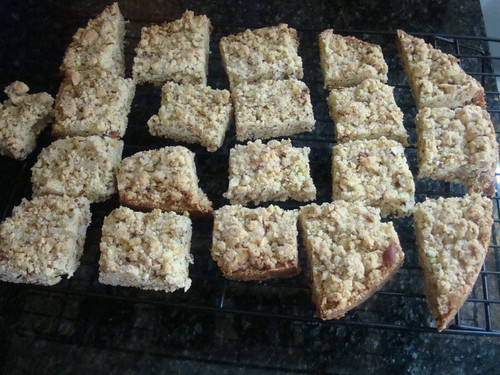
Sprinkle top with coconut, nuts, heath bar bits and 1 cup chocolate chips. Press down to set, and return brownies to oven to continue baking at 350 for 18-20 minutes. Remove from oven, allow to cool, and cut into squares of desired size.

Brownie on Steroids?

*For the rare emergency that you don't have Sweetened Condensed Milk when you need it....

Homemade Sweetened Condensed Milk

Ingredients:
3/4 C. sugar
1/2 C. water
1 C. plus 2 T. powdered milk

Preparation:
Combine all ingredients. Heat to boiling. Cook until thick, this will take 15 to 20 minutes.
This equals one can.

Notes:
This is a great way to make this milk, especially if your recipe calls for it and you don't have any in the house. It is lot cheaper to make it this way, and it does work nicely for baked goods.

Thanks Lisa.....awesome recipe! I made sure I brought some to work and gave some to my neighbor for no way I was letting all that BLACK MAGIC hit my hips! Besides....it's good to share. Thanks for sharing Lisa, you DA BEST!

Enjoy!

Wednesday, April 28, 2010

Easy Corn Pudding

I was in the mood for making some corn pudding with dinner. Holy cow, I didn't realize that I had so many corn pudding recipes....

Some with corn kernels, some not. Some with creamed corn only or some with regular corn AND creamed corn.
Some with cornmeal or some with corn muffin mix.
Some with buttermilk or some with sour cream.
ACK!!!!


And the winning corn pudding recipe choice? From She's Becoming Doughmesstic. Susan has such a myriad of recipes....she's fancy one day, down home the next, decorating cakes or catering. Emulating Julia Child....living on 100 bucks for food for the month (with a family of 3) Yep, she's a regular box of chocolates, I tell ya!

I love some recipes on occasion when you open the can/box, mix and bake. Done!

Corn Casserole
found on She's Becoming Doughmesstic....

1 (14 oz) can cream style corn
1 can whole kernel corn (I just filled the 'creamed' corn can with some frozen)
1 (8oz) package Jiffy Corn muffin mix
1 cup sour cream
1 stick butter, melted
1 egg, beaten
1-1 1/2 cups shredded Cheddar

Preheat oven to 350 degrees. In a large bowl, stir together both corns, muffin mix, egg, sour cream and melted butter. Pour into greased 8X8 dish/pan. Bake for 45 minutes, or until golden brown. Remove from oven and top with cheese. Return to oven for 5-10 minute or until cheese is melted. Let stand for at least 5 minutes and then serve warm.


Cooks Notes:
  • I've had many versions and some are on the sweet side and some more savory. Although, this was tasty and moist, I was conflicted since the cornbread part was sweet and the cheese on top was not. I normally enjoy a sweet and salty combo. Since I enjoyed the EASE and how moist and corny this was, I'd just adjust the sweetness by substituting the creamed corn with another whole corn whirred in the food processor. That should cut down on some of the sugar. Texture-wise, LOVED this recipe.
  • OR I can nix the cheese and just enjoy it's sweetness.
  • I emailed Susan from Doughmesstic for her link to the recipe and she TRIED to credit Paula Deen....so I trotted over to the 'butter queen bible' and NOPE Paula didn't use egg or cheese in my cookbook. So, good try Susan....it's a DOUGHMESSTIC recipe....unless Paula is losing her mind and makes 10 different versions....well no WONDER....

Enjoy!

Tuesday, April 27, 2010

Impossible Coconut Pie

Do you like coconut? Do you like creamy custard like pies? Do you like EASY!!!!

Nah, I didn't think so.

I haven't made an impossible pie in years. They have many versions now. I stumbled upon this coconut one and I was happy because, less crust means less fat and calories.

So tasty and light!

Easy Impossible Coconut Pie
adapted from bettycrocker.com

1 cup flaked or shredded coconut
1/3 cup splenda
1/2 cup Original Bisquick® mix (reduced fat type)
1/4 cup butter or margarine, softened
2 cups fat free evaporated milk
1 1/2 teaspoons vanilla
4 eggs

1. Heat oven to 350°F. Grease 9-inch pie plate with shortening or cooking spray.
2. In medium bowl, stir all ingredients until blended. Pour into pie plate.
3. Bake 50 to 55 minutes or until golden brown and knife inserted in the center comes out clean. Cover and refrigerate any remaining pie.

Impossible Coconut Pie1

Cooks Notes:

  • I made the original version and the second time with splenda and the FF evaporated milk. I couldn't get over how still rich the FF evaporated made this pie...I find skim milk doesn't cut it richness-wise in some recipes.
  • I didn't want to get TOO extreme by using egg beaters and smart blend butter.....perhaps another time.

Enjoy!

Monday, April 26, 2010

Quesadilla Burgers!

It's grilling season KIDS! We wanted something fun and original to kick off the season. "Nacho" ordinary burger HERE!.....

Quesadilla Burger

Quesadilla Burger
JennyMac's Lipsmack

1 lb pound lean ground beef
1 cup salsa, drained of liquid
1 tbsp. McCormick's Montreal Steak Seasoning
1 tbsp. Taco seasoning
8 oz. Pepper Jack Cheese (yes, they make lower fat version now!), sliced
1 tomato, sliced
shredded lettuce
2 large tortillas
extras, ketchup, mustard, mayo

Mix ground beef, salsa and taco seasoning in a large bowl. Press into one LARGE burger* (slightly larger than your tortilla) Sprinkle steak seasoning on both sides and grill until center is the temperature of your favorite (medium, rare, well done). Place cheese on burger for last minute to melt and the tortillas on the upper rack to 'warm and toughen' up a bit.

Place tortilla on cutting board, then tomato, burger, lettuce and finish with tortilla. Cut into quarters or sixths with a serrated knife.

Quesadilla Burger


We just dipped our burger quarters in our ketchup. This keeps the tortilla from sliding all around and making it more messy to eat. These were fun and Tasty!

*I realize that a large burger will be difficult to handle for you. If you have a pizza peel (we have a metal one) putting it on the grill and flipping it is a breeze. But if you don't, chill burger until firm before you put it on the grill and put it on with TWO hands. Use two turners to lift it onto a plate. Invert it onto another plate and slide it back on the grill.

OH before I sign off....Looky what I found in my tortilla bag....

Do you know what you are looking at yet?

Someone in the Mission Tortilla factory wasn't paying attention! When they changed from whole wheat dough to flour dough.....the quality inspector blinked or sneezed or something....

and missed this SPECIAL tortilla. Half flour and half low carb. My package was for 8 tortillas. THIS WAS A BONUS or 9th tortilla. How fun. I am sure there are some unappreciative people out there who would call/write and complain about this error to the company.

I said "SCORE." I kinda don't wanna eat him either....I could put it up on e-bay next to the Virgin Mary toast....

Enjoy,

Sunday, April 25, 2010

Cascadian Farm Giveaway

What did you do to on Earth Day? Hopefully you aren't one of those people who only do something "GREEN" on Earth Day.

Everyday should be Earth Day!

I am not sure when I first heard the term of "green" (not being a color) but it seems that I've always known that I need to conserve energy and preserve Mother Earth.

Rookies of 'being green' can start with recycling, reusing and reducing with many little things and working their way up. No one expects you to live in a grass hut and eat 100% organic from your own yard as a lifestyle but if everyone just did some little things, everywhere....it could make a HUGE difference.

So to encourage you to think outside the box and keep treating each day as Earth Day, let's keep the 40th anniversary going...

I am hosting a "Live Green Together" prize pack from Cascadian Farm provided by MyBlogSpark! It has cereals and granola bars, including: Fruitful O´s cereal, Cinnamon Crunch cereal, Chocolate Chip Chewy granola bars, Dark Chocolate Almond Granola, Dark Chocolate Almond granola bars, Oats & Honey granola, and an eco-friendly grocery bag.

How do I enter, you are asking?

First- I'd like you to go to Cascadian Farm page on Facebook. Choose from eight different pledges, ranging from reusing clothes to reducing your speed while driving on the highway, and find the one that fits your lifestyle. For each person that signs a pledge now through May 31, 2010, Cascadian Farm will donate $1, up to $40,000, to the Organic Farming Research Foundation, which fosters the improvement and widespread adoption of organic farming systems.

Second, leave a comment here telling me what you are doing to be GREEN to enter for the GINORMOUS prize pack. I was lucky enough to get one as well....oh my....we gots FIBER for months here! WOW. K-man already snagged the two boxes of granola bars to take on his bike rides!

BUT WAIT....you can have a second ENTRY for this giveaway!!! Become a Fan of JennyMac's Lipsmack Facebook page and leave a comment there about being a new fan and you have a second chance!

Winners will be announced next Sunday May 2 (the first day of our local Farmer's Market- yay support your local farmers!!!) I will contacting you for your address to send to MyBlogSpark so they can send off your HUGE box of organic goodness!

Huge Thank you to Cascadian Farm and MyBlogSpark for these wonderful products for my family and my fans to devour!!!

Giveaway is NOW CLOSED! Thanks for visiting!


It can be easy being Green,

Saturday, April 24, 2010

All-Bran® Bran Buds® Brownies

Yes, I know, hard to believe there is BRAN in here!

I promised some Brownies made with bran from the cereal I got from my Tastemaker samples and here they are....YUMMMMMMMMMMMM. So moist. If you think BRAN makes things DRY and all 'fibery' tasting....you are WRONG!

All-Bran® Bran Buds® Brownies
from all-bran.com

Ingredients
2/3 cup all-purpose flour
1/4 teaspoon salt
1/2 cup cocoa powder (I used Hershey's Dark)
2 eggs
1 cup sugar
1/2 cup All-Bran® Bran Buds®
1 teaspoon vanilla
1/2 cup margarine or butter, melted, cooled
1/2 cup chopped walnuts

Directions
1. Stir together flour, salt and cocoa powder. Set aside.

2. In large mixing bowl, beat eggs until light. Add sugar gradually, beating until fluffy. Fold in KELLOGG'S ALL-BRAN cereal, vanilla and margarine. Fold in flour mixture and walnuts. Spread evenly in 8 x 8-inch pan coated with cooking spray.

3. Bake at 350° F about 30 minutes or until wooden pick inserted near center comes out clean. Cool completely in pan.

Definitely being made AGAIN,

Friday, April 23, 2010

Mexican Combination Dinner?

I haven't tried making my own pupusas yet. I will I promise. I have the recipe I am gonna try but until then...this is how we eat them.

What?

You don't know what a pupusa is?

It is like a cheese or bean filled tortilla.

Yes, FILLED.

They are popular here due to our Salvadoran residents who have immigrated here.

I can bang out tortillas easy....but making a pupusa takes a bit more skill.

We like to JAZZ up our pupusas.

If you have taco meat leftover in the freezer (I always do, so we don't get sick of eating Tacos for too many nights in a row). Instead of using a tostada shell...put it on a PUPUSA. Hopefully you have a latino section of your grocery to get these. If not you will have to come back another day when I finally make a pupusa from SCRATCH!


Taco Topped Pupusas
JennyMac's Lipsmack

4 pupusas (premade from grocery store in refrigerated Hispanic section)
1 cup taco meat (leftover or premade from Taco Bell/El Paso in meat section)
1 ½ cup shredded cabbage (bagged in produce section)
2 tsp. cider vinegar
1 tsp. sugar
½ tsp. salt
½ tsp. pepper
¼ cup pepper (green or poblano) julienned or chopped
1/4 onion sliced
sour cream and salsa for garnish

Bake pupusas in 350 degree oven to heat while you prepare the toppings.

In medium bowl, place cabbage, vinegar, sugar, salt, pepper, onion and pepper. You may want to taste so the seasoning or balance of sweet and sour balance is good for you!

Heat up taco meat in microwave.

Plate your pupusas, top with taco meat, top with cabbage mixture, top with sour cream and a bit of salsa.

Of course, we always try to have fresh avocado whenever we can!!

I'd like to see THIS for a menu selection in our favorite Mexican Restaurant.

Here Mexico meets El Salvador by a gringa's hands!

Delicioso!

Thursday, April 22, 2010

Strawberry Muffins


Strawberry Muffins

2 cups all-purpose flour
3/4 cup sugar
2 1/2 teaspoons baking powder
1/4 teaspoon baking soda
1/4 teaspoon salt
1 cup milk
1/2 cup vegetable oil
2 large eggs
1 1/3 cups chopped strawberries 0r any other berry or combination.
sugar for sprinkling on top

Directions:

Position a rack in the center of the oven and preheat to 400°F. Lightly butter twelve 2 1/2-inch muffin cups or place paper muffin cups in the muffin tin.

In a medium bowl, whisk the flour, sugar, baking powder, baking soda and salt to combine and make a well in the center. In another medium bowl, whisk the milk, oil and eggs. Mix well and pour into the well. Stir just until blended. Fold in the berries. Spoon equal amounts of the batter into the muffin cups, filling them about three-fourths full. Sprinkle some sugar on top.

Bake until a toothpick inserted into the center of a muffin comes out clean, 15 to 20 minutes. Cool in the pan for 5 minutes. Remove the muffins and serve warm or cool on a wire rack.


Very moist!

Very Berry!

Great for snacking or for a quick breakfast!

Wednesday, April 21, 2010

Spinach Stuffed Potatoes

We love twice baked potatoes!

We love spinach!

Who says we can't put the two together?

No one.

This recipe is for two but you can change the amounts to make for your family.

Just keep tasting the mixture before you stuff your potatoes until it is the way you want!


Spinach Two Baked Potatoes
JennyMac's Lipsmack

1 russet potato, cleaned and cooked in microwave until soft
4 oz. reduced fat or Fat Free cream cheese
1 cup frozen chopped spinach, thawed and squeezed dry
1 tsp. dried onions
¼ tsp. garlic powder
1 tsp. salt
1 tsp. pepper
1 c. cheddar cheese, shredded (regular or 2%)
¼ c. milk or cream

1. Preheat oven to 400 degrees.

2. Microwave potatoes until soft. Cut in half and scoop out potatoes leaving 1/4 inch on skin.

3. Place in medium bowl the hot potatoes and mix with cream cheese until combined. Add spinach, onions, garlic powder, salt and pepper and milk/cream. Taste for seasoning to your liking.

4. Add half of the cheese to potato mixture and scoop into potato shells. Bake for 20-25 minutes or until hot. Add remaining cheese on top to melt and serve.

Enjoy!

Tuesday, April 20, 2010

Chocolate Peanut Butter Layered Cupcakes

I am always in the mood for Chocolate and Peanut Butter Combinations! I found these on Pillsbury's site!

Chocolate Peanut Butter Layered Cupcakes
from Pillsbury.com

1 1/2 cups all purpose flour
1/3 cup baking cocoa (I used Hershey's Dark)
1 cup packed brown sugar
1 teaspoon baking soda
1/4 teaspoon salt
1/3 cup oil
1 cup water
1 tablespoon white vinegar
1/2 teaspoon vanilla
1 egg
1 package (8 oz) cream cheese, softened
3/4 cup peanut butter
1/3 cup granulated sugar
1/3 cup powdered sugar
1/4 cup peanut butter chips
1/4 cup semi-sweet chocolate baking chips


1. Heat oven to 350°F. Place paper baking cup in each of 18 regular-size muffin cups.
2. In large bowl, mix flour, cocoa, brown sugar, baking soda and salt. Add oil, water, vinegar and vanilla to flour mixture, stirring just until smooth (do not overmix).
3. In another large bowl, beat egg, cream cheese, peanut butter and granulated sugar with electric mixer on medium speed until smooth. Add powdered sugar; beat until creamy.
4. Spoon 1 level tablespoon chocolate batter into each cup; evenly spread 1 level tablespoon peanut butter filling on top. Repeat layers. Sprinkle with peanut butter chips and chocolate chips.
5. Bake 25 to 30 minutes or until toothpick inserted in center comes out clean (do not overbake). Cool in pan 15 minutes. Remove from pan to cooling rack; cool 15 minutes. Serve warm or cool.

Recipe says makes 18.

We shared with two neighbors. One was moving and this was my goodie for them in case they got hungry during the move. The remaining ones I left for K-man and I were gone in 3 days!

Easy and so yummy!

Monday, April 19, 2010

Mac and Cheese?

Is it or isn't it?

Looks are deceiving for sure. This is my FAUX Mac and Cheese made with cauliflower!

Faux Mac and Cheese
JennyMac's Lipsmack

1 bag (14 oz) frozen cauliflower
2 cups cheese, shredded (I used half sharp and half 2%)
½ c. egg substitute
1/4 cup milk/cream or Fat Free evaporated milk
1/2 tsp. salt
1/2 tsp. white pepper

TOPPING:
1 c. bread crumbs
1/2c. French’s onion rings, crushed
½ tsp. garlic powder
½ tsp. salt
½ tsp. pepper
1 Tbsp. butter

Preheat oven to 350 degrees.

Place bag of cauliflower in microwave and cook at 1 minute intervals until hot (rotating and turning over with each-took me about 4 intervals) Drain in colander and cool slightly.

In medium mixing bowl, add cheese(s) egg substitute, milk and seasoning. Mix well.

In a small bowl, mix ingredients for topping. Mix well.

Chop cauliflower into pieces that would resemble the size of elbow macaroni (I used a pair of kitchen shears in bowl). Add to egg cheese mixture and mix well.

Place cauliflower mixture into greased 1 quart casserole and top with bread crumb mixture.

Bake for 30 minutes until firm and bread crumbs are browned.

Lipsmacking Notes:
  • Very yummy! If you are going for the lower carbs, omit the crumbs. K-man loved it and he's the picky one about his Mac and Cheese!
Enjoy!

Sunday, April 18, 2010

All Bran Tastemaker!

I remember watching my uncle eating Bran cereals for breakfast after his triple bypass. Poor guy I was thinking as I bit into my bacon. We only had Cracklin' Oatbran or Raisin Bran for cereals (no froot loops or cocoa pebbles for me growing up!) So bran wasn't always on my FAVE list. As I've gotten older and wiser, I know NOW bran is not my enemy and fiber is essential in our diet.

Lucky me, got sent some ALL-BRAN cereal samples from Kellogg's courtesy of Foodbuzz's Tastemaker Program.

I was sent All-Bran® Original, All-Bran® Bran Buds® and Complete® Wheat Bran Flakes. Kellogg's also sent a few recipe cards for me to try and a letter informing me that they do have a website with more recipes....yeah 400 of them. Is it really possible to have that many recipes to incorporate fiber into our diets? YUP!

I found at least 7 new recipes and printed them out since I have a plethora of bran cereal to use now! I found a Honey Muffin recipe but in true Lipsmack fashion....I had to tweak it.

Apple Honey Muffins
adapted from all-bran.com
Servings: 9 regular muffins, 6 texas size muffins

Ingredients
1 cup all-purpose flour
1 teaspoon baking powder
1/4 teaspoon baking soda
1/4 teaspoon salt
1 cup All-Bran® Original
1/3 cup buttermilk or sour milk
1 egg
1/2 cup honey
1/4 cup butter
1/2 cup dried apples, chopped (the ones from Wal-mart are super soft)
For Sprinkling on top: extra All-Bran® Original and 2 Tbsp light brown sugar


Directions
1. Preheat oven @ 400°F

2.Stir together flour, baking powder, soda, salt and chopped apples. Set aside.

3. In medium mixing bowl, combine Kellogg's® All-Bran® cereal and buttermilk. Let stand about 2 minutes or until cereal softens. Add egg, honey and butter. Beat well. Add flour mixture, stirring only until combined. Portion evenly into 6 texas sized muffin cup that have been sprayed with non-stick spray or lined with muffin papers. Original recipe says it makes 9 regular.

4. Sprinkle with some more All-Bran® Original and some light brown sugar on top.

5. Bake at 400°F about 25 minutes or until golden brown. Serve warm.


ALL-Bran's NOTE:

Variation: To make sour milk, stir 1 tablespoon vinegar or lemon juice into 1 cup milk.

To substitute milk for buttermilk or sour milk, omit buttermilk or sour milk and use 2/3 cup milk, 1/4 cup honey, 2 1/2 teaspoons baking powder and omit baking soda.

Lipsmack Notes:
  • These were yummy! I am now thinking about making a berry one now. Will it have a filling? Hmmmm.

Come back soon for the Bran Bud Brownies!

Thank you Foodbuzz and Kellogg's....these were great to have and play around with! Love it!

Don't be hatin' on Bran anymore!

Saturday, April 3, 2010

A blogger has died and gone to heaven...

Well, to Chocolate World....also known as....Hershey Pennsylvania!

Yeah this is my cropped pic of the 2oo dollar haul of souvenirs, mementos, treats for K-man and future baking posts!

Have any of you been to Hershey's PA? I live only 2 1/2 hours away and never have gone. Don't say shame on me! Blame my parents....they never took me nor had the desire to go. I also had to take myself to Disney World as well 4 years ago!

As my birthday present, I told K-man I wanted a trip to Hershey while we had the time also known as SPRING BREAK. We planned a mid week trip left Wednesday and came back on Friday. (OH MY, you should have seen the line on the way into Hershey for the FIRST day opening of Hershey Park!!! We didn't care cuz we were LEAVING...lol)

First, I have been to many an amusement park, we were not going there to ride the rides @ Hershey Park. I wanted to check out the chocolate! Second, I wanted to go to Hershey when it wasn't crazy from park attendees - middle of the week and BEFORE the park opened for the spring season was ideal!

I had read the book The Emperors of Chocolate (the story of Hershey vs. Mars) and I was intrigued. Milton Hershey was all about community and giving back. His school is attended by 1500 kids of NEED (stopping myself from going on, because it's an amazing story). Just the story about how he worked for years to make milk chocolate perfect, makes me shake my head how he worked so hard wavered on the brink of bankruptcy a few times. Also, are many people who think Hershey's chocolate is awful (but doesn't everyone have their OWN opinions about ANY/EVERY product?)...but he was only trying to make it available for average and poor people...chocolate was for the rich (again, there is so much more to this story....stopping myself).

For family fun...the Hershey Park is the way to go. I think the parking lot for it is bigger than the park. I can't speak of the rides and park itself for we "jetted" before it opened for the season.

Much of Hershey is all about the history and philanthropy:
  • The Hershey Story museum is a self guided tour seeing the artifacts of Hershey's life.
  • The Trolley ride through town is a physical trolley ride around all the buildings (actually I learned more detail about the school through this trip than I did reading books-the kids on the trolley were getting wiggly impatient- was it because they were JACKED on chocolate?)
  • Big 3D show, very cartoon-y for the kids....you smell smells, get rained on...hokey cute but the kids loved it.
  • Chocolate Tour - a ride that SUBSTITUTES a factory tour. Singing cows, videos of chocolate bar productions, simulated candy on conveyor belts....It was fun (getting off and on the ride car was cool-room in perpetual motion thing)
There are many places to actually experiment with chocolate.
  • Cafe Zooka (in the Hershey Story Museum)just a little sandwich/coffee cafe that offers a Tasting of chocolate shooters (for 13 bucks) to enjoy 6 different sauces from chocolate beans from 6 different countries,
  • The Chocolate Lab -you can sign up for classes to make things from chocolate (they were making Spring Tulips with balloons during our visit).
  • In Chocolate World (down the street two blocks) the kids can sign up to be an apprentice and package some chocolate kisses. The get a employee id badge, hat, box of kisses they packaged and a picture of the process. (Don't ask me the price....I didn't look into it since I couldn't play)
  • You can get your picture put on a Chocolate bar or bottle of syrup.
  • Coming this spring, you will get to customize (nuts, rice crispies, graham cracker bits, peanut butter, etc) your own chocolate bar....DRAT...too early for the next exhibit!
  • Chocolate Tasting in Chocolate World was a classroom setting where you were more educated about chocolate and the tones and flavors and pairings, etc. You receive a 'Master's in Chocolate Tasting' (I didn't understand why parents were taking small children in for this...I can't see them caring about the different beans or the world and how they taste....all they want is chocolate in any shape or form!?)
I could not GET OVER the amount of free samples that were given out.
  • On the trolley ride...a dark kiss, then a hug....then a regular kiss....then a mini peanut butter cup. Although, great for us adults...not sure it's good idea with young kids who are trapped for an hour listening to an old guy speak of Hershey History. At the end of the trolley ride you received a regular Hershey Bar when you stepped off the trolley.
  • We got a peppermint patty after the Chocolate Tour ride.
  • We got sour filled twizzlers from the 3D show.
We planned when to do 'the SHOPPING'.....

I had to decide....we DO I get from Chocolate World? OMG...chocolate and candy everywhere!!!....A chocoholics best dream or nightmare!!! (yes, there were shirts, keychains, hats, and a million other souvenirs)....
SO- K-man picked up a basket and braced himself....for he knew a FOOD BLOGGER was on the PROWL!!!


(seen here DARK reese pieces..., chocolate toffee baking bits, COCONUT kisses, cinnamon chips, DARK miniatures, DARK reeses cups.- except for the almond joy pieces NONE of these are available in our area.)


Instead of me putting all my pix on here....I embedded a slideshow from flickr...

You will be seeing my new apron, the HUGE 5lb candy bar (I am donating that to our school's Silent Auction), extra long twizzlers for classrooms rewards, some other products I have never seen or tried, cookbooks for me the blogger, K-man eating, picturesque Hershey from the trolley.


If you have any questions about my STUFF or suggestions what to make with them...go to my JennyMac Lip Smack Fan Page on Facebook (link on the right side margin) where we can chat more !!!

I highly suggest you visit Hershey! If you haven't....don't wait until your 44th birthday like me!

Chocoholic for life,

Friday, April 2, 2010

That's the way the cookie crumbles...

And a HUGE one at that!

I saw these one my Cookie a day email from MarthaStewart.com. I love simple-quickie-like cookies but I also love a shortbread cookie. This was perfect.

Giant Nut Crumb Cookie
adapted from MarthaStewart.com

1 1/2 sticks unsalted butter, room temperature, plus more for pan
1 1/2 cups finely ground nuts, toasted slightly (I used almonds and pistachios)
1 3/4 cups all-purpose flour
3/4 cup sugar
1/4 teaspoon table salt
1 1/2 teaspoons pure vanilla extract

  1. Preheat oven to 350 degrees. I put the nuts on a cookie sheet while the oven preheated to get a little 'toast' on. Butter a 10-inch springform pan; set aside. In a large bowl, whisk almonds, flour, sugar, salt, and vanilla. Cut in butter with a pastry cutter until mixture is crumbly. Work in butter until completely incorporated with no dry crumbs.
  2. As you start to smell the nuts, take them out of the oven and whirl them around in the food processor until fine. Mix into crumb mixture.
  3. Transfer all but 1 1/2 cups of mixture to pan. Press mixture into pan to compress dough (I used the bottom of a custard cup to make it easily even). Sprinkle with reserved 1 1/2 cups of mixture; transfer to oven.
  4. Bake, rotating pan two to three times, until cookie begins to turn golden, about 25 minutes. Reduce temperature to 300 degrees. bake until golden brown and fairly dry, 15 to 20 minutes more. Transfer to a wire rack to cool completely. Remove from pan. Store in an airtight container for up to 3 days.
The recipe suggests to serve whole and break into chunks when serving for affect. I knew crumbs would be 'flying' all around if broken at the table. I used a pizza cutter to make it a bit neater.

Can you tell how many pieces above are missing that I had to sample for quality control?

I love the little bits of pistachio. So simple yet so delicious!

Enjoy!

Thursday, April 1, 2010

Stuffed Peppers as a sidedish


Mushroom and Rice Stuffed Peppers
created by JennyMac

2 green peppers
1 package of favorite flavored rice (I used Uncle Ben's Chicken Rice)
1/2 cup cooked mushrooms, chopped
1/4 cup green onions, chopped
1 cup cheddar cheese, grated (divided 3/4 cup and 1/4 cup)
1 tsp. freshly ground pepper

Preheat oven to 350 degrees.

Slice peppers in half, core, seed and de-vein. Prepare rice according to package directions. Under cook rice by five minutes since you will be baking this in the peppers later. Rice will seem a bit wet, this is okay.

Mix mushrooms, green onion with 3/4 cup cheddar cheese and pepper. Mix in cooked rice and scoop into pepper halves and press gently. Bake for half hour or until peppers are soft or tender crisp. Top with last 1/4 cup of cheese and let melt while you prep the rest of your dinner.

Your double dose of veggies, your starch and some dairy to round out your protein for dinner. This went great with our baked chicken!

Enjoy!