Friday, July 31, 2009

A marriage made in heaven...

Not ham and cheese or eggs and bacon but chocolate and peanut butter!


I found these chocolate cookies and they used cherry flavored Chips. Ick, not my thing. As always I played with it...

Peanut Butter Chips and Peanuts! YUM!

Chocolate Peanut Butter Chip Cookies

1 cup butter
1 cup white sugar
3/4 cup brown sugar
2 eggs
1 tsp. vanilla
1 3/4 cups flour
1 1/4 cups cocoa powder (I used Hershey's Dark Chocolate Cocoa Powder)
2 tsps. baking soda
1/4 tsp. salt
1 bag of Reese's Peanut Butter Chips
1 cup dark chocolate chips
1 cup lightly salted peanuts

1. Preheat oven to 350 degrees and use a cookie sheet with a silpat liner.

2. In a large bowl, cream together the butter and sugars until light and fluffy. Slowly add eggs and vanilla until well combined.

3. In another bowl, combine the flour, cocoa, baking soda and salt. Slowly add to wet ingredients then stir in white chips and cherry chips. Using a medium cookie scoop, drop by rounded spoonfuls onto the prepared cookie sheet.

4. Bake for 9-11 minutes, should still be soft in center. ESSENTIAL: Allow cookies to cool on baking sheet for 5 minutes before removing to a wire rack to cool completely.

3 dozen cookies

I love the rich intensity of the chewy dark chocolate and the bits of peanut butter and crunchy, slightly salty peanuts. Great with my coffee! Breakfast of champions!

Enjoy!

Thursday, July 30, 2009

A new look for Lipsmack and one for pizza...

HI GUYS!!!

Sorry, I've not posted in awhile. I've been "under construction". The transition to a new web design is nothing like flipping a switch, I tell ya. Just my usual posting, taking pictures, editing pictures is arduous enough as a food blogger....so....

In honor of my new look...I have a new look for pizza for you...

As a salad!


Nothing is more refreshing in the summer as a pasta salad...especially if it's tweaked pizza style!


Pizza Pasta Salad

Half a box of your favorite spiral pasta
6 Tbsp. oil
1/3 c. grated parmesan cheese
1/4 c red wine vinegar
1 tsp. oregano
1/2 tsp salt
1/2 tsp. garlic powder
1/2 tsp. pepper
1 c. halved cherry/grape tomatoes
1 c. cubed cheddar cheese
1 c. cubed mozzarella cheese
1/2 c. green onions (I used red onion slices- seemed more 'pizza-like')
1/2 c. pepperoni
optional I also added fresh chopped basil, sliced black olives and mushrooms!

Cook pasta. In a jar with a tight lid - combine oil, parmesan, vinegar, oregano, salt, garlic and pepper. Shake well. Drain pasta. In a large bowl, combine rest of ingredients. Add pasta and dressing. Toss, cover and chill for 1 hour.


I enjoyed this very much yet K-man wasn't a fan just because he likes 'man-food' and prefers his salad standard with ranch. As for pasta salad, just a plain macaroni for him (boring!)

Enjoy!

Tuesday, July 21, 2009

Bread in 5 minutes? Yeah sure!

Weeeeelllll, not EXACTLY 5 mins. But a lot faster than any other bread I've made!!!

Let me go over the process a bit...then include the recipe afterward:


Water @ 100 degrees, plus 1 package of yeast, and salt. Mix a bit. You don't even have to worry about all the yeast dissolving they said in the instructions.

Dump in your flour and mix just until dry flour dissipates.


Put dough into a container (not airtight) and let rise for 2 hours.


Here it is after two hours.


YAY, it worked!


Now put in the fridge until tomorrow to make your first bread. You can bake some immediately if you want too.


I only made half of the recipe from the book. I didn't want TONS of dough when I wasn't sure if it would work. So I cut the dough in half with scissors.


Put cornmeal on your parchment paper (they suggest to do it without but honestly I just didn't want cornmeal all over the oven burning for weeks).


Place your "cloaked" dough on the cornmeal. Let rest for 40 minutes. My dough was still cold and rose just a little. I let it keep rising until I doubled (perhaps 1 hr-15 mins?)


Flour top, cut slashes into dough. Place this parchment on a cookie sheet turned upside down (so you can slide it right off)


Bake in preheated 400 degree oven. Slide dough on pizza stone. Yes, I HIGHLY suggest you get one. They aren't too costly and you can use it for many things! (A later post!)

Put one cup of water in a broiler pan that is underneath your dough ....STEAM BABY!

Bake for 30 minutes.


TA-DAH!

So crispy, crusty on the outside and so soft and fluffy on the inside. I tell ya....nuffin bettah than freshly baked bread!

Oh the smell in the house!


Now the recipe but afterward read the catch:

Artisan Bread in 5 minutes
Master Recipe
by Jeff Hertzberg and Zoe Francois

1-1/2 cup of warm water (100 degrees)
1 pkg. yeast
2 tsp. salt
3 + 1/4 cup flour
cornmeal

Needs: pizza stone, container for dough storage, pizza peel would be nice, but not necessary

The CATCH:

You really need to buy the book. If you noticed my lack of instructions after the list of ingredients that is because the instructions are VERY DETAILED. Like 'cloaking'....I didn't know what that was until I read it. ALSO....if you buy the book it came to my attention that the authors made a website to correct some many many errors. Um, like the yeast amount to practically every recipe? Here's their link so you can correct the errors when you buy the book. I went through every page. I had to correct like half. I just changed it in my book. No biggie.

Lastly, Cassie (such a cutie!) from How to Eat a Cupcake made her own video and it really helped me visualize after I read the book. This is the part two. I highly recommend this book and recipe!


Artisan Bread In Five Minute A Day on Foodista

Monday, July 20, 2009

Joe, you're so Sloppy!

He SURE was! I don't even remember when the last time I had a sloppy joe! I found this recipe on Oprah's site....tried it and it was delicious. Don't be afraid of some of the ingredients....it turned very tasty!

Sloppy Joes
from Bob Greene on Oprah.com

This familiar dish can be a smart choice with a few small changes that cut calories but not any of the flavor or satisfaction.

Ingredients:
Serves 4

Vegetable oil cooking spray
1 onion , finely chopped
1 large sweet pepper , seeded and finely chopped
12 ounces 95 percent lean ground beef (I used ground turkey)
1 1/4 cups chopped fresh tomatoes , or canned no-salt-added tomatoes
1 cup canned, no-salt-added kidney beans , drained and rinsed, or cooked, mashed with the back of a fork (I omitted this, perhaps it makes the mixture thicker?)
4 Tbsp. tomato paste
4 Tbsp. cider vinegar
1/8 tsp. cloves
1/4 tsp. cinnamon
1/2 tsp. brown sugar
1/4 tsp. salt
Black pepper to taste
4 whole wheat hamburger rolls (about 170 calories each)

Heat a large skillet over medium heat and coat with cooking spray. Add the onion and
sweet pepper. Cook for 3 minutes, stirring.

Crumble in the ground beef and cook until browned; keep breaking it apart with a spoon for about 4 minutes.

Stir in the tomatoes, beans, tomato paste, cider vinegar, cloves, cinnamon, brown sugar, salt and pepper. Cook for an additional 4 minutes.

Divide the mixture evenly between the four rolls and serve.

Recipes from The Best Life Diet Cookbook by Bob Greene

Nutritional Information:
Per serving, about: calories: 415; protein: 34 g; carbohydrate: 60 g; dietary fiber: 14 g; sugars: 5 g; total fat: 6 g; saturated fat: 2 g; cholesterol: 52 mg; calcium: 72 mg; sodium: 451 mg

I know for some of you it's easier to use the canned mix to make these. But I had all the ingredients on hand....so what the heck? It was well worth it!

Homestyle Sloppy Joes on Foodista

Sunday, July 19, 2009

Yet another Monster!

*Singing to self* "Oops I did it again...."

Well, it was no accident that I made some Monster Chili Dogs...

Do you have someone in your household that has a fascination with hot dogs? For me, once in a blue moon will I want one. Of course I want only the crunchy ones with skin. But K-man would eat a hot dog with every meal or FOR every meal if he could have his way. So I decided to surprise him not with just a lil ol' hot dog for dinner but a man food -monster sized- chili dog!

Here's what you need:

Monster Chili Dogs

JUMBO franks (mom gets these for me from an Amish Store in Lancaster County PA)
can of chili or pull some out that your stored in the freezer
chopped onion
sub rolls
shredded pepper jack cheese

Chop your onion, shred your cheese, cook your dogs, heat up your chili, toast your buns. Assemble!

Looks like this:

When I say JUMBO, I meant it....here is the comparison. The other one is a Nathan's hot dog. Quite a difference...Get out your rolls now...


So when I say you need sub rolls, I mean it. A regular hot dog roll would not work...

Snug as a bug. Pile on your chili (no pic, it was too blurry, but I figured you could deal)
Add your onions....


Top on your fave cheese.


I love Pepper Jack!


I toasted mine...

But what did K-man want along with HIS chili dog?

Yup, another regular hot dog. With his fave topping of mayo and onions. He was feeling a lil crazy and add a bit of ketchup on his regular hot dog. So there you go proof of the size and what K-man had for dinner. He grabbed it and shoved it in for a bite. Contrarily, I ate mine with a fork and knife and could only eat one side of the roll! By the way, there was a cucumber salad on the side with dinner.....LOL

It's the weekend! Make something fun and messy for your man/family!

Monster Chili Dog on Foodista

Saturday, July 18, 2009

Not your average coleslaw!


If you have all these ingredients....why not make some tonight? A great compliment to your barbecue!

Tangy Cole Slaw

1 bag shredded cabbage (this is the 'angel hair' shred type - I think this is perfect)
1-2 navel oranges, peeled and sectioned
1 Tbsp. sesame oil
2 thin slices of red onion
Handful of sliced almonds, toasted
salt and pepper to taste

Toast your almonds and set aside to cool. In a bowl, mix your shredded cabbage and thin onion slices. Peel oranges and section them with a knife right above the cabbage mixture so the juices go into the bowl. After each orange is sectioned, squeeze the remaining membranes to get every bit of juice. Repeat with second orange. Add sesame oil, salt and pepper. Lightly toss. Taste. Store in fridge covered until ready to serve. Garnish with toasted almonds when ready to eat.


Cook's notes:

  • If you notice in my picture, I used mandarin oranges. Not a good idea. You really need the acidic juices from an orange to make this taste good. As you know that canned oranges are stored either in some 'light syrup or pear juice' (why they don't use orange juice is beyond me) and this would not taste good. Even though I used orange juice (the drinking kind), it wasn't the same. I made this again using the right oranges with it's juice....what a difference!
  • If you want your cabbage crunchy, serve this immediately. If you want your salad cold, they orange juices are going to 'wilt' the cabbage and the salad will have reduced in size and be a bit softer. This continue softening if you eat the salad the next day. But still very delicious and refreshing!

No Mayonnaise Cole Slaw on Foodista

Thursday, July 16, 2009

Are sure you know what to do with those two pieces?

I remember when I first cooked pork tenderloin....

"Oh cool, they give you two pieces in the package. I will cook one and save the other for later."

NOT!

Do you also know about the 'silver skin'?

When you take those two piece there is one distinct patch of silvery areas that are incredibly 'stuck' on the flesh. Many of you may just ignore it, cook it, eat away and just spit out these 'weird' chewy areas when you eat them. Cuz chewy stuff happens when you eat meat, right?

NOT!

With a knife (pretend you are a surgeon) and take the knife point and go right under the silver skin (in the middle of it) and move along the blade (either to the left or right) until the knife comes out from the silver skin. Now take that cut piece and slice right under the silver skin the OTHER way until that section comes off. Keep doing this until this 2 inch by 4 inch silver skin section is gone. And yes, you will have to do it for the other piece too. LOL

Hey, I am really sorry I don't have a pictorial for you to see me taking off the silver skin....but you have no idea how hard it is to have slimey hands, wash, dry, SNAP. Get next position, wash hands, dry, SNAP! It's a royal pain. I know some of you pros out their have tripods or a willing spouse to help you out but I cook on my schedule!

So let's get started shall we?

Pork Tenderloin*

1 pork tenderloin (don't get those already flavored, ugh too salty for me)
butcher's twine
your favorite grilling rub (I used 'southwest' today)
chipotle chili powder (it's hot!)
your pepper of choice (these are cubanelle)
*make sure your pre-made rub is low in sugar or sugar free cuz your meat will burn more!


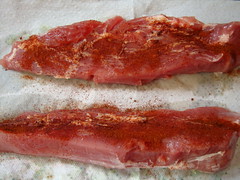
With silver skins removed. Sprinkle on your chipotle. I wanted just a lil heat on the inside with the peppers (cubanelles aren't hot- taste like those chiles you get in a can)
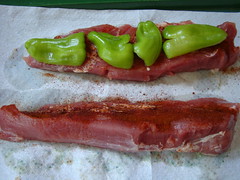
Cut peppers and lay in flat side of one of the tenderloins.
Notice how one end of tenderloin is NARROW and the other side is FATTER? This is WHY you have two of them.


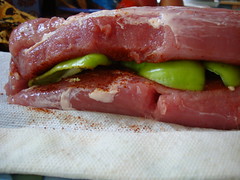
Make a cubanelle sandwich with your pork tenderloins. Making sure one narrow end is on top of the fatter end of the pork below. Conversely, the fatter end of the top will hover over the narrower end of the pork on the bottom. GET IT?

Now cut a LONG piece of twine.


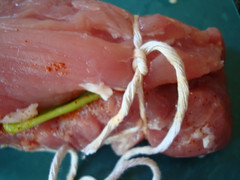
Tie a square knot on the end. WHAT? You didn't remember knot tying from scouts? Shame! Left over right, right over left. Rocket science, right?

Take remaining twine and run under the meat keeping a loop on top for you to catch.


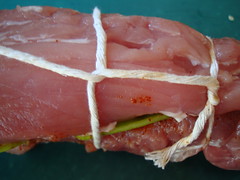
Loop long end. Pull so the sections are firm enough to HOLD the meat, not cutting into it. Repeat for a couple of sections.


If you get really good you will back and forth making sure the loops are going in the opposite directions to support the tightness. BAH. Do it how over you can at this point. You aren't a profession butcher, so don't sweat it.

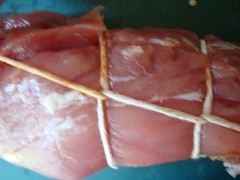
Tie a knot when you reach the end.


See? Mine isn't perfect either but you know what?...the peppers aren't coming out so I done good!


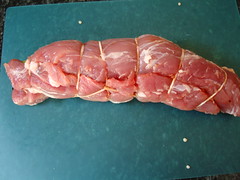
Roll baby roll! Sprinkle on your favorite pre-made rub. Make sure you get all sides. Rub gently so you don't work the insides to slide out.


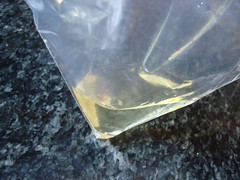
Gallon ziplic bag with 2 Tbsp oil. Lay this bag flat and rub your hand all around INSIDE the bag to coat it with oil. This will make it easier for the pork to get inside the bag AND makes it easier to coat the tenderloin as well.


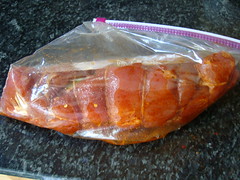
All done. Slip this puppy in the fridge and either prep your other stuff for dinner or relax until grill time.


Turn grill on high to heat up grate. Place pork tenderloin on grill and turn down heat to medium. Continue cooking and rotating sides to evenly cook your meat. Use a thermometer to check the center. You want your pork to be either medium well or 160 degrees (depending on how yours works) Mainly so the juices run clear (for those who don't have a thermometer). This may take 20-30 minutes depending on your grill heat.
Sorry with no pix. K-man was grilling while I was prepping the rest of dinner. I can't be everywhere! LOL


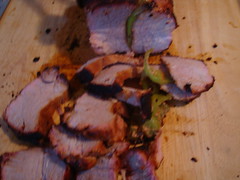
Slice up you pieces to however thick or thin you want. It's ok if the sections come apart. It's all good!


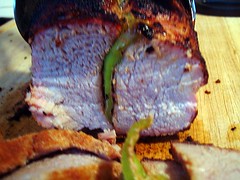
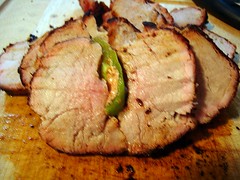
Slight pink, in the center.


And juicy. Now if you didn't TIE these together. One end would be HORRIBLY dry and over cooked by the time the center was perfect. You COULD use one and fold the ends and do the tieing this to make one SMALL roast so it would cook evenly. BUT I only want to do this tying thing ONCE. ya dig?


Hope some of you learned something new! Every piece from end to center was absolutely melt in your mouth tender! By the way....save this for a weekend cookout....not something you wanna do before work and cook when you get home - no way. This is for when you have the time. Enjoy my peeps!
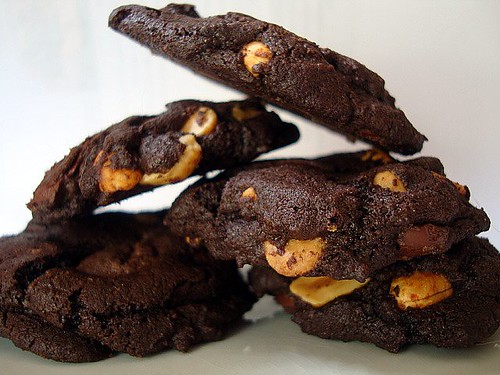
Wednesday, July 15, 2009

Easy Peasy Summer Salad

It's a crime for me to NOT share with you an easy summer salad you can make for your family!

It all started when I perused the garden and pulled back a leaf and saw....

Oh my! I've been surprised 3 times with a hidden cucumber. I mean I know I have lots a little cukes on the vine....but they seem to explode overnight! It's too funny.

What is best about this....it's my OWN organic that I don't have to overpay for! I don't even care if I don't wash it for I know 1,000 people didn't have their hands on it. No matter how much you wanna scrub those grocery cukes....the wax just doesn't come off. You hear me?

Easy Cucumber Salad

1 cucumber
1/2 sliced onion or 1/4 cup sliced green onion (whatever you have on hand)
1/2 cup vinegar (I think rice wine vinegar is the mildest)
2-4 Tbsp sugar (start with 2, taste, add until it's the sweet and sour balance you like)
Sprinkling of salt
Fresh cracked pepper

Just dump all your ingredients in a tightly seal able container. Shake. Put in fridge until ready to eat later for dinner or even tomorrow.


Every time you go to the fridge...Shake. Turn it upside down. Shake. The reason for this is that I've seen many people who make this and use a whole bottle of vinegar and it seems it more liquid than cucumbers.

It think less liquid and just shaking it ever so often is more practical. It's no different then when you are marinating your meats in the fridge and you move it around every so often.

So after I removed the cukes from the container for dinner to plate.....I reached in the fridge for another cucumber and sliced it up right back in to marinate for tomorrow. This time to mix it up, add some fresh herbs like thyme or rosemary for a different flavor.

I've been eating this simple salad since I was a kid. Now that I have my own cucumbers exploding, I couldn't NOT share this with you. So refreshingly sweet and tart. Deliciously cool to the tongue to balance out your hot barbecue from the grill. Try it!