Saturday, July 24, 2010

Orange Monkey Bread

I am a bread lovin' fool...sweet, savory... I've been making that no knead Artisan Bread in 5 minutes recipe every week (added below) and I love it. I used that dough instead of the canned biscuits shown here. I've done both....so use what is most convenient for you!

This is a great alternative from the cinnmon-y type monkey bread standard. I love the buttery orangey flavor...the crispy, crunchy outside yet spongy soft inside. Delish!


Orange Monkey Bread

1 1/4 cups sugar
1 tablespoon finely grated fresh orange zest
1/3 cup orange juice
1/4 cup melted butter
2 (10 ounce) cans refrigerated biscuit dough, separated and halved

1. Preheat an oven to 375 degrees F (190 degrees C). Grease a 10-inch Bundt pan.
2. Toss the sugar and orange zest together in a small bowl. Whisk the orange juice and melted butter together in a separate small bowl.
3. Roll the biscuit dough pieces into balls. Dip each ball into the orange juice mixture and then roll in the sugar mixture. Arrange the coated balls evenly in the prepared pan. Pour the remaining orange juice mixture over the biscuits.
4. Bake in the preheated oven until golden brown, about 30 minutes. Allow to cool in the pan for a few minutes before turning out onto a serving platter. Serve warm.

If you want the "make your own dough" adventure....this is really no fuss dough recipe...

1. In a large lidded container... mix

3 cups lukewarm water
1 1/2 Tbsp. granulated yeast
1 1/2 Tbsp. salt
1 1/2 Tbsp. sugar
6 1/2 cups flour

2. Let rise for 2 hours....I wait until it's doubled or gets flat on top. No biggie really.
3. Put in fridge for whatever/however you want to make from it....see the link to their site for ideas.
4. If you use this dough for the monkey bread, you have to let it rise until doubled then bake it. Its easier to do this before bed and put in the oven first thing when you wake up. Great weekend treat!

Here is what I've made with this GREAT dough so far:

Jalapeno Bread
Pepper Jack Rolls
Sticky Caramel Rolls (with or without bacon)

Honestly I have made at least 15 other things....but we ate them up too fast before I could get a picture....cloverleaf rolls, flat breads, pizza...it's so cool to always have dough in the fridge to get creative with! I will try to post more about my dough creations!

Enjoy!

Thursday, July 22, 2010

Zucchini Pepper Jack Mac

My summer bounty, I average one every other day sometimes two.....


Searching under those large leaves each day is like an Easter Egg Hunt. Constantly I am heard saying "OMG!" Mother Nature amazes me yet I saw this yesterday....

WHUT? Methinks this little zucchini is confused. He thinks that if he poses as a CROOKNECK squash that I won't eat him? Sowwy, little guy...I eat all squash, all colors, all shapes, I do not discriminate! Here is what I made from large zucchini....and so easy.

Zucchini Pepper Jack Mac
created by JennyMac Lipsmack

1 large zucchini, shredded
1/4 onion, grated
2 Tbsp. butter
2 Tbsp. flour
1 cup milk, cream, or even FF evaporated milk if you like
1-1/2 to 2 cups Pepper Jack cheese, shredded (from a block, don't use the bagged stuff)
2 cups cooked pasta (macaroni, egg noodles, penne or whatever you have on hand)
1 cup plain bread crumbs, panko, crushed ritz crackers or potato chips
2 Tbsp. butter, melted

1. Preheat oven to 350 degrees. Mix your crumbs of choice with melted butter, set aside.

2. Shred your cheese, set aside your pile. Shred your zucchini and place in large bowl. Shred the onion and mix into the zucchini.

3. Cook your pasta according to the directions. Drain and mix into zucchini and onion mixture.

4. In the used pot from the pasta, start your white sauce. Melt butter, add flour and cook flour until it smells nutty. About one minute. Slowly whisk in your milk. (It's ok if it's thick for the water from the zucchini, onion and pasta will help thin it out.) Add shredded cheese and mix over low heat until no lumps remain.

5. Add pepper jack cheese sauce to zucchini/pasta mixture. If you think the mixture is not 'loose' enough you can mix a little more milk if so desired.

6. Place cheesy pasta mixture in a greased glass baking dish/casserole, approx 2 quart size. Top with butter and crumb mixture.

7. Bake for 20-30 minutes or until mixture is hot and bubbly and crumbs are light brown.


Great sidedish with your favorite grilled steak or chicken. Nice brunch item as well... creamy, yummy and the shredded zucchini cooks up in a flash this way.

Enjoy!

Wednesday, July 21, 2010

Cowboy Cookies and New use for a Pan

I am always a sucker for good homemade cookie. If it's chocolate or got chocolate in it...done deal!
Of course, during the summer who wants to heat up the kitchen. Save these for one of those rainy days when it isn't so hot and want something to do with the kids!!!


Cowboy Cookies
3 dozen large cookies; 6 dozen small cookies

3 C Flour
1 Tbsp. Baking Powder
1 Tbsp. Baking Soda
1 tsp. Salt
1½ c. Butter (3 sticks), at room temperature
1½ c. Sugar
1½ c. Light Brown Sugar, packed
3 Eggs
1 Tbsp. Vanilla
3 c. Semisweet Chocolate Chips
3 c. Old-Fashioned Rolled Oats
2 c. Sweeten Coconut Flakes
2 c. Chopped Pecans (8 oz)

Directions:

1. Preheat oven to 350º

2. In a large bowl, combine flour, baking powder, baking soda, and salt. Set aside.

3. In a large bowl, beat butter on medium speed until smooth. Add sugar and brown sugar to butter and beat for an additional 2 minutes. Add one egg at a time and beat after each egg.
Add vanilla and beat.

4. Add flour mixture and stir until combined. Do not over mix.

5. Hand mix the chocolate chips, oats, coconuts and pecans and combine.

Place ¼C (use either a measuring cup or an ice cream scoop) of dough on ungreased baking sheet about 3 inches apart. Bake for 15- 17 minutes or until edges start to brown.

Remove cookies and let sit on tray for about 1-2 minutes before placing on a cooling rack. OR

For smaller size cookies use a regular size cookie scoop. My cookie scoop measures about 1 Tbsp. Bake for about 10-12 mins.

NOW FOR THE UNIQUE USE OF A PAN!!!!

I purchased one of those "Perfect Brownie" Pan sets. Ironically, I have not used them for brownies yet. LOL

I put one scoop of each cookie in each space. ( I put the remaining cookie dough formed in balls in a ziploc bag in the freezer for future cookie cravings) Baked @ 350 degrees for 10-15 minutes.

Lower pan on stand, lift dividers out come your squares. I loved how each square had it's own crusty edge. YUM.


Cowboy Cookies on Foodista
Delish!

Tuesday, July 20, 2010

Summer Corn and Tomato Salad

Got tomatoes coming out of your ears? We do. No worries just restyle them each dinner time for a great side dish. No cooking, easy wonderfully tasty!

Summer Corn and Tomato Salad
adapted from Chow.com

2 cups sweet white corn kernels, from 3-4 medium cobs
1 tablespoons lime juice
3/4 teaspoon kosher salt
1/4 teaspoon freshly ground black pepper
3 tablespoons extra-virgin olive oil
1 /2 cup grape or juliet tomatoes (seen here), halved (can use cherry or pear)
1/4 cup red onion, small dice
6-8 leaves fresh basil, chiffonaded (sliced into ribbons

1. This could be a great use of leftover corn from dinner or I just used raw corn removed from the cob...so sweet and refreshing. Cook in microwave for 4 minutes if you prefer if cooked.

2. Combine lime juice, salt, and pepper in a large bowl. While continuously whisking, add oil in a steady stream until completely incorporated. Add remaining ingredients and cooled corn and toss until well coated. Serve.

Cook's Notes:
I found that if you refrigerate this, you may want to let it sit out before serving. Olive oil tends to cloud over and tighten in the fridge. Either use canola to keep it from seizing but if you enjoy the flavor of olive oil a few minutes in a bowl on the table before you eat dinner it should be fine and loosen up.

Summer Corn and Tomato Salad With Fresh Basil on Foodista

Enjoy!

Monday, July 19, 2010

Grilled Spicy Meatballs

If you have the same type of kitchen I do, no matter how much you have the A/C on or ceilings fan or both....the kitchen still gets hot in the summer (and it goes right up to the the bedroom for us to sleep in later, UGH). We always look how we can cook anything and everything on the grill during July and August.

I found on Life's Ambrosia a fun meatball recipe that I tweaked to work for me...They were STUPENDOUS! We cooked them on the grill without some special meatball grill cookware and had nothing to clean afterward....Check out what I did...

Grilled Spicy Meatballs
adapted from Life's Ambrosia

1 pound ground meat (I used 90% beef or you can use turkey)
1 egg beaten
1/3 cup dry plain bread crumbs (see how I made my own multi grain crumbs)
1/2 red onion, pureed in food chopper
bunch of chives, chopped
2 cloves garlic, minced (in food chopper)
2 tablespoons sriracha
3/4 teaspoon kosher salt
3/4 teaspoon freshly ground pepper
2 tablespoons oil

1. Combine all ingredients except oil in a bowl. Mix well to combine. Roll into 20 (or so) meatballs. Place in fridge until ready to grill.
2. Heat up grill on high. Pull off a large piece of non-stick foil bend up the sides and pinch the corners to form a 'faux' cookie sheet. Place foil 'sheet' on grill and drizzle the oil on the foil (hahaha). Place meatballs on oiled foil and turn every so often for even browning. Approx 15 min.
3. Serve plain with a dab of more sriracha sauce. Also, as a leftover suggestion...nice bun, sliced herb cheese and re-heated meatballs for a sandwich...

Throw away that foil and no dirty frying pan or yucky grill. Easy clean up. Zingy meatballs! Loved them. Ate them with grilled zucchini and corn the first night and I had a tasty meatball sandwich the next day for lunch. I offered it to K-man to take for lunch but he said "the guys were doing "Friday lunch out"....*yay, fist pump*... K-man's loss was my gain. Even better the next day. Cook these on your grill and tweak your aromatics like I did...but DON'T forget the sriracha....gotta have THAT.

Meatballs on Foodista

Enjoy!

Thursday, July 15, 2010

Most Yummy Jalapeno Cheesey Bread and a Winner

Years ago at one of those wholesale clubs I always got their jalapeno cheese bread. Loved it!

Either they don't make it anymore or I don't go that club anymore but I don't see it anymore (I only go to BJ's now and not very frequently) Sometimes I see a smaller version in the grocery but they just don't seem to have much flavor either.

Inspired by a cinnamon roll boule style bread I saw this is what I came up with....


Jalapeno Cheesy Bread

JennyMac Lipsmack Creation

2 thawed bread dough loaves (found in your freezer section) or the 1/2 recipe for no knead bread dough
1/2 stick melted butter
6-8 sliced jalapenos (don't use those pickled ones!)
1 lb. shredded mild cheddar or colby cheese (don't use the stuff in the bag!)

1. Shred your mild cheddar cheese (the sharp stuff just doesn't taste right with the zingy jalapeno). I really have stopped using those bagged cheese not only to save money on buying blocks but the flavor is SOOOOOO much better. The cornstarch/flour they put on the pre-shredded stuff really mutes the cheese flavor I feel.

2. Slice your jalapenos. Remember the seeds and the veins inside hold the heat. If you want your bread zingy....slice with abandon. I take a few of the peppers and dig out the seeds and veins to help balance out the heat. Some bites are zingy so not AS zingy. Every bite is a surprise! If you do half seeded and half not....mix up your pile so they distribute well through the bread.

3. Set aside your peppers, cheese and melted butter.

Sorry I don't have step by step pictures of this....It's a pain to keep wiping off doughy hands to snap a pix. I need an assistant....

4. On a floured surface, roll out your dough. Don't worry so much about the size. Just as big as you can get without it the dough getting too thin. Spread on the melted butter. Sprinkle on half of the cheese and half of the jalapenos. Roll up from the longest edge and pinch edges.(kinda like making cinnamon rolls!)

5. Hopefully your roll with be nice and thick from the pepper and cheese. Very gently with both hands roll back and forth (like you did with play dough as a kid) to 'snake' it out longer. Just aim for double in length. Mine was about 2-1/2-3 feet at first and it slowly shrinks as you work with it more.

6. Take one end and start to curl it into itself making one big spiral. Be sure to grab a bunch of cheese and jalapenos as you roll along. Roll, stuff with cheese and peppers. Roll and stuff with cheese and peppers, etc.


7. Top with remaining cheese and space out the peppers. Generously grease a 10 inch springform pan. Cover with towel and let rise in warm place until double or filled the pan.

Preheat oven to 400 degrees.

8. Bake for 45 minutes. You can cover the top of the bread with foil if you feel it's overbrowning after 30 minutes. You can also remove the bread from the springform ring and bake on parchment for the final 15 minutes to get the rest of the bread 'crusty'.

9. Let cool on cooling rack until room temperature. Do not try to cut this bread while hot. You will flatten it and the cheese will ooze out.


OH GAWD, the smell.....


The GOOEY cheese....


Someone get me some butter..... Heaven!

I've also got so distracted by this bread that I failed to announce my Good Earth Giveaway Winner....Cheryl from The Lucky Lady Bug she journals and has a separate blog where to lists who is having giveaways. You should check her out. Congrats Cheryl....dinner is on MyBlogSpark and the wonderful people at Good Earth!

Jalapeno Cheese Bread on Foodista

Enjoy!

Monday, July 5, 2010

Got Leftover Grilled Veggies?

As I was looking at my kitchen counter this morning....I noticed that we are being taken over by the tomatoes and zucchini here (no complaints, really) AND the fact that we have leftovers of summer grilling in the fridge as well.

I used this recipe before with great success. So whether you use fresh veggies, leftover grilled ones or a combo of each (as I did), this is a great brunch, lunch, snack or side dish. Give it a try?

(Leftover?) Garden Veggie Bake
adapted from bettycrocker.com

1 cup grated FRESH Parmesan or Romano cheese
1 cup chopped zucchini (either leftover grilled or parcooked)* see note
1/2 cup corn kernels(mine was leftover roasted with onion from the grill)
1 medium tomato, chopped (1 or 1/2 cup)
1/2 cup sauteed mushrooms, chopped
1 medium onion, chopped (1/2 cup) (omitted since onions were in the mushrooms and corn)
3/4 cup Bisquick Heart Smart® mix
1 cup fat-free (skim) milk (I used FF evaporated milk)
1/2 cup fat-free egg product or 4 egg whites
1/2 teaspoon salt (I used Paula Deen's House seasoning, love it!)
1/4 teaspoon pepper

1. Heat oven to 375°F. Spray 8-inch square (2-quart) glass baking dish with cooking spray. Sprinkle 1/4 cup of the cheese in baking dish. Top with zucchini, corn, tomato, mushrooms and onion. I sprinkled more 1/2 cup more cheese in between the veggie layers as well.
2. In small bowl, the baking mix, milk, eggs and seasonings until blended. Pour over vegetables and top with remaining 1/4 cup cheese over vegetables.
3. Bake uncovered 32 to 35 minutes or until knife inserted in center comes out clean. Let stand 5 minutes before cutting.


Cook's Notes:
  • The corn, mushrooms and tomatoes were great! Even though the zucchini was cut in small pieces, they still were a bit 'firm'. If you look at the pic above, notice the one cube on the left side and you can SEE the line of cooked versus 'less cooked'. Don't get me wrong, the zucchini wasn't CRUNCHY or hard. But if you like your zucchini tender crisp then follow the recipe as listed. I know that when I reheat this, it will be perfect.
  • I think fresh, raw onion would be not only crunchy but heavy in onion taste, if you are into it.
  • Mellowing out or making the zucchini and/or onion softer could be done easily in the microwave cooking it for a minute or two until both are 'not so raw'.
STILL TIME LEFT! ENTER MY GOOD EARTH GIVEAWAY!

Enjoy!

Saturday, July 3, 2010

Blue Cheese and Broccoli Salad

Back in my college days I used to work at a department store called Woodward and Lothrop (sniff-sniff...RIP, woodies!) and one of my favorite lunches in the mall was this broccoli salad. After awhile I wised up and started making my own at home....certainly cheaper. That was back in the 80's....I have never seen this salad in any deli or store since. I don't know why but I love it!

Another reason I am sharing this recipe with you is because Elena from Mann's contacted me asked if I wanted a few coupon's for some of their product and blog about it. YIPEEEEE! I have used their bagged cut up broccoli mixes several times in a pinch and was always happy....but more for FREE.....YES (fist pump!)


Blue Cheese Broccoli Salad
from JennyMac and published on allrecipes.com

1 bag of Mann's Broccoli Wokly
1 tomato, seeded and coarsely chopped
1/4 -1/2 cup blue cheese dressing
salt to taste
freshly ground pepper to taste
optional crumbled bacon bits

  1. In a bowl, place broccoli and soak in very hot tap water for 5 minutes. Drain and pat dry. Broccoli should be very green and show no bluish/grayish surface.
  2. Over dried broccoli place the salad dressing and mix well. Add chopped tomatoes either one large chopped or grape tomatoes halved. Season with salt and pepper to taste.
If you are feeling adventurous crumble some bacon on top. Since I had used a newly tried yogurt based blue cheese dressing I felt I could spare the fat grams!

Mann's products are available @ Food Lion, Bloom and Giant Food. You can go on their website for a location near you AND get some cool recipes! Thanks again Elena and Mann's!

BTW, the recipe link to allrecipes.com is my original version, the recipe on this post was created to be used with Mann's packed product.

DON'T FORGET TO ENTER MY GOOD EARTH GIVEAWAY!

Enjoy!

Friday, July 2, 2010

Kraft Homestyle Product Review

Who hasn't eaten Kraft's mac and cheese out of the blue box? Either I ate too much of it in college or my palate has changed over the years. I gave it up...way too ORANGE to be good.
Then I found out that that orange powder has no cheese in it whatsoever! ACK!

I've made my own mac and cheese for years. It's a labor of love for sure. But don't get me started on my battle with K-man liking and not liking my versions of mac and cheese!!!

I received some free coupons for some new products from Kraft's First Taste program this was one of them. They offer the classic orange cheese version and/or a Parmesan. I took the Parmesan for I didn't think the 'orange cheese' version was going to really change my feeling about it. But free was free and on a busy night....what the heck?

Do you want two hefty meals or four small side out of this? I was impressed! It was pretty good. I like my mac and cheese to be a bit more saucy and creamy but the flavor was good. Even the tiny crumbs for the topping had great crunch.

All I had to provide was 2 Tbsp of butter and some milk. Kraft provided the pasta, cheese, seasoning and crumb topping. Cost? About $3.29. I am sure the 'cheese content' in this product is no different than it's orange cousin!

But if you want good flavor and have put convenience ahead of nutrition give it a try...tell me if you liked or how the 'orange cheese' compared to the traditional box type.

I will still be making my own mac and cheese in the future for I feel better knowing what exactly I am eating. I have plans for a mac and pepper jack coming soon! Stay tuned.

DON'T FORGET TO ENTER MY GOOD EARTH GIVEAWAY!
Enjoy!

Thursday, July 1, 2010

Good Earth Giveaway

I've returned! LOL Anyone notice I was gone? Well not gone but crazy busy and no energy to snap pix and blog. Well I've missed you and ready to kick off my summer vacay with a GIVEAWAY!

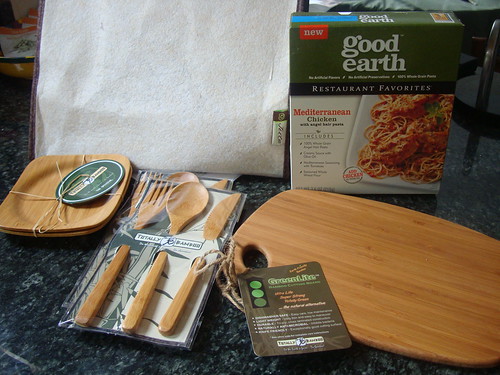
Good Earth Giveaway1

The generous people at MyBlogSpark and Good Earth sent me this fun package. A reusable grocery bag, a bamboo cutting board, 2 sets bamboo flatware and two small plates and a box of Good Earth of Mediterranean Chicken with Angel Hair Pasta to try out. I love the bamboo! So cute. Made with 100% whole grain, no trans fat, no artificial flavors, no artificial preservatives, no MSG. Gotta love that!

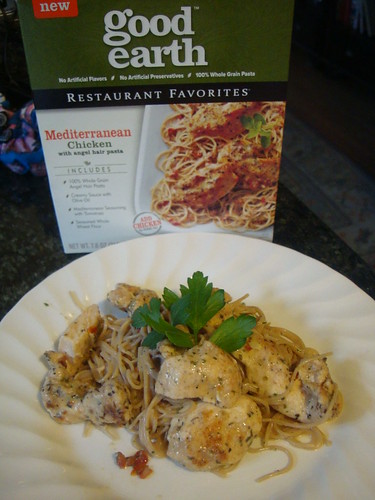
I gave the package dinner a try one night when I wasn't in the mood to coordinate a full dinner. All I had to do was add my own chicken and all the sauce, seasonings and pasta was provided. Dinner in a snap. Very tasty too! I am sad that I didn't get more flavors to try to compare because sadly Good Earth has not shown up in our stores yet.

Good Earth Giveaway

Do I pass? Does it look like the picture on the box? Well perhaps it would have if there wasn't a random clump of 'something' in the front there. Oh well. I am by far the pro photog!

I know the 4th of July holiday weekend is coming up and perhaps you want an easy meal to prepare after all your hard work from your holiday prep! Won't you put in a comment how you are a package dinner queen or what you'd like to do with your new bamboo products or just a quick comment about how much you missed me!

Just in case you are going away this giveaway will be held for one week! Give you plenty of time to enter.....

Thanks again MyBlogSpark and Good Earth!

THIS GIVEAWAY IS NOW CLOSED! THANKS FOR STOPPING BY.

Enjoy!