Friday, October 29, 2010

Meaty Orzo Pasta Dish

Meaty Orzo
I absolutely despise jarred sauces. They are full of sugar and other 'stuff'. I am aware of the addiction children get to the sugar in these jars when after my 8th graders made some lasagna with a sauce from scratch a student came up to me and asked if she could have some sugar to put on her lasagna....I about fell on the floor. Absolutely NOT! was my answer to her request. See? You don't think something like jarred spaghetti sauces could feed an addiction to sugar and that was your proof. I had a similar request when I my first year of teaching when a High-Schooler asked to put sugar on the chili they made. THUD.

Here is a fun, meaty pasta dish with sauce from scratch and it's not difficult or lengthy to make.

Meaty Orzo Pasta Dish
by JennyMac Lipsmack

1 lb bulk Italian Sausage
10 large meatballs, cut in half (leftover or from frozen convenience bag)
1 pint sliced mushrooms
1 medium onion, chopped
2 Tbsp. olive oil
2 cloves garlic, minced
1- 29 oz canned diced tomatoes
1- 6oz can tomato paste
1 cup chicken or beef broth or water (more may be needed)
2 Tbsp. Italian Seasoning (or any combo of basil, oregano, thyme, rosemary and parsley)
salt and pepper to taste
1/2 cup orzo
fresh Parmesan

In a large skillet or pot. Brown the sausage, halved meatballs with the onion and mushrooms in the oil. Add the minced garlic and seasonings. Pour the canned diced tomatoes over the meat mixture. Add the tomato paste and meat broth. Stir carefully to incorporate the paste into the broth. Salt and pepper to taste. Let meaty sauce cook for 10 minutes. Mixture should still look watery. Add orzo (it will need a watery sauce to absorb). Cook for 10-12 minutes, stirring every so often to move the orzo around. Keep an eye on the sauce if it's looking dry add 1/2 cup more of broth at a time as needed. This dish/pot can also be baked if desired. Serves 4.

Serve in bowls with freshly grated parmesan (you can put shredded mozzarella on it if you baked the dish). Great with crusty garlic bread!

The effort to put this sauce together was minimal and much better than a jarred sauce. Less chemicals in a can of tomatoes than a jar of sauce too!

Buon Appetito!

Thursday, October 28, 2010

Yukon Gold Breakfast Hash

Yukon Gold Hash1

Perfect for a lazy Sunday morning, great for early Saturday that is hearty enough to carry you through a busy Saturday of errands or even ideal for one of those 'breakfast dinners' during the week.

I like using Yukon Gold potatoes for they are not as starchy as the russet variety and are quite 'velvety' when cooked.

Yukon Gold Breakfast Hash

6-8 small Yukon Gold Potatoes (or 3-4 medium)
6-8 slices of thick bacon, cooked and crumbled
half an onion, chopped
1/4 cup pepper, chopped (I used jalapenos from the garden)
salt and pepper to taste
4 eggs
1 cup colby jack cheese, shredded
minced chives for garnish

Wash potatoes and microwave for 6-10 minutes until soft (time depends on size and amount)
In large ovenproof skilled, cook bacon and drain on paper towels. Keep bacon fat in skillet and add chopped pepper and saute onions until soft/clear. Preheat oven to 350 degrees (or later cook on stove top, your preference). Coarsely chop potatoes with skins and put in skillet. Keep breaking up potatoes until resembling hash and mixing the bacon fat around them. Salt and pepper to taste.
Press potatoes into pan and use spoon to make four 'divots' or dents in potato hash where eggs will go. Crack eggs into custard cup and gently put into each 'designated divot/dent'. Place in hot oven and cook until eggs are starting to set up. Sprinkle on crumbled bacon and top with cheese. Place back into oven until cheese is melted.

Cut the circle of hash into 4. Making sure there is one egg in each quarter. Garnish with chives and serve with fruit! Oh the smell!

Yukon Gold Hash

Crispy bottom, velvety creamy potatoes, crunchy smoky bacon, runny egg, gooey cheese. THUD! All the senses are being hit. AWESOME way to start a day! Loved it!

Enjoy!

Wednesday, October 27, 2010

Chicken and Mushroom Rotini

Chicken and Mushroom Rotini

You saw that beautiful roasted chicken yesterday? Here is it's leftovers! Don't ya just love that. Sliced Roast Chicken one night....totally different chicken the next!

Chicken and Mushroom Rotini
by JennyMac Lipsmack

2 cups leftover cooked chicken
1 package fresh sliced mushrooms
half onion, chopped
drizzle oil
3 Tbsp. butter
3 Tbsp. flour
1 cup leftover chicken broth
1 cup cream
Half package rotini pasta
chopped chives for garnish

Cook pasta according to directions, drain and set aside.
Saute onions and mushrooms with drizzle of oil until cooked. Add butter and melt, add flour. Cook for about a minute until flour starts to smell 'nutty'. Slowly add chicken stock and cream. Stir until thickened. Add chopped/shredded leftover chicken. Mix in cooked pasta.
Garnish with chopped chives.

Easy leftover chicken dish, you'll love it. We did!

Tuesday, October 26, 2010

Sage and Garlic Chicken

A roasted chicken cooking in our house just makes me want to float in the air instead of walking...come to think of it...so does bacon, cookies, fresh bread, tomato sauce. Ok get a hold of yourself Jenny, clearly you love food smells.

Sure I like the ease of boneless chicken parts to cook with mostly but on the weekend I can appreciate the slow roasted chicken when I have more time to spend on preparing it and cooking it.

Sage and Garlic Roasted Chicken
by JennyMac Lipsmack

1 whole chicken roaster
handful of fresh sage, finely chopped (my last from the garden)
2-3 garlic cloves
2-3 Tbsp olive oil
2-3 Tbsp vinegar
1 onion quartered
8-10 whole carrots, washed and peeled

Wash and peel your carrots and line your roasting pan with them. Your chicken will cook on top of them. Unpackage your chicken and be sure to read the directions how long per pound. Don't totally rely on those pop up timers! I've have them not POP before. Be sure to remove the 'chicken stuff' on the inside of you chicken. Dry off chicken and thoroughly salt and pepper it all over inside and out.

Grind up your sage, garlic and olive oil and vinegar in a blend, food processor or mini food chopper (just perfect). Rub mixture under skin, over skin and inside chicken. Place quarter onions inside chicken. Bake in a preheated oven @ 350 degrees.

BEFORE:
Sage and Garlic Roasted Chicken
*I know this picture does not depict how the carrots were instructed to be used in the recipe but after a few attempts, the recipe above rendered more tender and tasty carrots. This picture was attempt number one....I preferred attempt #2's carrots.

AFTER:
Sage and Garlic Roasted Chicken1

I know I should have trussed or tied my chick's legs together, but oh well I figured she'd endured enough animal cruelty! LOL. I made this one afternoon for dinner and something came up and didn't get home in time to cook it. It was great to pop into the oven the next day, already to go. The garlic really was infused throughout the chicken....so juicy too. Don't forget to let your chicken sit for about 10 before carving to let the juices redistribute!

Great lazy Sunday dinner choice!

Sunday, October 24, 2010

Goya Product Tastemaker

Would you like some Black Bean and Jalapeno Rice on the side?

Black Bean and Jalapeno Rice

I received from the Foodbuzz Tastemaker Program some FREE Goya products. YUM! Since I live in diverse area some stores here have a pretty large Goya section. They have many interesting products that I have not used before and when I signed up to take part in the Tastemaker they sent me nothing scary to use. I received a can of black beans, garbanzo beans (chick peas), yellow rice, green olives, olive oil and two recipe booklets highlighting Mexican and Carribean recipes. I noticed in the book the also had two booklets on Central and South American recipes. DRAT, I would have liked those books instead for most of my students come from those areas. I guess that is what the Goya site is for!!! LOL There I found the section for Central America and found a recipe for pupusas. This food item is HOT at our school. Parents bring them in for food events, trucks come to sell them on special events and my students bring them for cooking projects. The pupusa is loved by all -especially the 'gringos'. LOL. Great, I've been waiting for a good recipe!

Enough small talk and onto the recipe. For my recipe, I decided to use:

Black Bean and Jalapeno Rice1

There were no recipes for any 'bean' and rice mixture side dishes. I guessing that the Hispanic culture are purists and like their beans separate from the rice (I am guilty of when I go to Mexican places I mix my refried bean and rice sides together). Not me I am a rebel! Instead of jazzing up the beans with spices and making a rice side plain; I added plain beans to the rice that was seasoned already and jazz it up with the last of my jalapenos from my garden!

BEFORE COOKING NOTE:
Two questions need to be answered before you approach this recipe.
How do you want your peppers?
1. Hot and Spicy, Zingy or Mild?
2. Crunchy or Soft?

Cooking Approach to those answers:
1. The heat depends on the chopping process. If you want them HOT. Just chop off the stems and chop. All the heat is in the veins and seeds. But cooking them will also reduce the 'caliente' scale as well.
2. If you want them with some crunch, stir them in at the end before serving. If you want them 'par cooked' stir them in the rice when they are sitting for the 5 minute rest. If you want them soft: Cook the peppers with the rice.

Now proceed....

Black Bean and Jalapeno Yellow Rice
by JennyMac Lipsmack

1 box Goya Yellow Rice
1 Tbsp Goya Olive Oil or butter
1 can Goya Black Beans
half an onion, chopped
jalapenos (you decided how many you can handle)

Read the instructions on how you want to prepare your rice. Stove Top or microwave. I like the microwave option for I don't have to babysit it and can do other things. Plus, I think this rice comes out PERFECT from the microwave.

Chop your onion, big or small chunks, your preference. Stir the onions, oil or butter, and water with the rice and follow your cooking directions. 5 Minutes on High and 20 minutes on 50% power. Devein and/or chop jalapenos (see below)Open black beans, drain and rinse. When rice is ready the last direction asks you to let the rice 'set' to absorb last of moisture. Stir in beans and peppers and cover for five minutes. Serve with chicken and garnish with freshly chopped cilantro.

To remove the heat from jalapenos:
1. Put on gloves. I have not worn gloves and washed hands several times...washed hair the next morning and still found some "heat" under my nails!
2. Slice one side off pepper from stem to tip. This first slice should be shallow enough to cut off the "meat" of the pepper, leaving the vein with the seeds inside. One quarter turn the pepper and repeat the cut. After the third cut you will have all the seeds and most of the veins on the remaining quarter. Remove stem and use gloved finger to scoop out veins and seeds. Either julienne cut your quarters or finely chop.

Again, THANK you Foodbuzz and Goya. Those of you interested in more Latino Flavor to your recipes definitely hit up Goya's site....very user friendly and authentic recipes easy to follow.

Delish!

Monday, October 18, 2010

Buttermilk Biscuits

I love biscuits!

Buttermilk Biscuits

Breakfast, lunch, dinner, snack....whenever....buttery, jammy, sandwichy....I am not picky. I guess I got the biscuit bug from my grandmother who used to make them all the time. Many biscuit recipes use just plain milk but I really think the buttermilk really makes them tender.

I troll around the food blogs and Cathy from Noble Pig always seems to get me off my butt to try her recipes. Even a biscuit recipe when I've made millions of biscuits by now. I was intrigued by Cathy's tips and the use of cake flour made it different enough that I wanted to give them a try.

Basic Buttermilk Biscuits
Discovered on Noble Pig and she made from Cuisine at Home

1-1/2 cups all-purpose flour
2 teaspoons baking powder
1/2 teaspoon table salt
1/4 teaspoon baking soda
1-1/2 cups cake flour
5 Tablespoons cold vegetable shortening, cubed
4 Tablespoons cold unsalted butter, cubed
1-1/4 cups buttermilk
2 Tablespoons unsalted butter, melted

Preheat oven to 450o F. Line a baking sheet with a silicone baking mat or parchment. Whisk together all-purpose flour, baking powder, salt and baking soda in a bowl; set aside. Pulse cake flour, shortening and cubed butter in the bowl of a stand mixer with the paddle attachment until fats are pea-sized flakes. Mix in all-purpose flour mixture just until blended. Add buttermilk to dry ingredients and mix just until moistened. To avoid overmixing the biscuit dough, stop when the ingredients are just moistened. Even though the dough is wet, don't add more flour, that leads to overmixing.

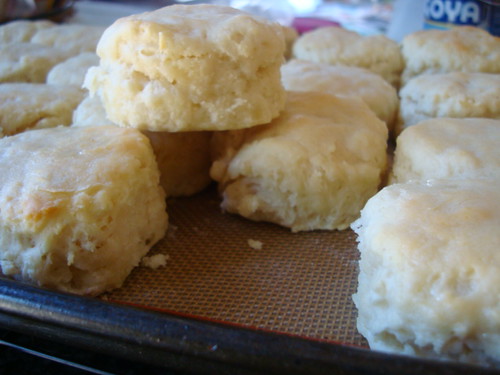
Turn dough onto a floured surface and knead just until dough holds together. Do not overwork it. Flour your hands to keep the dough from sticking before patting dough into a 1" thick circle. Using a 2" thick biscuit cutter, cut dough into 10 biscuits. Pull cutter up without twisting, as you remove. Twisting results in jagged edges on the biscuits.

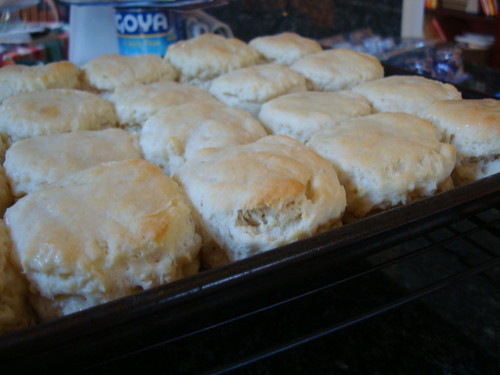
Transfer the biscuits to prepared baking sheet and bake until golden, 15-18 minutes. Brush tops with melted butter during last few minutes of baking.

Buttermilk Biscuits1

Cathy's Tips & Tricks for High-Rise Biscuits

-For bigger rise, place any tools, especially the stand mixer bowl and paddle into the bowl, into the freezer for a few minutes before mixing to ensure the fats won't melt until they are in the oven.

-Patting the dough into a circle compresses it less than rolling it with a rolling pin, giving you a loftier biscuit.

-Use a sharp biscuit cutter to cut your biscuits. The sharp edges don't seal the sides thus promoting rising . Juice glasses and tin cans trap air and compress biscuit dough, sealing the sides and reducing rise.

-Excess flour on the tops and bottoms can make the biscuits seem dry, brush off any excess flour from both sides before baking.

-You can reroll the dough once (you'll need to) and still yield tender biscuits. To do so, brush any flour from the scraps and gently fold the dough back together before patting into a circle.

Buttermilk Biscuit

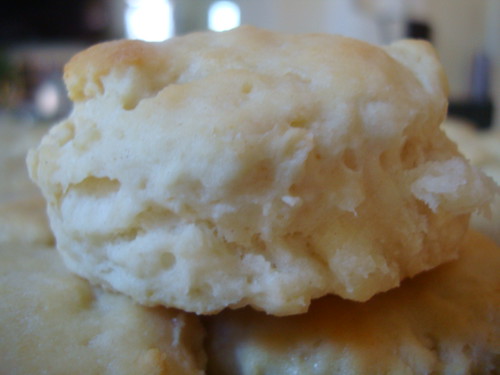
I made mine a bit 'blonde' for I wanted to be able to put them in the freezer and reheat when I needed a biscuit fix, not wanting to over cook them. These were fabulous. The cake flour really made the delicate. Give these a try. Thanks Cathy!

Enjoy!

Saturday, October 16, 2010

Smoky Jalapeno Cheesesteak

Welcome Back! Where you been? Haahahahahaha. No long story what I've been up to....just stuff. Sometimes you just aren't feelin' it. I've felt my cooking at home either was not worthy to blog about or the camera battery was dead when I had something fabulous made. It's always something, right?
Right.


Regardless....today fun sandwich is:


Smokey Jalapeno Cheesesteak
by JennyMac's Lipsmack
makes 2 large sandwiches or 4 average

Sandwich Rolls/Hoagie Rolls (per person)
6 layers of Steak-Um meat or slivered beef (about 1/2 pound)
1 onion thinly sliced
6 jalapenos, deveined/seeded and julienned
Smoked Cheese

Slice onions and peppers and saute in pan until soft. Slice beef into strips and add into onion mixture until beef is no longer pink (take just a minute or so).

Prepare your rolls by heating them up in the oven (if you desire a crusty roll). Slice cheese thinly. Slather on the mayo. Put meat into "mayoed' rolls top with cheese. Serve with your favorite chips -hope your mouth is big enough!

Cooks Notes:

1. The smoked cheese is not something you will find in the grocery with all your other cheeses. This cheese I found at a Farmer's Market. It was actually a Smoked Horseradish Cheese....yummy. BUT normally when a recipe calls for a smoked cheddar I have to go to the section of the grocery when I need Saga Brie, Manchego or Guyere cheeses. Look for it. Today I noticed they had a smoked Guyere right next to the smoked provolone and mozzarella. Wow, they are increasing their stock! It shouldn't be too hard to find. These smoky cheeses are also great on burgers for it tastes like you have bacon on it....when you
don't!

2. As for jalapeno....don't be scared to use this and opt for the plain bell pepper. The heat of you sandwich is directly related to how well you remove the seeds and the veins in the pepper. This is your source of heat. When I am feeling crazy for some heat I just slice them up without regard...and also don't forget the cheese on your sandwich is also your saving grace. Any dairy is the antidote to pepper pain!