Sunday, October 18, 2009

Nothing squeaked in the making of this recipe!

"Bubble and Squeak" now there is a fun name for a recipe.


A name kids could really get into as well. I've seen many recipes for B.A.S., none were the same so I never tried it since I didn't know what the original is really supposed to be short of taking a trip to Great Britain to do so.
So when I made corned beef I was debating the usual....carrots and potatoes? mashed only? So when the beef was was done I decided to make my own version of Bubble and Squeak.

B.A.S. typically uses brussell sprouts (aka mini cabbages) and it's considered a leftover dish of potatoes (either chunk or mashed), onions, beef, ham or bacon being used. I wasn't in the mood for a pile of mush but since we'd been having a COLD rain for the past 3 days....I was in the mood for something like a stew or soup and following the ingredients somewhat.

Lipsmacking Bubble and Squeak Stew

1 corned beef in store package with seasonings
Half package of baby carrots
1/2 cup onions chopped
2 cups of brussel sprouts
1 cup barley (uncooked)
Chicken broth (if you need to thin out your stew)

Cover your corned beef with water and the included seasoning packet in your crock pot. About 3 hours on high or boiling in a pot on your stove.

Remove corned beef and with a fine screen mesh strainer remove the 'seeds' from the seasonings or just use an immersion blender to break them up. Keep the corned beef water in crock pot and put your 1 cup of barley in the water. Cook on high about 30 minutes or until soft.

Use a slotted spoon and remove about half of the barley (about 1 -1/2 cups) and put aside in a small bowl. Use an immersion blender to blend up the barley until smooth. Mixture will be thick. Put in your carrots and brussell sprouts. Cook until vegetables are soft. Put the cooked barley in small bowl back into the crock pot and stir. My stew was very thick and could use a little thinning so I used some chicken broth (I used about 1 cup)

You can decide if you want to cut up your corned beef into the Bubble and Squeak stew or just slices on top of your stew.

This was absolutely delicious and was exactly what we needed after three freezing cold rainy days. I served some crusty buttered bread with this. K-man ate TWO big bowls!

Enjoy!

Thursday, October 15, 2009

This recipe takes the cake alright!

I've seen this cake around on the blogs. I printed it out probably in the spring. We love cake and blueberries! I didn't make it at all this summer (when the blueberries are at their peak) for the primary reason that not only does baking/using the oven make my kitchen hot but that same heat goes right upstairs. So now with it getting cool/cold out.....it was time. Oh my....


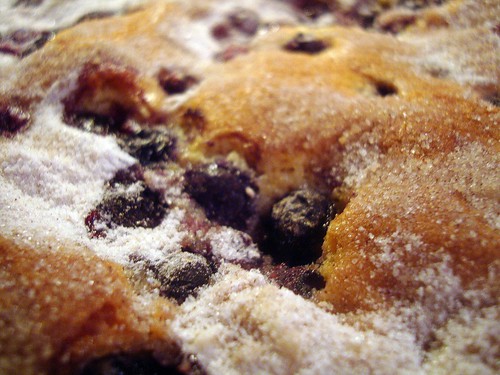
I can totally see why the funny name as 'boy bait'....this cake rocks! It was light and buttery. K-man's was on high alert for dessert when he was just smelling it baking (and I didn't even tell him I was making something!) Once he ate his serving ('mmmmm-ing' all the while) He even 'mmm-mmm'ed' as he passed the pan on our way up to bed. Clearly SOMEONE was smitten. LOL. Duly noted!

Blueberry Boy Bait
Adapted from Cook’s Country
Serves 12, generously

2 cups plus 1-teaspoon all-purpose flour
1-tablespoon baking powder
1-teaspoon table salt
16 tablespoons unsalted butter (2 sticks), softened
3/4 cup packed light brown sugar
1/2 cup granulated sugar
3 large eggs
1 tsp. vanilla
1-cup whole milk or buttermilk would work too (I used evaporated)
1/2-cup blueberries, fresh or frozen
Topping
1/2-cup blueberries, fresh or frozen (do not defrost)
1/4 cup granulated sugar
1/2-teaspoon ground cinnamon

Preheat to 350 degrees. Grease and flour 13 X 9 pan.

Whisk two cups flour, baking powder, and salt together in medium bowl. With electric mixer, beat butter and sugars on medium-high speed until fluffy, about two minutes. Add eggs, one at a time, beating until just incorporated and scraping down bowl. Add the vanilla and mix until incorporated. Reduce speed to medium and beat in one-third of flour mixture until incorporated; beat in half of milk. Beat in half of remaining flour mixture, then remaining milk, and finally remaining flour mixture. Toss blueberries with remaining one-teaspoon flour. Using rubber spatula, gently fold in blueberries. Spread batter into prepared pan.

For the topping:
Scatter blueberries over top of batter. Stir sugar and cinnamon together in small bowl and sprinkle over batter. Bake until toothpick inserted in center of cake comes out clean, 45 to 50 minutes. Cool in pan 20 minutes, then turn out and place on serving platter (topping side up). Serve warm or at room temperature. (Cake can be stored in airtight container at room temperature up to 3 days.)

Great for breakfast with your coffee too. Make this for your hubby NOW....the holidays are coming....LOL

Enjoy!

Tuesday, October 13, 2009

A yummy way to cut some carbs!

I sure do LOOOOOOOOOOVVVEEEEE da mashed potatoes.
The holidays are coming soon and there is going to be a lot of mashed potatoes coming our way!

But I am always looking of ways of cutting the carbs in my diet, not entirely but somewhat along the way (carbs and me, don't get along).

I've also seen how people have made the 'mock mashed potatoes' out of cauliflower. No matter how much butter, sour cream, chives, etc. They still taste like mashed cauliflower (not that I have a problem with that) but more importantly, they have no real body to it.

Are you seeing where I am heading yet? I like mashed potatoes and mashed cauliflower why not cut the carbs a bit and combine the two?


Mashed Potatoflower (K-man's name for it)

one head of the ORANGE cauliflower (my store sells the white, purple, orange and green [aka broccoflower])
1-1/2 lb package of refrigerated mashed potatoes, very warm not piping hot
butter to taste
salt and pepper to taste
chives, chopped

Cook washed, and roughly chopped cauliflower in the microwave. Cook until semi soft (about 5 minutes?) Place chopped cauliflower in the food processor with some pats of butter. Blend until smooth. You may have to stop it to scrape the cauliflower as it may whirl around on the bottom and stay chunky on the surface. When smooth, add your warm mashed potatoes and pulse until blended. Salt and pepper to taste and whirl one last time. Garnish with chives or mix them in.

These were also great as a leftover. I sprayed some Pam in a glass dish and baked it until hot. Edges got a lil crusty....topped it with some French's Fried Onions in the last few minutes until brown.

Not only does K-man love cauliflower and was excited for this new recipe. But he especially when THUD when I served it as a leftover with the fried onion rings on top the next night!

ALSO-----

I received an award from Melissa of Serendity is Sweet. YAY....my first award! SO cool!

As for Melissa's site..... Oh my, she's got several blogs going AND she home schools too! She has lots of resources/links on her site for you to use in regards to home schooling. She also has a ton of pumpkin "things" you can do in your class or at home to extend school learning. Check out her site. I sure did and there was so much to see that I needed to subscribe for I didn't want to miss a thing!


Enjoy!

Monday, October 12, 2009

Two favorites combined

Fall is here and apples are everywhere. My latest favorite is the Honeycrisp.

I love apple pie and I love apple crisp. Why not combine the two? I am going to be honest with you here. I've stopped using my pie pan after I discovered how nicely the crostada way works. Although you may want a deeper filling but I was getting annoyed over how each time I took out a slice parts of the crust was on the bottom. But every slice I do crostada style, no fuss, no muss!

Here's what you need and how you do it:

Apple Crisp Crostada

1 pie crust (either your favorite recipe or a pre-prepared one)
5 apples, peeled, cored and chopped in chunks
juice of one lemon
2 Tbsp instant tapioca
1 Tbsp cinnamon
2 dashes nutmeg
1/4 cup sugar (maybe even less since these apples are so sweet)
dash salt
Topping:
1/2 cup brown sugar
1/2 cup flour
1/4 cup butter, ice cold, cut into chunks
1/2 cup toasted walnuts, chopped

Preheat oven to 375 degrees.
In a small bowl, prepare the topping. Using a pastry blender, cut the butter chunks into the brown sugar and flour. Keep cutting the butter until the pieces are as small as the walnuts you chopped. Add walnuts and lightly toss into the butter and sugar mixture. Set aside.

In a large bowl, peel and chop apples and add lemon juice, tapioca (these apples were juicy and needed some thickener), cinnamon, nutmeg, sugar and salt. Mix well.

On parchment paper, roll out pie crust as large as it can go without getting 'see thru' thin. Take parchment paper and put on a cookie sheet (I used my pizza peel and baked this on my pizza stone). Sprinkle a handful of the topping in the center of the pie crust. Pile all the apples in the center, leaving about 1 -1/2 inch around the edge. This will be a pretty big mound. Use your fingers and hands to lightly press if you need to keep the apples from 'rolling down'. Sprinkle your topping over the mound and also the sides of the mound (this will be tricky). I started to curl up the pie crust edges up while I did the topping to help keep it ON. Take all the edges and fold them up and press gently into the apples.

Bake for one hour or until the juices are bubbly and is 'pooling' level to the crust edge. Cool on parchment until ready to eat.

Nice and crunchy nutty topping on those apples.

I can't get over how level this is when the mound was HUGE. I wish now I had taken a picture of the mound and put them side by side. Although the honeycrisp apples are still firm I guess the smaller chunks did cook down more. I am also glad that the whole lemon gave a some tartness to cut the sweetness of the apple.

This was REALLY good. No ice cream or whipped topping was used in the eating of this pie. It didn't need it. When you are ready to make your apple pies this season....don't use both crusts at once. Make a crostada, it's easier and you'll get more pie this way!

Enjoy!

Monday, October 5, 2009

I found the perfect CCC, I think.

My quest is over. I have tasted and baked many a chocolate chip cookie. Since they are my overall favorite, I am picky about them now.

I want a crispy edge yet thick and chewy on the inside.
Ok, I had found that in the past but only on the first and perhaps the second day and then the cookies would change over the next few days. They'd lose their chewiness for for being dried and out and harder. (yes, I stored them properly) I needed a CCC to last over the few days that it took for us to eat them and I didn't want a gadzillion of them either. Sometimes recipes aren't the same when you either double or half a recipe.


The Chewy CCC
(chocolate chip cookie)

adapted from the food network

Ingredients:
2 sticks unsalted butter
2 1/4 cups bread flour
1 teaspoon kosher salt
1 teaspoon baking soda
1/4 cup sugar
1 1/4 cups brown sugar (I used light for it's what I had on hand)
1 egg
1 egg yolk
2 tablespoons milk
1 1/2 teaspoons vanilla extract
2 cups semisweet chocolate chips (I used dark chips)
I added a cup of toasted walnuts
some mini or regular chips to decorate the tops

Hardware:
Ice cream scooper (#20 disher, to be exact)
Parchment paper Baking sheets
Mixer

Directions:
Heat oven to 375 degrees F. Melt the butter in a heavy-bottom medium saucepan over low heat. Sift together the flour, salt, and baking soda and set aside. Pour the melted butter in the mixer's work bowl. Add the sugar and brown sugar. Cream the butter and sugars on medium speed. Add the egg, yolk, 2 tablespoons milk and vanilla extract and mix until well combined. Slowly incorporate the flour mixture until thoroughly combined. Stir in the chocolate chips. Chill the dough, then scoop onto parchment-lined baking sheets, 6 cookies per sheet. Bake for 14 minutes or until golden brown, checking the cookies after 5 minutes. Rotate the baking sheet for even browning. Cool completely and store in an airtight container.

Some I left 'as is' when I scooped them. Others I dipped in a pile of mini chips to enhance their top. K-man and I really loved these. I think you should try them and see if I am right in thinking they are the BEST!

Enjoy!

Countdown until Halloween part 1


Time is ticking many of you are looking for cool Halloween ideas....

I've been known to be the Queen of Halloween at my school....that is until we stopped having Halloween dances and my stint of doing the food for many years ceased forever. Yes, our principal thinks that Halloween is culturally insensitive. It is sad to see a kid tradition is removed because of the ignorance of what it really is. Confused with All Saints Day, All Hallow's Eve or even Los Dias de los muertos....let's be for real here.....it's a day when the kids get candy. They live for this stuff. So did we.

Regardless, we are a culture of many countries of origin and many of us wear green on St. Patrick's Day even though we aren't Irish. We may go out for some enchiladas and down a beer on Cinco de Mayo. Or not. It's our choice to participate in whatever cultural celebration comes our way. Funny thing....as a school we do not dress for Halloween, nor have a Halloween due to possibly offending those who do not 'participate' in Halloween but I was told I could do my Halloween foods in my classes if I so desired. What the heck?

Anyway, off my soap box and onto some fun stuff for you to peruse.....

Since I have many Halloween recipes and pictures of the stuff I've made in the past on my school site, I am not going to reinvent the wheel and just give you a link to one page of my site every couple of days. Please keep in mind some of these creations were 'kid made' as opposed to 'teacher made.'

Page One of Halloween Recipes

Page Two of Halloween Recipes

More pages of Halloween ideas are to come, if you don't cheat and go through my web page on my school site. LOL. When we make some new stuff in my classes I will add those later!

Enjoy!