Showing posts with label Tastemaker. Show all posts

Sunday, October 24, 2010

Goya Product Tastemaker

Would you like some Black Bean and Jalapeno Rice on the side?

Black Bean and Jalapeno Rice

I received from the Foodbuzz Tastemaker Program some FREE Goya products. YUM! Since I live in diverse area some stores here have a pretty large Goya section. They have many interesting products that I have not used before and when I signed up to take part in the Tastemaker they sent me nothing scary to use. I received a can of black beans, garbanzo beans (chick peas), yellow rice, green olives, olive oil and two recipe booklets highlighting Mexican and Carribean recipes. I noticed in the book the also had two booklets on Central and South American recipes. DRAT, I would have liked those books instead for most of my students come from those areas. I guess that is what the Goya site is for!!! LOL There I found the section for Central America and found a recipe for pupusas. This food item is HOT at our school. Parents bring them in for food events, trucks come to sell them on special events and my students bring them for cooking projects. The pupusa is loved by all -especially the 'gringos'. LOL. Great, I've been waiting for a good recipe!

Enough small talk and onto the recipe. For my recipe, I decided to use:

Black Bean and Jalapeno Rice1

There were no recipes for any 'bean' and rice mixture side dishes. I guessing that the Hispanic culture are purists and like their beans separate from the rice (I am guilty of when I go to Mexican places I mix my refried bean and rice sides together). Not me I am a rebel! Instead of jazzing up the beans with spices and making a rice side plain; I added plain beans to the rice that was seasoned already and jazz it up with the last of my jalapenos from my garden!

BEFORE COOKING NOTE:
Two questions need to be answered before you approach this recipe.
How do you want your peppers?
1. Hot and Spicy, Zingy or Mild?
2. Crunchy or Soft?

Cooking Approach to those answers:
1. The heat depends on the chopping process. If you want them HOT. Just chop off the stems and chop. All the heat is in the veins and seeds. But cooking them will also reduce the 'caliente' scale as well.
2. If you want them with some crunch, stir them in at the end before serving. If you want them 'par cooked' stir them in the rice when they are sitting for the 5 minute rest. If you want them soft: Cook the peppers with the rice.

Now proceed....

Black Bean and Jalapeno Yellow Rice
by JennyMac Lipsmack

1 box Goya Yellow Rice
1 Tbsp Goya Olive Oil or butter
1 can Goya Black Beans
half an onion, chopped
jalapenos (you decided how many you can handle)

Read the instructions on how you want to prepare your rice. Stove Top or microwave. I like the microwave option for I don't have to babysit it and can do other things. Plus, I think this rice comes out PERFECT from the microwave.

Chop your onion, big or small chunks, your preference. Stir the onions, oil or butter, and water with the rice and follow your cooking directions. 5 Minutes on High and 20 minutes on 50% power. Devein and/or chop jalapenos (see below)Open black beans, drain and rinse. When rice is ready the last direction asks you to let the rice 'set' to absorb last of moisture. Stir in beans and peppers and cover for five minutes. Serve with chicken and garnish with freshly chopped cilantro.

To remove the heat from jalapenos:
1. Put on gloves. I have not worn gloves and washed hands several times...washed hair the next morning and still found some "heat" under my nails!
2. Slice one side off pepper from stem to tip. This first slice should be shallow enough to cut off the "meat" of the pepper, leaving the vein with the seeds inside. One quarter turn the pepper and repeat the cut. After the third cut you will have all the seeds and most of the veins on the remaining quarter. Remove stem and use gloved finger to scoop out veins and seeds. Either julienne cut your quarters or finely chop.

Again, THANK you Foodbuzz and Goya. Those of you interested in more Latino Flavor to your recipes definitely hit up Goya's site....very user friendly and authentic recipes easy to follow.

Delish!

Sunday, April 18, 2010

All Bran Tastemaker!

I remember watching my uncle eating Bran cereals for breakfast after his triple bypass. Poor guy I was thinking as I bit into my bacon. We only had Cracklin' Oatbran or Raisin Bran for cereals (no froot loops or cocoa pebbles for me growing up!) So bran wasn't always on my FAVE list. As I've gotten older and wiser, I know NOW bran is not my enemy and fiber is essential in our diet.

Lucky me, got sent some ALL-BRAN cereal samples from Kellogg's courtesy of Foodbuzz's Tastemaker Program.

I was sent All-Bran® Original, All-Bran® Bran Buds® and Complete® Wheat Bran Flakes. Kellogg's also sent a few recipe cards for me to try and a letter informing me that they do have a website with more recipes....yeah 400 of them. Is it really possible to have that many recipes to incorporate fiber into our diets? YUP!

I found at least 7 new recipes and printed them out since I have a plethora of bran cereal to use now! I found a Honey Muffin recipe but in true Lipsmack fashion....I had to tweak it.

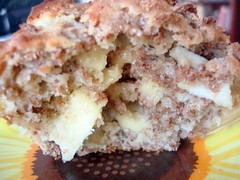
Apple Honey Muffins
adapted from all-bran.com
Servings: 9 regular muffins, 6 texas size muffins

Ingredients
1 cup all-purpose flour
1 teaspoon baking powder
1/4 teaspoon baking soda
1/4 teaspoon salt
1 cup All-Bran® Original
1/3 cup buttermilk or sour milk
1 egg
1/2 cup honey
1/4 cup butter
1/2 cup dried apples, chopped (the ones from Wal-mart are super soft)
For Sprinkling on top: extra All-Bran® Original and 2 Tbsp light brown sugar


Directions
1. Preheat oven @ 400°F

2.Stir together flour, baking powder, soda, salt and chopped apples. Set aside.

3. In medium mixing bowl, combine Kellogg's® All-Bran® cereal and buttermilk. Let stand about 2 minutes or until cereal softens. Add egg, honey and butter. Beat well. Add flour mixture, stirring only until combined. Portion evenly into 6 texas sized muffin cup that have been sprayed with non-stick spray or lined with muffin papers. Original recipe says it makes 9 regular.

4. Sprinkle with some more All-Bran® Original and some light brown sugar on top.

5. Bake at 400°F about 25 minutes or until golden brown. Serve warm.


ALL-Bran's NOTE:

Variation: To make sour milk, stir 1 tablespoon vinegar or lemon juice into 1 cup milk.

To substitute milk for buttermilk or sour milk, omit buttermilk or sour milk and use 2/3 cup milk, 1/4 cup honey, 2 1/2 teaspoons baking powder and omit baking soda.

Lipsmack Notes:
  • These were yummy! I am now thinking about making a berry one now. Will it have a filling? Hmmmm.

Come back soon for the Bran Bud Brownies!

Thank you Foodbuzz and Kellogg's....these were great to have and play around with! Love it!

Don't be hatin' on Bran anymore!

Monday, February 8, 2010

The Incredible Edible....

Egg! Have you sat down and thought about how amazing the egg is? I mean seriously! Normally people think of eggs for breakfast first. Whether alone, between two slices of bread or on top of foods....they are so yummy. I think what makes the egg so incredible is how we depend on them to bind things together. It's in our cookies and cakes. Quiches and casseroles. Salads and sandwiches. Possibilities are endless.

As a part of the Foodbuzz Tastemaker Program, I received Eggland's Best Eggs. I will NOT only show you what I made but give you the links to all my former egg posts. I just love eggs!

I saw a post from Mommy I'm Hungry for a Cheesy Ham and Hash Brown Casserole and I printed it out for future use....

After it was ready from the oven, K-man wasn't quite ready to eat due to our excessive snow shoveling. Then I got a last minute idea....let's make this casserole a little more 'brunchy'...

Look what I did....

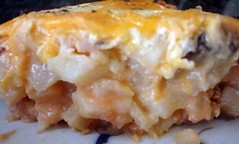
Eggs on Cheesy Ham and Hash Browns
adapted from Mommy I'm Hungry

1 -30 oz. bag frozen, shredded hash brown potatoes
8 oz sour cream
1 can cream of chicken soup
1 small onion, diced fine
2 cups cubed ham
2 cup shredded cheddar cheese, set aside 1 cup of cheese
3-6 eggs (depending on the size of the casserole you make-see note*)

Stir all the ingredients together*.

Place into a lightly greased casserole dish (9 x 13 in). Sprinkle top with 1 C cheese. Bake at 350 degrees for 45 min - 1 hour. Let cool a bit and serve.

*Now, we didn't have a need for full amount of this casserole. Sure, most cooks would HALF the recipe. That WAS my intent. I put half the amount of the hash browns in a bowl, something distracted me and before I knew it was dumping in the WHOLE can of soup and I woke up as I was pouring in the full amount of sour cream when I said aloud "CRAP!"

Has this happened to you?

I knew that if I left the soup and sour cream as is....it was going to be too soupy yet what was I going to do with a half can of soup tainted with sour cream....UGH. Back to the freezer for the remainder of the hash browns to make the full recipe. I portioned out half in the greased casserole as I was intending to make with half the recipe. I took out a square pan, lined it with foil to put in the freezer. The next day you take the frozen casserole out of the pan and seal it all up. Take the pan and put it back into your cupboard. When you are ready to bake the casserole....unwrap and place it back into the pan with the foil you froze it in! Problem solved.

Now I have an emergency breakfast/brunch to pull out of the freezer when I need it!

Are you wondering how does the egg come into play here? I told you K-man was still shoveling when the Ham and Hash Browns were ready. I took a spoon and made 3 divots on top and cracked 3 eggs into them. I turned off the oven and slid the casserole back in for the eggs to set about 20 minutes.

We invited my neighbor over to eat with us and we cleaned it all up! Scrumptious! So hot and creamy....perfect after a snowy morning!

Thank you Foodbuzz and Thank you Eggland's Best!

Try out of some these other tasty tried and true egg dishes I've made....

Spinach and Cheese Squares
Pepperoni Pizza Quiche
Egg Bowls
Poached Eggs and Easy Hollandaise
Egg, Sausage and Cheese Biscuit Sandwiches
Easy Garden Egg Bake
Spinach Quiche
Deviled Eggs
Bacon and Egg Cups

Eggs-cellent Recipes!

Sunday, January 24, 2010

Nature's Pride Tastemaker

I have some thank you's to catch up on. To whom you ask? I've been behind on my thank you's to FOODBUZZ. SO, since things happen in 3's....I thought I better get crackin'.....

Foodbuzz always has Tastemaker giveaways. Sometimes I don't open my email fast enough and the foods available are already spoken for. So I've learned my lesson, don't let ANY Foodbuzz email wait to open.... They are a real giving foodie community.

My First Tastemaker participation was from Nature's Pride. I've gotten their bread many times in my own store. Very hearty and yummy. I often find myself holding up several of their loaves wanting the one with the most fiber.

I'd seen a few other Tastemaker posts. One was toast with cinnamon and sugar. Another was a sandwich. Are you kidding me? That's all they could come up with. Seeing those posts I was a bit intimidated. If I thought those posts were a bit....um....uncreative. I certainly didn't want anyone to think the same of ME.

So I came up with a interesting idea based on my use of it lately. Panko. Yes, it's easy to make like those other posts but I think it has more creative uses.


Homemade Multi-Grain Panko

1 loaf Nature's Pride Multi Grain Bread


Directions:

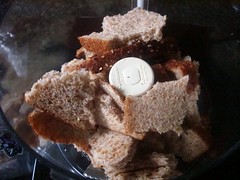
1. Tear up into pieces in your food processor. Seeing all the sesame and flax seeds on top made me happy!
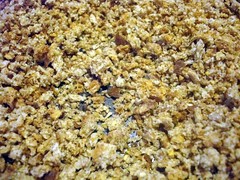
2. Pulse into coarse crumbs.
3. Place on cookie sheets. I found this had to be spread on two cookie sheets otherwise I think the crumb layer would be too thick in order to dry out.
4. Place in 300 degree oven.
5. Bake for 6-8 minutes.
6. Use pasta server (the claw like server in your utensil drawer you don't use!) to move crumbs around.
7. You want to dry out crumbs not toast them so after moving crumbs around place back into oven for another 6-8 minutes.
8. Move around crumbs again and turn off oven and place crumbs back inside with oven door ajar to finish drying.

I've been trying to reduce the amounts of fat, sugar in our diet but also to bump up the fiber. Since I've been using more bread crumbs lately why not make them have more fiber too?

Here are my suggestions for the Multi-Grain Panko (hopefully you will find a new one):

1. Covering your chicken nuggets or chicken strips to bake in oven. The wheat in this panko will render a much nicer browned coating. Be sure to season your crumbs well.
2. Meatloaf will have a healthier binder instead of white bread slices. I know some of you make already use oatmeal which is a whole grain but now you can save it for breakfast.
3. Speaking of breakfast, this multi-grain panko has a sweet nuttiness that would be awesome sprinkled on top of your oatmeal in the morning or on top of your fruit and yogurt.
4. Run out of graham crackers for your pie? This panko would be perfect! Slightly sweet and nutty, you may never use graham crackers again.
5. Topping for your mac and cheese....add some butter, garlic and your favorite herb....perfection!
6. Add to your cookie recipe to add fiber and some nutty goodness. This way you don't have to add real nuts and increase your fat content to your cookies. I have s'more cookie recipe I am going to try soon using my panko instead of graham crackers.


Please be sure to add your comments here for any other suggestions you may have that I can add to the list!

My last thank you to Foodbuzz is for my Foodie Blogroll totebag. It took awhile to get here since I won it over the holidays. Made of canvas, very handsome and sturdy. It's now in my collection of grocery bags (much bigger than them as well!) so I am not using all those plastic ones the store provides. What a difference bringing home so much less plastic!

Stay tuned for my next Tastemaker post when I review what I made from Eggland's Best Eggs.

If you aren't a member of Foodbuzz give it a whirl being a featured publisher and you too can have more opportunities to PLAY WITH FOOD!

Enjoy!