Showing posts with label peppers. Show all posts

Sunday, November 23, 2014

Easy Flank Steak Fajitas

 Here is the second recipe I promised to make for Reynold's this month. It was a no-brainer.  I always use all their foils, the slow cooker bags and turkey bags.  Accept no substitutes! The heavy duty foil is great for the grill and in a campfire.  I adore the non-stick but I said that in my last post already.  Check out this recipe and my extra notes at the end of the recipe too!

Easy Flank Steak Fajitas
Allrecipes.com recipe by  


1 pound beef flank steak, trimmed of fat
1/4 cup lime juice
1 tablespoon vegetable oil
1 tablespoon chili powder
1/2 teaspoon salt
1/4 teaspoon cayenne pepper
2 red, yellow or green sweet peppers (or combination), thinly sliced
1 medium onion, thinly sliced
2 cloves garlic, minced
8 (6- to 7-inch) flour tortillas
Guacamole, salsa, and/or sour cream (optional)

1. Place steak in a large resealable plastic bag. Add lime juice, vegetable oil, chili powder, salt, and cayenne pepper to the steak in bag. Seal bag; turn to coat steak.
 
2. Marinate in the refrigerator 30 minutes to 1 hour. 
 
3. Preheat oven to 400 degrees F. Drain meat; discard marinade. Center meat on a sheet (12x18 inches) of Reynolds Wrap(R) Heavy Duty Aluminum Foil. Bring up foil sides. Double fold top and ends to seal packet, leaving room for heat circulation inside. Center sweet peppers, onion, and garlic on another sheet (12x18 inches) of heavy duty aluminum foil. Repeat steps above to make another foil packet. 
 
4. Wrap tortillas tightly in heavy duty aluminum foil. 
 
5. Bake meat and vegetable foil packets 30 to 35 minutes or until meat is desired doneness (145 degrees F for medium rare) and vegetables are tender, adding tortillas to the oven for the last 10 minutes of baking or until heated through. 
 
6. Open packets carefully by cutting along top fold with a sharp knife, allowing steam to escape; then open top of foil packet. Thinly slice the meat. 
 
7. Fill warm tortillas with meat and pepper mixture to serve. If desired, top with guacamole, salsa, and/or sour cream.


#AllstarsReynolds


 #MealMagic.
 K-man wanted his contribution in all this....

 Cook's Notes:
1. The cooking of the pepper's and onions is great if you need some time to do other things but I like a 'char' on my veggies.
2.  Cooking meat in a foil pack in the oven is not the way I cook a flank steak.  30 minutes was way too long when I cook it for less on a grill and I get the smoky char on it too.
3.  Corn tortillas break up too much for this, flour is better.  I tried one of each. The corn fell away immediately when the flour tortilla stretched with the ingredients with each bite.
4.  Next time I would see how different this would be using the Reynold's foil but on the grill.

Enjoy!

Tuesday, March 11, 2014

Kick'N Chicken with Mango Salsa

Ooooohhhh, you're gonna like today's post.

Our second recipe to make this month for Allrecipes.com Allstars was Sweet and Spicy Salmon with Grapefruit Salsa. Unfortunately since that recipe was not possible I opted for another recipe from Mazola® Corn Oil.  Aside from chicken being one of our favorite proteins but I really enjoy the "sweet and savory" combination.  This recipe rings some bells.

This recipe came at a good time.  Remember the big rain Los Angeles was having before the Oscars?  That same Monster storm swept across the US and pounded our eastern area with SNOW.  One the day it was supposed to hit...it started to drizzle and I cranked up the grill before the snow developed from the rain.  Best snow day ever GRILLIN'!

Kick'N Chicken with Mango Salsa 
from Allrecipes and Mazola®

4 (4 ounce) boneless, skinless chicken breasts
2 tablespoons chicken seasoning
1/4 cup Mazola® Corn Oil
3 tablespoons fresh lemon or lime juice
Mango Pepper Salsa:

2 cups diced fresh mango
1 cup diced red bell pepper
3 tablespoons minced red onion
1 tablespoon fresh lemon or lime juice
2 tablespoons minced fresh cilantro
Salt and pepper to taste

1. Preheat grill to medium heat, or between 350 degrees to 450 degrees F.
2. Trim excess fat from chicken, rinse and pat dry. If necessary, pound chicken to 1/2-inch thickness. Place chicken into a 1-gallon size resealable plastic bag. Add seasoning, oil and lemon juice to the bag. Seal bag and turn to thoroughly coat chicken.
3. Grill chicken over direct high heat for 6 to 8 minutes. Turn chicken and continue to cook for 6 to 8 minutes until cooked through. Transfer to a serving plate.
4. Combine salsa ingredients in a bowl; stir and season to taste with salt and pepper. (Can be made up to 8 hours ahead and refrigerated until ready to serve.)
5. Top grilled chicken with mango salsa and serve immediately.


Cook's Notes:
1. I bought two regular organic breasts.  They were almost about 8 oz. apiece.  I sliced them in half horizontally. If you buy the breasts that are already sliced thinly keep in mind...they will cook QUICKLY.
2.  My husband prefers thighs and I cooked four breasts and several thighs.  I didn't follow the amount of the chicken seasoning because I spread out all the chicken and just seasoned away my favorite Mrs. Dash Southwest Chipotle Seasoning.
3.  I used 3 mangoes, half red pepper and two thick slices of red onion, chopped.  I don't chop and measure things like fruit and veggies.  I don't want a 1/4 cup of anything leftover until I have a use for it.  This salsa provided enough for two dinners for two.

I am an Allrecipes Allstar brand ambassador (a voluntary position) and I'm not compensated for my work with Allrecipes.com.  Products received from the advertiser are only used for experienced-based reviews on Jenny Mac's LipSmack.  The reviews, content, and opinions expressed in this blog are purely the sole opinions of JennyMac.  To learn more about the Allrecipes Allstars program visit, Allrecipes Allstars.

#AllstarsMazola®

LipSmack this,

Monday, April 15, 2013

Chicken a la Mexican

I make this little dish at least 3-4 times a month.  It's very versatile hence it's generic name.  It could have been Chicken tacos but why make you think you have to eat it with a shell/bread?  It's not a casserole because usually that has some kind of rice or pasta.  I named it Chicken a la Mexican because it's got Mexican type spices, peppers and onions.  But here is the fun part. You decide how/where you want it.  Put it on soft tortillas with shredded cheese.  Or put a giant spoonful on rice or pasta.  Top it with cheese or sour cream or both.  Put it on crushed tortilla chip on a green salad.  Slop it in a long crusty sub roll....Have you figured out how you want yours yet?


Chicken a la Mexican
a JennyMacLipsmack creation

4 chicken boneless chicken breasts, cut into strips
1 red bell pepper cut into strips
1 yellow bell pepper cut into strips
1-2 jalapeno peppers cut into very thin strips
1 large onion, sliced, rings separated
1-15 oz can fire-roasted tomatoes
cilantro for topping/garnish
oil for coating pan
shredded cheese, optional
sour cream, optional
Chicken seasoning:
1 Tbsp cumin
1 Tbsp chile powder
1 tsp. garlic powder
1 tsp. pepper
1 tsp. salt

1.  Sliced chicken into strips, coat with seasonings, set aside.
2.  Slice and prep all veggies.
3.  Heat pan medium high with oil of choice about 2 Tbsp.
4.  When pan is hot start with chicken and constantly stir with wooden spoon.
5.  When chicken is half pink and white (about half cooked) add sliced veggies and tomatoes.
6.  Keep cooking until chicken it totally cooked through and no pink remains.
7.  Serve on soft flour tortillas, rice, pasta or sub rolls or a pupusa (as seen below)


Cook's Notes:
1.   Feel free to add a whole green pepper instead of jalapeno if you can't stand the heat.
2.  Feel free to use a pre-prepared Mexican seasoning that is your favorite.  I won't mind.
3.  Taste while you cook to add more of something.  I didn't add on the list an ingredient I don't know if you have available.  I found some Smokey chipotle dried peppers at Home Goods.  I better start looking to see where I can find more.  They are smokey and spicy.  I love them.  But I didn't want you to not make this because you couldn't find them.

K-man smiles real big when he sees this dinner.  He always puts his on a soft flour tortilla.  I prefer the corniness of the tortilla chips on a salad is my favorite.  If you have pre made pupusas in your ethnic section, this is a great topping as well.  Find yours!

Fiesta!

Sunday, October 24, 2010

Goya Product Tastemaker

Would you like some Black Bean and Jalapeno Rice on the side?

Black Bean and Jalapeno Rice

I received from the Foodbuzz Tastemaker Program some FREE Goya products. YUM! Since I live in diverse area some stores here have a pretty large Goya section. They have many interesting products that I have not used before and when I signed up to take part in the Tastemaker they sent me nothing scary to use. I received a can of black beans, garbanzo beans (chick peas), yellow rice, green olives, olive oil and two recipe booklets highlighting Mexican and Carribean recipes. I noticed in the book the also had two booklets on Central and South American recipes. DRAT, I would have liked those books instead for most of my students come from those areas. I guess that is what the Goya site is for!!! LOL There I found the section for Central America and found a recipe for pupusas. This food item is HOT at our school. Parents bring them in for food events, trucks come to sell them on special events and my students bring them for cooking projects. The pupusa is loved by all -especially the 'gringos'. LOL. Great, I've been waiting for a good recipe!

Enough small talk and onto the recipe. For my recipe, I decided to use:

Black Bean and Jalapeno Rice1

There were no recipes for any 'bean' and rice mixture side dishes. I guessing that the Hispanic culture are purists and like their beans separate from the rice (I am guilty of when I go to Mexican places I mix my refried bean and rice sides together). Not me I am a rebel! Instead of jazzing up the beans with spices and making a rice side plain; I added plain beans to the rice that was seasoned already and jazz it up with the last of my jalapenos from my garden!

BEFORE COOKING NOTE:
Two questions need to be answered before you approach this recipe.
How do you want your peppers?
1. Hot and Spicy, Zingy or Mild?
2. Crunchy or Soft?

Cooking Approach to those answers:
1. The heat depends on the chopping process. If you want them HOT. Just chop off the stems and chop. All the heat is in the veins and seeds. But cooking them will also reduce the 'caliente' scale as well.
2. If you want them with some crunch, stir them in at the end before serving. If you want them 'par cooked' stir them in the rice when they are sitting for the 5 minute rest. If you want them soft: Cook the peppers with the rice.

Now proceed....

Black Bean and Jalapeno Yellow Rice
by JennyMac Lipsmack

1 box Goya Yellow Rice
1 Tbsp Goya Olive Oil or butter
1 can Goya Black Beans
half an onion, chopped
jalapenos (you decided how many you can handle)

Read the instructions on how you want to prepare your rice. Stove Top or microwave. I like the microwave option for I don't have to babysit it and can do other things. Plus, I think this rice comes out PERFECT from the microwave.

Chop your onion, big or small chunks, your preference. Stir the onions, oil or butter, and water with the rice and follow your cooking directions. 5 Minutes on High and 20 minutes on 50% power. Devein and/or chop jalapenos (see below)Open black beans, drain and rinse. When rice is ready the last direction asks you to let the rice 'set' to absorb last of moisture. Stir in beans and peppers and cover for five minutes. Serve with chicken and garnish with freshly chopped cilantro.

To remove the heat from jalapenos:
1. Put on gloves. I have not worn gloves and washed hands several times...washed hair the next morning and still found some "heat" under my nails!
2. Slice one side off pepper from stem to tip. This first slice should be shallow enough to cut off the "meat" of the pepper, leaving the vein with the seeds inside. One quarter turn the pepper and repeat the cut. After the third cut you will have all the seeds and most of the veins on the remaining quarter. Remove stem and use gloved finger to scoop out veins and seeds. Either julienne cut your quarters or finely chop.

Again, THANK you Foodbuzz and Goya. Those of you interested in more Latino Flavor to your recipes definitely hit up Goya's site....very user friendly and authentic recipes easy to follow.

Delish!

Wednesday, May 5, 2010

Supreme Pizza Bubble Bread

When you have all the makings for a nice supreme pizza...it really bites when your only 'bread' is some canned biscuits. I said to myself...."I REFUSE to press them out to make mini pizzas! Nor am I going to press them all together to FAKE pizza dough!"

Supreme Pizza Bubble Bread1

So here is what I did to make my pizza 'outside' the box....

Supreme Pizza Bubble Bread
JennyMac Lipsmack Creation

2 cans of refrigerated biscuits (10 count each)
1 cup of chunky tomato sauce (mine is just canned whole tomatoes mooshed with my hands with Italian seasoning, garlic powder and parmesan cheese added to taste)
1/2 cup onions, chopped.
1/2 green pepper, chopped
1 pint mushrooms (raw or sauteed)
1/2 cup pepperoni, chopped in half
1/2 cup Italian sausage, (however styled, mine was leftover from a hot sausage sub night, chopped)
4 mozzarella cheese sticks, chopped
1-2 cups mozzarella cheese, shredded.
Freshly grated parmesan

Preheat oven to 400 degrees.

In a large bowl, mix the sauce, onions, peppers, mushrooms, pepperoni, sausage and chopped mozzarella sticks. Cut each biscuit into quarters and mix into the 'supreme' mixture.

Put supreme mixture on lightly oiled pizza pan (not the ones with holes). Spread it out about 1 inch from edge. Bake for 20 minutes. Top with shredded mozzarella cheese and bake for additional 5 minutes or until cheese is melted. Top with freshly grated Parmesan. Pizza can be served as a slice and eaten with fingers or just serve from pan in center of table and everyone just pull and eat!

Here have a bite!

Supreme Pizza Bubble Bread2

Fun pull apart type of dinner that is kid friendly and chocked full of veggies! Also, this was NOT a supremely EVIL pizza if that is what you are thinking, I used turkey pepperoni and sausage, the mozzarella was reduced fat. So there.

Supreme Lipsmacking,

Sunday, January 11, 2009

Sunday Blues - Week #2

Good Gawd. Can I take a break from canned biscuits? I still have 3 left on my list to prepare….(WTH was I thinking?…LOL) I will do those later on (only because I still have cans of biscuits to use up!)….stay tuned.

Another Sunday Blues….

What do I have to do to get it to SNOW around here!!!! I am so bummed reading some of my fellow foodies about how they were cooking this on a snowy day or….cooked this dinner for their kids who came to visit and shoveled the driveway….GRRRRR. Can’t YOU people SHARE? I want some snow TOO…(sniffle, whimper)

What the problem is really, that the DC area has a protective screen most times….called the Appalachian Mountains. If the snow does venture over it seems to trickle over to western Maryland. Now don’t get me wrong….we’ve gotten POUNDED a few times. And this teacher was dancing around in her jammies when she got snow days but we’ve also had to make up our ‘too many days’ off with workdays becoming school days, extending the school day hours, tacking on extra days in June. Now that we’ve gotten extra days plugged in our school year calendar, we don’t ‘get them back’ like we used to if we didn’t use them up and got out a few days earlier in June. Sux. They’ve been calling for some icy mix days…..bah…nuffin! Just freakin' rain.

BUT.....Next week is our last week for the grading period and my students are just sewing like crazy. I am so proud of them. Now watch….I am pressed to get all our projects completed….THEN WE’LL GET MY SNOW….

Cooking always helps to ‘unblue’ me….

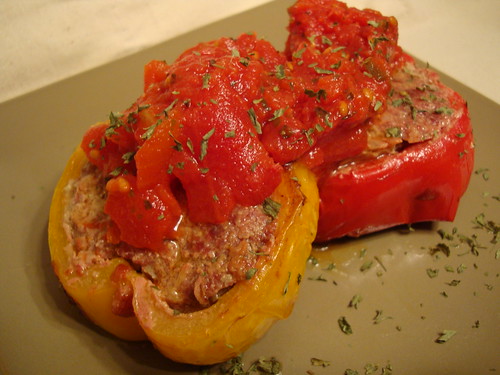
Awhile ago, I saw this recipe on the Food Network with Sunny Anderson’s Cooking for Real and I thought it was a nice ‘tweak’ It’s not meatloaf really or stuffed peppers but when you put the two together…


Pan Fried Meatloaf in Tricolor Peppers
Serves: 4 to 6 servings

1 green bell pepper
1 red bell pepper
1 yellow bell pepper
1/2-pound ground beef
1/2-pound ground turkey
2 slices white bread, cut into cubes
1 (28-ounce) can crushed tomatoes with basil
2 cloves garlic, minced
1 egg
1 small onion, chopped
1 tablespoon chopped sage leaves, plus 6 to 8 whole leaves, for frying
A few dashes Worcestershire sauce
A few dashes hot sauce
Salt and freshly ground black pepper
1-tablespoon oil
Vegetable oil, for frying

Preheat oven to 400 degrees F.

Remove core and seeds from peppers. Slice into 1 inch rings and place on nonstick baking sheet. You should get about 3 rings per pepper. In a large bowl mix together beef, turkey, bread, 1/2 cup of the tomatoes, garlic, egg, onion, chopped sage, Worcestershire sauce, hot sauce, and season with salt and pepper. Press meatloaf mixture evenly into pepper rings. In a skillet over medium-high heat, add oil. Sauté meatloaf rings on both sides until golden brown, about 5 minutes per side. Add remaining tomatoes to skillet and bake until cooked through, 20 to 25 minutes. Garnish with sage leaves.