Showing posts with label kids. Show all posts

Wednesday, December 31, 2014

The ones I missed....A 2014 Food in Review!


Happy New Year's Eve Jenny Mac Lipsmack Fans! 

I know I wasn't posting as much this year but I have been cooking quite a bit! I really need to create some system to get my recipes on my blog in an easier way! Any suggestions short of hiring an assistant, feel free to send me suggestions...So Good-Bye 2014....here is some of what I have made chronicling my year in food in review.


Cauliflower Tots is what caught my eye on Pinterest but when I saw the site included her version of Zucchini Tots and that was the abundant item currently from the summer's bounty...it is what I made.  These are pretty healthy with lower fat cheese and were VERY good!  I'd make again!


Bacon and Cheddar Zucchini Bread.  Ha-Ha....mine looked anemic.  Nothing like the picture on the website.  Perhaps I needed to cook it more but the cake tester came out clean.  I was afraid of drying it out.  It was okay.  I'd try again to see if it turned out better, but I was sad over the waste of good bacon in this.  I think half of it got thrown away.  You try it and see if yours looks like the one in their website. Let me know how you did!


I loveeeeeee demonstrating new foods for my students to try.  These were a little treat I found on Pinterest.  The students loved it so much I included it on my school website for the kids to have access to make at home if they wanted.  So if picky 7th graders gobbled these down and wanted more, you may have a hit at home with your kids!


Every so often I become OBSESSED with some type of recipe.  I have biscuits crumbs in my blood due to my grandmother making them all the time (Did I pass Me-mom?) However she would woefully say to us when we'd visit how sorry she was that these were not one of her better batches. WTH? They were always good! She was just overly perfectionistic! So the more I see recipes done on TV about biscuits and the flaky layers and the such...I wanted the same.  See the monster you created in me Me-mom?  Warning the recipe provided is good but it's really about the PROCESS of the dough folding.  Trust me, don't ignore this warning, it's more about the folding than the recipe.  I had to make this about 5 times to understand this.  Don't be stubborn like me.


I made this Pumpkin resembling Cheeseball for halloween.  I had printed it out last year but found it and made it this year.  I searched for the recipe and found it on Food Network.  It was really good with minced jalapeno and coated in ground up Dorito chips.  Next year, I'd make it with more minced jalapenos.  We like it zippy around here!


Sorry, I was too busy cooking on Thanksgiving....and we wanted to eat! But I included this picture because the real standout recipe that was new this year that I would DEFINITELY make again was the Chipotle Sweet Potatoes.  Sweet Heat.  We loved it.  I think I enhanced the recipe by adding just a touch of brown sugar 1/4-1/2 cup to bump the sweetness.  I buy those chipotle peppers in a can and separate the peppers out in their own baggie with some of the sauce and store them in the freezer! That is what this recipe called for ONE of those hot suckers in these here taters! Barely seen on the right...LOL


Christmas Holiday Party! We invited the neighbors to meet and greet.  We hadn't done it in a long time.  Those who came, we had a blast.  Might consider doing this again, maybe a tradition...Hey, it's gets the house cleaned too! LOL.  Found most of my ideas on Pinterest, modified them like the appetizer tree below.  When I figured out that only half of the neighbors were coming I chopped half of my styrofoam cone down (AC Moore, Michael's Craft stores, Jo-Ann's). Covered in plastic wrap. It was fun to assemble but really appropriate for a large crowd. We had much of this tree left over.


This was adorably cute but I'd use a different recipe.  Bottom half was mustard, onion with cheddar cheese and the top (head) was a pesto.  Coated in Parmesan cheese.  I just wasn't WOW'ed by the flavors.  Use the favorite cheese ball recipe of your own and use the picture as a base how to SCULP your snowman.  I will include the link so you can be your own judge if you like it or not.


I have made this Ranch Veggie Tree numerous times.  Kids even love it.  Very easy.  I tweak their version on Pillsbury.com by using dry ranch mix in whipped cream cheese and my decoration of the tree is more prominent. Their site includes a video if you need it.


Classic Sausage Ball recipe by Bisquick.  Next year I am making it with their Gluten Free mix since I have a GF neighbor and I would like to give her more options next time.  Also I think I will hunt for an optional dipping sauce as well.


I am NOT a seafood eater, however my husband is.  A good host has to please other people than herself, so sometimes she's gotta 'suck it up' and touch smell fish! K-man raved about this so this recipe will be repeated to keep him and my other guests in the future happy.  Thanks Pioneer Woman!


Easy Peasy! Phyllo Shells, brie and Cranberry Sauce.  Just melt brie for about 5 minutes in the oven and top with cranberry sauce.  Yum!


Just a peek of the SPREAD....


Party Sweets!  Top: Oreo Truffles, Middle: Salted Caramel Bon-Bons and Bottom: Pretzel Kisses and Pecan Rolo Pretzel Bites.


School Staff Food Gifts...Oreo Snowman
I tweaked this idea with adding sprinkles, and pull apart licorice garland.  Staff loved them!


Lastly, I just wanted an old standby for a sweet treat during the holidays.  Shortbread, simple, satisfies, makes many.


See you next year!

In Foodie Love,

Saturday, November 3, 2012

Halloween Treats

I know, Halloween is long gone.  However many of us had a lot going on.  I was all excited about posting my Halloween Treats and Hurricane Sandy hit.  We did not have school for two days and alas I was not able to make my treats until the actual day of Halloween and 2 days after.  My plan was to have most of it done BEFORE!  As a teacher trying to reschedule all that cooking and to rearrange the other classes.  AND, keeping my plan to decorate my room for the kids, taking it all down and decorating the house for the kids in the neighborhood.  Between making the treats, passing them out, remembering to take pictures, decorating  (....oh did I mention I had hall duty that week that requires me to monitor the hall 20 minutes before I normally come to work so that means I can't do anything in my room?)  So if I only worked 3 days last week, why did it feel like a full 5 days?  Fortunately, we lost no power and maintained no house/tree damage.  The "cat lady" above and her "roadie" are very blessed.  Enough whining....let's get to the treats, shall we?


Charlotte’s Web Cake

Create a spider web on top of a cake!

Start by spreading a round cake with white or orange frosting. Thin some chocolate frosting with milk until it's about the consistency of melted chocolate, and place it in a piping bag with a ¼-inch tip.  Starting in the center, pipe a spiral pattern radiating out until you come within an inch of the edge of the cake. Now, pretending the cake top is the face of a clock, gently drag the tip of a toothpick from the center to 12 o'clock, continuing all the way to the edge of the cake. Drag the toothpick from 1 o'clock back to the center, and then from the center to 2 o'clock. Continue in this fashion until you have completed the circle. You can also do this on a smaller scale with cookies and cupcakes. Decorate your 'web' with plastic spiders (or gummy ones) and bugs!


Used Tampons
from Divine Dinner Party (digusting food section)

Ingredients:
20 large marshmallows
1 can sour cherries in juice (not cherry pie filling!)
5, 8-9" lengths of food-safe string

 Instructions:
1. String four marshmallows on each of your five strings. I find the easiest way to do this is wrap the string around a wooden skewer, skewer the marshmallows, and pull the skewer out. You can also tie one end of the string around a toothpick.
2. Line the marshmallows up on one end of the string. Knot the bottom of the string.
3. Place marshmallow "tampons" on a serving tray. 5. Pour an undrained can of dark, sour cherries (it's best if you cut up the cherries a bit) over. Or use cranberry juice and dried cranberries.
6. Enjoy!  


Bloody Worm Sandwiches
from Divine Dinner Party (more gross food section)

Ingredients:
8 hot dogs
8 hot dog buns
1/4 C. ketchup Instructions:
1. Bring a pot of water to a boil.
2. Slice each hot dog into long, worm-like strips.
3. Dump hot dog strips into boiling water and cook until they begin to curl a bit. 4. Drain.
5. Return cooked hot dog worms to pan and toss with ketchup until thoroughly mixed.
6. Serve in hot dog buns.


Breadstick Spiderweb

1 can (8 oz) Pillsbury® refrigerated breadsticks (8 breadsticks)
 1 egg
 1 tablespoon water
1/2 cup shredded Cheddar cheese (2 oz)
Pizza sauce or marinara sauce, heated, and garnished with chopped fresh basil leaves or flat-leaf parsley

Heat oven to 350°F. Spray large cookie sheet with cooking spray. Separate dough into 8 pieces; roll each piece into 12 to 14-inch rope. On cookie sheet, place 4 dough ropes overlapping to look like asterisk; with remaining 4 dough ropes, make concentric circles to create spiderweb.
In small bowl, beat egg and water; brush over dough. Sprinkle with cheese.
Bake 12 to 14 minutes or until golden brown. Immediately remove from cookie sheet. Serve warm with sauce for dipping.


Hairy Armpits  
(sorry no picture, what was I thinking? Just imagine some European chick dancing with her arms in the air and you get a quick glance of her unshaved armpits!  lol)

3 large shredded wheat bundles
3 TBSP. honey
1 TBSP. light brown sugar
1 6oz. bag milk chocolate chips
2 TBSP. butter or margarine

Directions:

Break up shredded wheat bundles into single long strands, so that they have the appearance of armpit hairs. Set aside. Place the honey, brown sugar, chocolate chips, and butter in a medium sized heavy saucepan and heat over low to melt. Gently stir mixture with a rubber spatula. Mixture should be smooth and glossy. Remove the saucepan from burner and place it on a heat safe work surface. Gently fold in shredded wheat. When the shredded wheat is completely coated, scoop it onto wax paper in nine equal portions. Use a fork to gently rake "hairs" into one direction. To set Chocolate Armpit Hairs, place them in refrigerator for about thirty minutes. If there are any hairy bundles left over, keep them stored in the refrigerator.


Froot Poops My school site has a photo gallery of these plus many others...


1 and 1/2 pkg (12 oz) chocolate chips
1- 14 oz sweetened condensed milk
Dash salt
2 tsp. vanilla
1 and 1/2 cups chopped, dried mixed fruit

1. Line the bottom of a 9 inch square pan with waxed paper.
2. Pour chocolate chips, sweetened condensed milk, and salt into large glass bowl and melt in microwave. Stir constantly to determine when melted.
3. Pour in vanilla and dried fruit. Stir into chocolate mixture.
4. Pour chocolate mixture into lined pan and spread it evenly with your rubber scraper. Place pan in the refrigerator and chill for at least two hours.
5. When thoroughly chilled, invert chocolate mixture onto cutting board. Cut into 1 inch squares.
6. Create loads of uniquely shaped diarrhea dumps by rolling each square between the palms or your clean, dry hands. Make some flat, round disks, some short, thick poops, and some long skinny ones!

Really Gross: Make sure you present your diarrhea delight on toilet paper wads!

Please print these out for next year.  Again I am sorry for these GREAT recipes being poor timed....but stuff happens.

My thoughts and prayers go out to the people of New York City, Staten Island, Long Island and New Jersey Shorelines.  Of all the people of our Wonderful US of A.  I feel the folks of NY and NJ have the stuff that make them strong survivors.  They survived 911 and this too shall pass.  If you can make a donation to the Hurricane Sandy Fund, even the smallest bit can help. 

Slurp,

Friday, October 5, 2012

Gearing up for Halloween

Let's start out healthy on our treats for Halloween and slowly get evil?  Nah, Halloween food is all about deception and FUN.
I was just telling some colleagues about how I used to do the food for my school's Halloween dances.  My funny observance?  When it comes to FREE food and teenagers....watch out, you may lose a hand.  Chips, cookies, candies for free.....WHOOSH!  It's gone in a few minutes.  When I did the food and gave it gross names and formed it to resemble things like POOP....SCREECH!  For some reason taking raisins stirred melted chocolate forming it into little logs and calling them "Fruit Poops"....I had to talk them INTO coming BACK to the table and eating it.  That was hilarious!  Anyhow, more of those recipes to come. 

Today I'd like to share with you what I made for my fellow FACS teachers at our meeting.
My little Veggie Skeleton.  Isn't he CUTE?  It was just us Middle School teachers the high school teachers were a no show so they missed out.  The four of us 'killed' him easily.  Hahaha.

So if you are planning a Halloween party with a lot of junk....make this little guy and you'll be surprised that he may disappear before the high calorie stuff.  Make sure you hit my cook's notes at the end for the SHORTCUTS!!!

Veggie Skeleton

2 cups of ranch dip
2 celery stalks cut into 3 parts
1 red pepper cut into strips (see picture)
6-8 mushrooms, sliced
2 cauliflower flowerets, halved
8 baby carrots
1 black olive, pitted and cut in half
10 spinach leaves
10 cucumber slices

This really has no directions other than save the picture and arrange it on your platter as shown.  However...

Cook's Notes:
1.  Most of these items I took from the salad bar at my grocery.
2.  Grabbed a tub of ranch dip and placed in white bowl, stuck in spinach leaf hair and two eyes.  Didn't feel the need for a mouth.
3.  I only bought a whole red pepper because the salad bar was LOW on the red ones.
4.  I purchased a container of the celery stalks because the salad bar always chops up their celery for salads.  Same goes for baby carrots.  And you are going to need extras to use up all the dip. 
5.  Very easy to put together and cute as a button!

Monday, May 10, 2010

Doughnut Cake Pan- A review

Donut Pan

Nuff said...pretty good likeness. Unlike my review of the cookie cake pan with not so good results.

I made this for dessert for our Mother's Day dinner. The family joke is about my grandmother's love for doughnuts. No matter the brunch spread...she will gravitate to the doughnuts. We have gotten her shirts as gifts about liking doughnuts. One year someone gave her some doughnut cologne. Another year during the holidays a family member bought a ginormous boston cream doughnut. It was about the size of a large pizza. It was only fitting that when I saw this pan from Williams Sonoma that I get it to make for grandmom's birthday. Well, since her b-day is in August....and it was Mother's Day....the cake came early!

Honestly, I didn't bother with the recipe on the box for time was lacking. I doctored up a cake mix and had some leftover frosting from another cake in the freezer. I also scooped up some cake to make holes to add some dulce de leche pudding in the middle for a cream filling doughnut affect.

I didn't think this cake pan wouldn't have problem due to the lack of 'detailing' on the cake pan. I will try the cake again using the recipe for I think any cake recipe or mix would work without a problem and so far even a cake mix was just fine. One day I will surprise my homeroom with a 'doughnut' for breakfast. I sure will be a hit for any food or sugar makes them happy always!

So if doughnuts are popular in your family this would be perfect to make with the kids and it will give you huge brownie.... err....doughnut points if you made this.

Enjoy!

Monday, October 5, 2009

Countdown until Halloween part 1


Time is ticking many of you are looking for cool Halloween ideas....

I've been known to be the Queen of Halloween at my school....that is until we stopped having Halloween dances and my stint of doing the food for many years ceased forever. Yes, our principal thinks that Halloween is culturally insensitive. It is sad to see a kid tradition is removed because of the ignorance of what it really is. Confused with All Saints Day, All Hallow's Eve or even Los Dias de los muertos....let's be for real here.....it's a day when the kids get candy. They live for this stuff. So did we.

Regardless, we are a culture of many countries of origin and many of us wear green on St. Patrick's Day even though we aren't Irish. We may go out for some enchiladas and down a beer on Cinco de Mayo. Or not. It's our choice to participate in whatever cultural celebration comes our way. Funny thing....as a school we do not dress for Halloween, nor have a Halloween due to possibly offending those who do not 'participate' in Halloween but I was told I could do my Halloween foods in my classes if I so desired. What the heck?

Anyway, off my soap box and onto some fun stuff for you to peruse.....

Since I have many Halloween recipes and pictures of the stuff I've made in the past on my school site, I am not going to reinvent the wheel and just give you a link to one page of my site every couple of days. Please keep in mind some of these creations were 'kid made' as opposed to 'teacher made.'

Page One of Halloween Recipes

Page Two of Halloween Recipes

More pages of Halloween ideas are to come, if you don't cheat and go through my web page on my school site. LOL. When we make some new stuff in my classes I will add those later!

Enjoy!

Saturday, May 9, 2009

Cooking/Bonding Experience

I know that often Mother's Day is when we should give Mom a rest in the kitchen. But some of you mom's just can't sit still. Here is a fun activity in the kitchen that the kids can do and you can get your cup of coffee and watch/relax while they bump up their cooking skills!


Let my 6th grade class demonstrate for you how to do it and the recipe will follow:


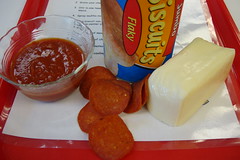
Gather your ingredients:

-can of biscuits (your choice of type/size) -pepperoni slices (we always use the turkey ones) -about 1/3 package of mozzarella cheese
-parmesan cheese/ garlic salt
-tomato sauce (plain not the spaghetti sauce from the jar - too much sugar in it!!!)


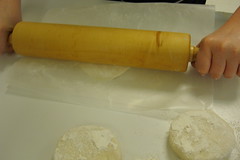
Put some flour on your counter and lightly coat each piece from the can. The kids love opening the can and having it POP in their hands! Tear off a piece of wax paper, fold in half and have the kids roll out the biscuit to be flatter and bigger. (Sorry....flour and biscuits are difficult to see on white counter tops! Look hard!)


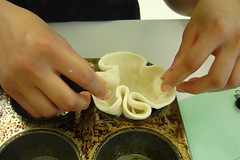
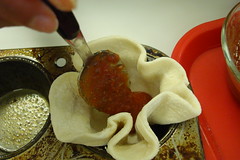
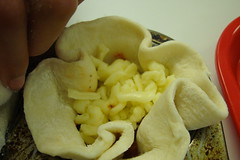
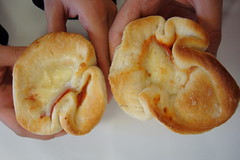
In a muffin tin spray with non stick cooking spray, line 8/10 cups with your flattened dough (the number of 'pizzas' will depend on the number of biscuits per can) These thick 'flaky' jumbo biscuits could have easily been split in half to make 16 pizzas but you will see how they turn out later....


Place a tsp of sauce in each cup. Prior to this, my students put 1 tsp of Italian seasoning in about 1/2 cup of tomato puree. This group forgot to add 1 Tbsp. of grated parmesan cheese. Oh well.


Put in a slice of pepperoni on top of your sauce.


Prior to this step, you want your kids to grate their own cheese. I know that it's easier to buy the shredded cheese but they put 'stuff' on that shredded cheese to keep it from sticking and I don't think the bagged stuff tastes as good AND...it's good to have your kids experience grating cheese...nice and slow no harm will come to them....now grating carrots....a little more risky!


Alrighty, these puppies are ready to be put in their PREHEATED oven (another important thing to impress on the kiddies!)

Moms....don't put these in the ovens for your kids. Let them put the oven mitts on and do this....ovens are not to be scared of if used properly! You have no idea how many of my students are terrified of putting their hands in the oven....I have to show them (with my own hands) the heat is nothing to fear....it's the metal inside but with an OVEN MITT on....again....no fear. Teach your kids confidence....not fear! I really think many people avoid cooking as adults from scary/misguided cooking experiences!

TA-DA! Ginormous hand-held kid friendly pizzas. These are great for family snacks, dinner (with a side salad) or something perfect for those slumber parties where all the kids are involved. Trust me there is plenty for many kids to do with this recipe!


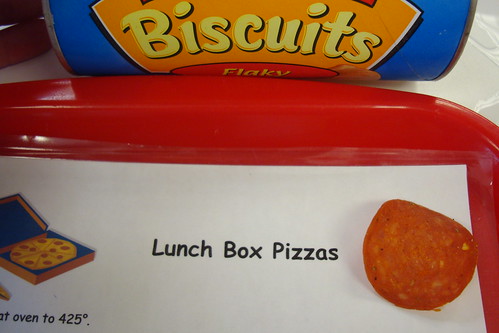
Lunch Box Pizzas

1 tube (7-1/2 ounces) refrigerated biscuits* (8-10 biscuits)
1/4 c. tomato sauce (I like puree better for it's thicker)
1 tsp. Italian seasoning
1 Tbsp. grated parmesan cheese
1/4 tsp. garlic salt
10 slices pepperoni
3/4 c. shredded Monterry Jack or Mozzarella cheese

Flatten each biscuit into a 3-inch circle and press into a greased muffin cup. Combine the tomato sauce and Italian seasoning, parmesan, garlic salt; spoon 1 tsp into each cup. Top each with a slice of pepperoni and about 1 Tbsp of cheese. Bake at 425º for 10-15 minutes or until golden brown. Serve immediately or store in the refrigerator. 8-10 servings.

*The grands type or jumbo type biscuit are great....renders jumbo sized pizzas. Also the flaky types of biscuits can be split to give you double the amount of biscuits. I have also had the kids you the tortilla press with the biscuits. I offer both rolling pin and the press and let them decide which is 'funner'

ENJOY and GET THOSE KIDS COOKING (and washing the dishes too!)

Tuesday, January 20, 2009

Closing the Biscuit Book

Happy Inauguration Day!!

" 'Tis the gift to be simple, 'tis the gift to be free, 'Tis the gift to come down where you ought to be, And when we find ourselves in the place just right, 'Twill be in the valley of love and delight. When true simplicity is gain'd, To bow and to bend we shan't be asham'd, To turn, turn will be our delight, Till by turning, turning we come round right."

-Simple Gifts by Elder Joseph Brackett

What a beautiful song.....What a great day to be locked in at home and do some cooking of something simple, my last biscuit entries. There is NO WAY I would be out amongst those crowds in DC today. I am content with my most perfect view from my warm home. Thanks to our Superintendent for changing his mind at the last minute and giving the teachers the day off. Driving would have be insane....Thank you Dr. Smith (like you are reading this....lol)

ANYWAY...I was thinking what could I do for today....hmmmm....something red, white and blue? Nah, I don't have any blueberries left in my freezer. Then I remembered.... Gotta finish up my cans of biscuits!!! Even though K-man and I are trying to eat healthier until Spring....I told myself, no worries having this evil stuff around, I will just take it to school....those kids will eat anything!!!

So in honor of NOT going down to DC today....GOOF BALLS (lol)


Goof Balls

2 (10 count) packages refrigerator biscuits
20 chocolate candy kisses
2/3 - 3/4 cup miniature marshmallows
1/4 cup sugar
2 teaspoons cinnamon

1. Preheat oven to 350F.
2. Flatten biscuits with palm of hand.
3. Place one chocolate kiss and 3 or 4 marshmallows in the center of each biscuit.
4. Bring edges of biscuit up and around to enclose, pinch well to seal.
5. In small bowl combine sugar and cinnamon.
6. Roll each biscuit ball in sugar mixture to coat.
7. Place on ungreased baking sheet.
8. Bake at 350F for 15 minutes or until bottoms are golden brown.
5. Serve warm.

Your kids will love making this one!!!

______________________________________

"Bake-In" Oozy Bread
From the Rachael Ray show

Bacon (“Bake in” get it?) and maple syrup baked right in.


* 1 package bacon, chopped
* 1 8-ounce jar maple syrup
* 1 stick butter
* 1 package (8 biscuits) home-style buttermilk biscuits, preferred brand Pillsbury


Yields: 4 servings

Step 1
Preheat oven to 375°F.

Place a medium skillet over medium-high heat and add bacon. Cook until crisp, about 8-10 minutes and reserve.

Place a small saucepot over medium heat and add the maple syrup and the butter -- do not bring up to a boil. Cook until butter is melted, then turn the heat off and reserve.

Step 2
Butter or spray a 3x9 loaf pan. Pour a couple tablespoons of the maple/butter sauce in the bottom. Layer 3 of the biscuits in the bottom of the pan. Tear up one of the biscuits and fill in any open spaces with the pieces. Don't worry if any still remain, the ooze will fill those in.

Step 3
Sprinkle half of the reserved bacon onto of the biscuits and top with about a 1/2 cup of the butter/syrup mixture. Place the remaining biscuits on top, sprinkle the rest of the bacon over them and top with the remaining maple sauce.

Step 4
Transfer to oven and bake for 25-30 minutes. Remove and immediately turn over onto a serving dish.


OMG....these were sticky, buttery, salty, ooey, goeey, crunchy....THUD.


LASTLY....


The reason for my whole ODE TO BISCUITS....
Me-mom's Biscuits. I didn't realize that I had two of her recipes when I went to my recipe box. I had a Buttermilk Biscuit and Master Biscuit Mix (below in her handwriting - which you can see is very difficult to read)

Me-mom's Buttermilk Biscuits

1 stick of butter
4 c. flour
2 T. baking powder
1 t. salt
2 T. sugar
1-1/2 c. buttermilk

Cut butter into sifted dry ingredients. Add liquid. Knead a few times. Roll out and cut into biscuits. Bake @ 450 for 10-12 minutes.

Master Biscuits

9 cups of flour
1/3 c. baking powder
1 T. salt
1 t. cream of tartar
1/4 c. sugar
2 cups shortening

Stir dry ingredients and sift 3 times. Cut in the shortening until it looks like cornmeal. Store and keep at room temperature. When making biscuits: use 3 cups mix, 2/3 c. milk. Bake @ 450 for 10 min.

Thank you Me-mom, I know I never was able to tell you how I appreciated your culinary influences on me when you were around. I hope they have internet access in heaven by now!!!