Tuesday, July 14, 2009

Run for your life! There's a monster....


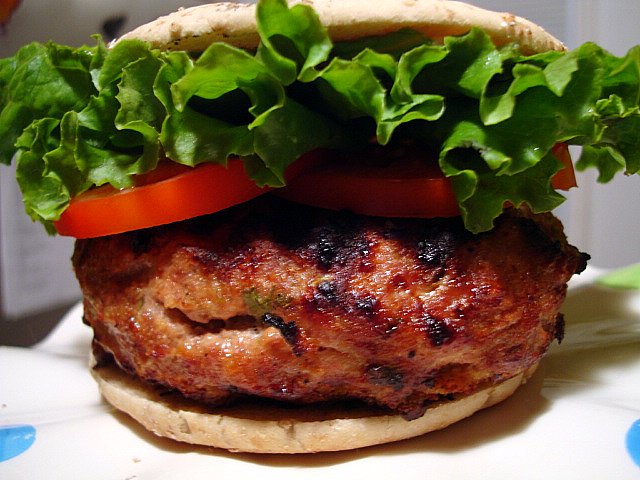
Thank God for Arnold's Sandwich Thins or I'd never been able to get my mouth around this monster! I needed to put some olives for eyes on the edge/side of this burger to have given it a face for the lettuce on top kinda looks like hair....LOL.

Honestly, this was NOT intended to be so huge. I had prepared 4 nice and thin 1/4 lb. turkey burgers. K-man was in the mood for a 'man-food' kinda burger. I gave him some options.

1. Cook two patties and have two burgers.
2. Cook two patties and make a double burger.
3. Put some cheese slices on one and pinch the two together for one 'monster' burger.

His eyes grew wide. Of course, you KNOW what he chose!

Now for the recipe:

Monster Turkey Burger
adapted from Bob Green's Best of Life Diet Cookbook also on Oprah.com

1 pound ground turkey breast
1/4 onion , ground in a food processor (omitted and just doubled the green onion)
1/4 cup finely chopped green onion (scallion)
2 slices whole wheat bread , toasted and processed in a food processor for 1 minute to make crumbs (do this before the onions! I just used 4 halves of the Arnolds Whole Grain Sandwich Thins)
1/4 cup Better 'n Eggs or 1 egg , beaten
2 cloves garlic , finely chopped
1/8 tsp. ground mustard
Black pepper to taste
Vegetable oil cooking spray
4 whole wheat hamburger buns (about 115 calories each, again I used the Arnold's @ 100 cal ea.)
1 Tbsp. mustard
8 leaves lettuce
8 thick slices tomato
4 slices red onion (omitted for I thought the onion in the burger was enough)
2 oz of 70% reduced fat White Cheddar (1 ounce per burger- this is not part of Calorie count below)

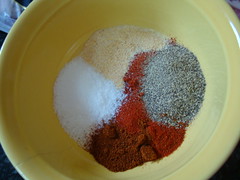
Thoroughly mix the turkey, onion, green onion, bread crumbs, egg, garlic, mustard and pepper to taste in a large bowl. Form the mixture into 4 patties.

OR: Slice of two thin slices of low fat cheese and place on top of one burger. Lay another burger on top of the cheese and carefully pinch and seal the edge.

Heat a large, heavy-bottomed skillet over medium heat.

Lightly coat the pan with cooking spray and place the patties in the pan. Cook
until the pink just disappears in the center, about 4 minutes on each side, or until a
thermometer inserted into the center of the burger reads 160°.

Slice the buns. Spread each top with mustard. Place the lettuce, tomato, onion and a
burger on the bottom bun and cover with the top. Serve.

Nutritional Information:
Per serving, about: calories: 367; protein: 29 g; carbohydrate: 36 g; dietary fiber: 6 g; sugars: 3 g; total fat: 13 g; saturated fat: 3 g; cholesterol: 143 mg; calcium: 118 mg; sodium: 487 mg


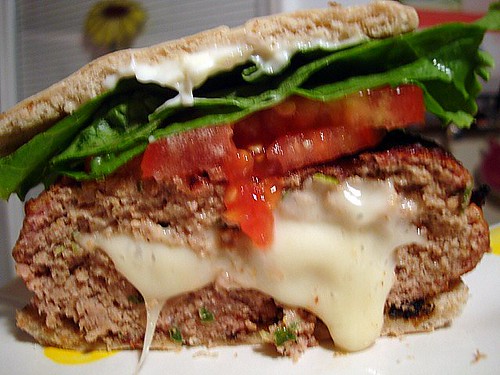
Can you get over how that was two little thin slices of cheese? They were barely 1/4 inch thick.

I highly suggest you dip your burger in your ketchup, mustard etc. If you put it on your toppings and bun will slide all over the place. Just the bit of light mayo under the lettuce and the juicy tomatoes made for a slippery burger! K-man liked this burger but I could see in his slightly sad eyes that he'd wish it was BEEF. "Sometimes we eat healthier at home so going out for a burger is a real treat, right hunny?" Uh huh he said.....

LOL

Monday, July 13, 2009

Compost in the Kitchen

Compost Cookies that is....

Be sure to always spread out your 'compost' evenly....

You wouldn't want the heat from the 'compost' to ignite....LOL

Add new 'compost' on top...make sure your 'composting' is completely cool.....

Now that is a pile of 'compost' I can get INTO. Oh, the smell of this 'compost'.....heavenly!

I've been hearing some talk about this cookie....Anna from Cookie Madness tried one from a bakery in her travels and she is has been trying to replicate it, she loved it so much. One day I was perusing my cookies files and there a compost cookie recipe was....wow. I better try this then. I was intrigued by the ingredients....I love the sweet and savory put together. A marriage made in heaven.

I have no idea who the Oatmeal Cookie Blog belongs to and I was happy to see there was a source to this recipe. I blog searched on Google and found no matches alas, I could provide no link. So, if you are out there "Oatmeal Cookie Blog".....banging recipe! Kudos!


Compost Cookies
Recipe courtesy of Oatmeal CookieBlog

1- 1/2 sticks butter (one stick was Smart Balance, half stick butter)
3/4 cup dark brown sugar
1/4 cup white sugar
2 tablespoons dry, used coffee grounds (I used instant Espresso, oh the smell of it too!)
1 egg
1 tablespoon vanilla
1 cup oatmeal (I used the regular rolled oats not instant)
1 cup flour
1 teaspoon baking soda
3/4 cup roughly crushed potato chips
1/2 cup roughly crushed pretzels
1/2 cup roughly crushed Fritos
1/2 cup peanut butter chips
1/2 cup chocolate chips

1. Preheat oven to 350º.
2. In your Kitchen Aid or a large mixing bowl, cream together the butter and sugar.
3. In a small bowl, combine the egg and vanilla and whisk together until smooth.
4. Add the combined wet ingredients to the cream mixture. Mix together until well incorporated.
5. On a piece of parchment, pile the oatmeal, flour and baking soda. Using a spoon, lightly mix together until evenly distributed
6. Slowly pour the dry ingredients to the combined creamed mixture. Mix until evenly combined.
7. On the same used parchment, pile up your crunchy/chip ingredients. Fold in gently with a rubber scraper.
8. Scoop out with the small ice cream disher–about 2 tablespoons each.
8. Place dough balls about 2 inches apart on Silpat- or parchment paper-lined cookie sheets.
9. Bake at 350º for 10-12 minutes or until golden brown. Remove the cookie sheets from the oven and let stand for 2 minutes. Then place cookies on wire racks to cool.


See all those lumps and bumps, who knows what lurks underneath, will it be a pretzel bit? A peanut butter chip? I totally loved the texture of this cookie....the dough is so chewy and the crunchy, crackly bits you hit as you chew away. It's a texture field trip for the tongue not knowing if you are gonna get a soft smooth chip or a crunchy bit.


If you make these....you'll love me forever for sharing this!

Sunday, July 12, 2009

Got Dregs?

Huh, what?
You know, the dregs on the bottom of the bag of your favorite chip/cracker!


How could you not know what the 'dregs' are? Sheesh!

As I am finishing the last of my 'wholesale sized' bag of Stacy's Pita Chips, (it seemed to take forever, K-man doesn't really care for them as much as I do, he loves "Munchos" ick) all the big chips for dipping were gone. Of course, I could have tipped the bag and slid all those crumbs in my mouth (you know you do this when your bags of favorite chips are done, c'mon, admit it, LOL) but there were too many lil pieces it seemed THEN.... I got an idea.

Let's grind them up to make crumbs! I coated some chicken last week with it....yum (sorry, I didn't catch that on pix so I guess I will have to make it again) and since THAT was so good....let's top some squash!

Oh yeah baby! These were good! We've been grilling LOTS of zucchini lately and LOVE it. Unfortunately you can't get the brown to top without having to broil them in the oven for a bit.

Here's how it goes:

Gratin Topped Squash

Zucchini/Summer Squash, cut in half lengthwise
1 cup finely ground Stacy's Sea Salt Pita Chips
1/2 cup parmesan, grated (don't use that stuff from the green can please!)
1 Tbsp. olive oil or melted butter (your preference, I used O.O.)
Freshly cracked pepper (I used a mortal and pestal, grind yours finer than I did!)
1/2 tsp. Minced onion or onion powder

Cook your squash. Grill it, bake it, fry it...just get it cooked through as you like it. Just don't cook it too much until it's 'smooshy'. It would be difficult to handle for you.

Take your chip 'dregs' and process them in a food processor or just roll that rolling pin over the 'dregs' right in the bag. Place crumbs in bowl, add cheese, seasonings (I didn't add salt for I feel the chips/cheese provided enough saltiness). Mix

Add oil/butter and mix until incorporated. Top cooked squash and press lightly. Broil in oven until golden brown. This will not take LONG!

K-man doesn't know that I have a CUE from him when I know I've made a hit (Shhhhhh don't tell). As soon as a food I make hits his lips and he goes "Mmmmmmmmmm - this is GOOD!" Other times....he will munch along and throw out 'this is good hunny'.....(sorry, I can tell you are saying that to be appreciative that I made dinner, but thanks anyway). OR (this is funny) he will take a bite of everything on his plate and then he will eat up everything but his favorite....he will save the huge pile for LAST (such a boy at heart)

Very easy, try it. You will like this. I am going to make up a batch of these crumbs and keep them in the fridge so I can top stuff whenever I want!

What does your family do to clue you in that they REALLY love what you made? What other clues do they give you that they are just being nice? Tell me, I wanna know.

Saturday, July 11, 2009

What to do for a debut?

Call it kismet, but I just so happened to be reading "Garlic and Sapphires - The Secret Life of a Critic in Disguise" by Ruth Reichl. You gotta love reading a book whether it is a mystery, biography or memoir when you get FREE recipes. SCORE! Since I had pasta making in the plan and I was reading this book....the first recipe to create with my homemade pasta fell into my lap....

Spaghetti Carbonara

1 pound spaghetti (I used the angel hair that I made)
1/4-1/2 pound thickly sliced bacon
2 cloves garlic, peeled
2 large eggs
black pepper
1/2 cup parmigiano cheese, plus extra for topping

Bring large pot of salted water to boil. Follow the directions of pasta package to cook boxed spaghetti. I used fresh pasta which you only cook until the pasta floats to the top or until is 'al dente'.

Cut the bacon crosswise into pieces about 1/2 inch wide. Put them in a skillet and cook for about 2 minutes, until fat begins to render. Add the whole cloves of garlic and cook another 5 minutes, until the edges of the bacon just begin to get crisp. The author warns of overcooking the bacon for if too crisp it will not 'meld' with the pasta. We found this to be not cooked enough for us. So cook the bacon the way YOU prefer.

Meanwhile, break the eggs into the bowl you will serve pasta in, beat them with a fork. Add some grindings of pepper to taste.

Remove the garlic from the bacon pan. If it looks like too much fat for you, discard some but you're going to toss the bacon with most of it's fat into the pasta.

When it's cooked, drain the pasta and inmmediately throw it into the beaten eggs. Mix thoroughly. The heat of the spaghetti will cook the eggs and turn them into a sauce. Add the bacon with it's fat, add cheese and serve.

Serves 4


LOL, here is my 'unworthy' food porn site picture....I will submit the one above with fingers crossed....


YUMMMMMMMM, nothing beats fresh pasta I tell ya! This recipe is definitely a do-again. Next time I think I will add some peas or onions also! Make this NOW (with your pasta from a box of course, I know you don't have homemade pasta right this second...bwahahahahaha!)

Friday, July 10, 2009

Let's Talk About....

ACCESSORIES!

If you remember one of my posts around my birthday; I received a Kitchen Aid Mixer from K-man. YAY! I am so glad to finally have one of my own (I have 4 in my classroom).

Speaking of having KA mixers at school, when they were purchased, my supervisor suggested getting one set of some of the attachment sets. Hey, I wasn't having to foot the bill....."sure!" I said.

We selected: the first attachment set, it had a food grinder (haven't used yet) and a food slicer/shredder (I do not suggest this, food processor is so much quicker), a pasta roller/cutter attachment set and the pasta maker plates set (you need food grinder to use this!)

So I bought the pasta sets home for the summer to do some experimenting. It took awhile for me to get up the energy, because I've made homemade pasta before and I KNEW this was going to be an undertaking....

What I didn't realize until the very moment I started this project.....is that I needed the food grinder attachment in order to use the pasta maker plates. Grrrr....this is packed away in my school and that would be a task to go retrieve (sign out my keys, unlock the chains, dig for the attachment, chain cabinet back up, sign back IN my keys....ugh) SO, that attachment post will be another day, K?

Today I am showing you my the use of the pasta roller attachment. Here are the players:

This is the roller knob. Look above at the picture on the box for the full view of it. Man, these numbers were hard to see without my reading glasses. "Floury" hands don't make it easy to turn these knobs either.


This is the Fettuccine cutter attachment. No fuss, no muss. After you got your dough flattened from the roller on setting 5 you just switch out and slide the dough on in.


They call this attachment for the "linguine fini". Who are we kidding here? This is for angel hair pasta. LOL. I guess I have to use the 'pasta plates' to make linguine.


In the instruction booklet this was their recipe for making the pasta dough:

Basic Egg Pasta

4 large eggs
1 Tbsp. water
3 -1/2 cups sifted all purpose flour
1/2 tsp. salt

Place eggs, water, flour and salt in mixer bowl. Attach bowl and flat beater. Turn to speed 2 and mix 30 seconds. Exchange flat beater for dough hook. Turn to speed 2 and knead for 2 minutes. Remove dough from bowl and hand knead for 1-2 minutes. Divide dough into eight pieces before processing with pasta roller attachment.

Flatten each piece of dough to approx. 3/8 inch thick. Set roller at 1 by pulling knob and turning to setting 1. Turn mixer on speed 2 or 4. Feed flattened piece of dough into rollers to knead. Fold dough in half and roll again. Repeat folding and kneading dough until smooth and pliable. Make sure you are always lightly dusting pasta with flour while rolling. Continue the 'kneading and flattening' with remaining pieces.

Move adjustment knob to setting 2. Feed dough through rollers to further flatten. Change setting to 3 and feed dough through rollers again. Continue to increase until desired setting (about 5).

HERE WE GO.....

This is (believe it or not) 8 layers of pasta, floured, flattened and ready to go. I actually cut this in half before I went to the cutter. I didn't need my pasta THAT long!


I started with the fettuccine cutter attachment....

WHEEEEEE....how happy I was! My own noodles! I cut half of my pasta in fettuccine and the other half as angel hair....

Clearly I have to now have to master the drying part....


Here is what the booklet said....that in my excitement I ignored:

"Pastas can be either dried or frozen for future use. To dry, lay stands of pasta in a single layer on a towel or drying rack to completely air dry (meaning don't do what I did up above, LOL).
Store dried pasta in an airtight container. To freeze, let pasta air dry for one hour before freezing in an airtight container. It is not necessary to separate strands of pasta before freezing just dust with flour and form into nests."

I suggest laying your towel on a tray and when they come out of the cutter just run the tray along as the pasta comes out. Too bad I did all my pasta on top of each other. But now I know for the next time!

Tune in Tomorrow to see what I made with my first batch of homemade pasta!!!

Basic Egg Pasta on Foodista

Thursday, July 9, 2009

How do you like your cookies?

With flour or flourless?

Well, I gave it a try. I can see if you have no choice to avoid flour in your diet because of Celiac's disease. These cookies remind me of those chocolate meringue kisses you can buy. If you are on Weight Watcher's, these cookies have no fat and are only 2 points a piece. They are crispy on the outside and chewy on the inside. I am glad these only made 16....

Don't get me wrong! These cookies were tasty and delicious but I felt the lacked the substance you get from flour. So since my digestive system allows me to eat flour....I will make/eat my cookies with flour!

Those of you who need a flourless cookie recipe, HERE YOU GO....have at it!

Flourless Fudge Cookies
from King Arthur's Flour/Baker's Banter

2 1/4 cups confectioners' sugar
1/4 teaspoon salt
1 teaspoon espresso powder, optional but good
1 cup cocoa powder, Dutch-process preferred
3 large egg whites
2 teaspoons vanilla extract

1) Preheat the oven to 350°F. Lightly grease two baking sheets. Or line with parchment, and grease the parchment.

2) Stir together all of the ingredients till smooth. Scrape the bottom and sides of the bowl, and stir again till smooth.

3) Drop the dough onto the prepared baking sheets in balls about the size of ping pong balls, about 1 1/2"; a tablespoon cookie scoop works well here.

4) Bake the cookies for 8 minutes; they should spread, become somewhat shiny, and develop faintly crackly tops.

5) Remove the cookies from the oven, and allow them to cool right on the pan.


Baker's Banter Notes: You can add up to 2 cups of chocolate chips or diced walnuts to the batter. You'll lose the cookies' "no added fat" attribute, but make some very tasty cookies. With 2 cups of add-ins, you'll make about 24 large cookies, or 48 smaller cookies. Note: For larger cookies with add-ins, increase the baking time by 2 minutes, to a total of 10 minutes.

Wednesday, July 8, 2009

Berry Good Patriotic Dessert

You don't have to prepare this dessert just for 4th of July, Memorial Day or Veteran's Day. Make this now when berries are in season and just so yummy!

Whether you call this a tart, galette, crostada...who cares. It's berry delicious!

The following is a pictorial procedure and ending with the recipe for you:


Roll out your prepared dough on parchment


Place softened cream cheese in bowl.


Add 2 Tbsp of flour to cream cheese.


And 2 Tbsp of sugar.


1 tsp. of vanilla


Sidebar: Have you noticed McCormick's went flip top? I am not sure if I will like this or not. I think the alcohol would evaporate quicker for the twist top I think would prevent less air to get inside. What do you think?


Mix altogether.


Spread onto dough. Keep cheese mixture one inch from the edge.


Mix 2 Tbsp of sugar with your berries.


Put berries on cheese mixture.


Fold dough edge over berries, press lightly.


Brush with egg. White only or whole beaten egg, this just makes it shiny and gives more strength to the dough edge.

Bake as directed....


Warm 2 Tbsp of your fruit preserves in the microwave and brush onto baked fruit when removed from oven.


Serve either warm or chilled....


Berry Patriotic Gallette/Crostada

1 pint blueberries
1 pint raspberries
2 Tbsp. sugar
1 prepared pie crust
8 oz cream cheese, at room temperature
2 Tbsp. flour
2 Tbsp. sugar
1 tsp. vanilla
1 egg, beaten
2 Tbsp. preserves, jam, jelly, warmed

Preheat oven to 400 degrees.

Roll out dough on parchment paper to even out and enlarge about 2 inches more.

Mix softened cream cheese, flour, sugar and vanilla in a small bowl and spread onto dough. Leave an inch from edge. Mix berries and sugar in another bowl and spread onto cheese mixture.

Fold dough edge over berries, pressing slightly to keep shape. Using pastry brush, put beaten egg on folded dough edge only.

Bake in 400 degree oven for 20-25 minutes or until edges are slightly brown.

Warm preserves in microwave and brush onto fruit when crostada comes out of oven.

Serve either warm or chilled. Top with whipped cream and ENJOY!


OH-MY-GAH...no worries about the tart spots of the berries because the sweet creamy cheesy goodness balances it all out!

Tuesday, July 7, 2009

Let's Get Corny!

Meet my side dish to those ribs you saw on my last post!

So moist and corny and those onions and pepper were such a tasty addition. Almost like eating a veggie side dish rather than a bread with dinner. Since I got this from King Arthur's Flour blog site called baker's banter....you can see their pictorial instructions if you like in their link. Why recreate the wheel right?


Instead of the *onions and peppers called for in the recipe...I did a little convenience thing and used this:


Some days....you just don't wanna bother....also going and getting a handful from the salad bar is good too!


Skillet Cornbread

adapted from Baker's Banter they called it Sopa Paraguaya

1 tablespoon butter
1 tablespoon corn or vegetable oil (I used some leftover bacon grease from breakfast)
1 cup diced onion* (see note above)
1/4 cup diced red bell pepper*
1/4 cup diced green bell pepper*
1 1/2 cups cornmeal
1 cup milk
2 tablespoons sugar
1/2 cup cottage cheese; low-fat or nonfat are fine
2 large eggs
1 teaspoon salt
1 tsp. chipotle chili powder
1/4 to 1/2 teaspoon coarsely ground black pepper, to taste
2 teaspoons baking powder
1 1/2 cups fresh or frozen corn kernels
1 cup grated Monterey Jack or pepperjack cheese

Saute the first five ingredient in cast iron skillet. Cook until translucent, don't brown them. Remove veggies from skillet to cool. You will reuse the skillet to bake the cornbread.

In a large bowl, combine the cornmeal and milk. Stir in the sugar, cottage cheese, eggs, salt, chili powder, pepper, and baking powder.

Stir in the corn kernels and cooled onion mixture.

Stir in the cheese, and then transfer the batter to the prepared pan. If you're using the same skillet in which you sautéed the vegetables, grease it again, using non-stick vegetable oil pan spray or shortening (I, of course used the bacon grease again!)

Bake for 40 to 45 minutes (in a 9" x 9" pan), or 30 to 35 minutes (in a 10" cast-iron skillet), until the center feels set when lightly touched with your finger, and the edges are beginning to brown.

Remove from the oven, cut in squares or wedges, and serve warm. Warning, this bread is going to be really moist, the first piece may not cooperate with you!


Cornbread on Foodista

Monday, July 6, 2009

Who loves ya Baby?

I loves me some baby back ribs!


We "splurged" for the 4th and made some ribs for the grill....

HAHAHAHAHA! Can you believe it? You can spend like $19.99-25 for a full rack of ribs in the restaurants! Total SCORE!

Here's the process for you to see then followed by the recipe:


Gather up your spices in a bowl to make rub.


It's okay if you don't have some of those dried herbs as long as you have the fresh stuff...it's all good.


Make sure you really give the meat a rub down to release all those oils from the herbs into the meat!


Place in heavy duty foil, wrap it up in the fridge until you are ready to grill!


Herb-Rubbed Baby Back Ribs

2 T. smoky paprika
1 T. salt
1-1/2 T. black pepper
1 T. chipotle chili powder
1 T. garlic powder
2 T. dried thyme (I didn't have any, so I used fresh...LOL)
Rack of ribs

In a small bowl, mix all your above ingredients. Rinse ribs and pat dry. Rub mixture over both sides pressing so it sticks. Wrap rack in heavy duty foil. Store in fridge up to one day ahead. Bring to room temperature before grilling.

Bake @ 250 degrees for 2 hours. (no worries about making the kitchen hot....we went to the movies and it smelled heavenly when we got back!) Baste meat side of ribs with favorite barbecue sauce and carefully place meat side down onto to hot grill. Baste underside of ribs with sauce as well. Cook just enough to char up sides the way you like them.

Cook's Notes: Of course, barbecue purists would scoff at this procedure. They want low and slow on the grill over charcoal and basting all the while. Well, if you have the time for that....great. I for one don't always have the time to babysit something on the grill AND honestly cooking something like ribs on the grill (we have gas) uses up a LOT of propane. So if you have the time and want to use a lot of propane/charcoal....my point here is the RUB is fabulous! We loved it!

Sunday, July 5, 2009

Fiesta time!

Party for your chicken or for your tastebuds? You decide. I found this recipe on kraft foods and decided to give it a try.... it was so good I had to share it with you...

Before I start this recipe, one question: Does your grocery have fresh salsa? I'll tell ya once I discovered that they make it fresh, I never went back to the jarred stuff. So if you make this recipe, I highly recommend you get this. It's located in the refrigerated section where they put pre-prepared salads, salad dressings and dip stuff.

Crispy Santa Fe Chicken
adapted from Kraft Foods

2 chicken breasts, sliced in half lengthwise
1 egg
12 saltines, finely crushed (I used tortilla chips to keep with the 'mex-flava' about 1 cup ground)
1 cup salsa
1 cup Kraft Mexican style Finely shredded Four Cheese (I used Pepper Jack Cheese instead)
2 Tbsp. butter melted

Preheat oven to 425 degrees.

DIP chicken in egg then in cracker crumbs (tortilla chip rock!) , turning to evenly coat both sides of each piece. Pressing coating into chicken.

PLACE in 13x9-inch baking dish sprayed with cooking spray; drizzle with butter.

BAKE 20 min. or until chicken is done (165ºF). Top with salsa and cheese; bake 5 min. or until cheese is melted.

OLE! Crispy on the outside, moist in the inside. Mucho delicioso! This was incredibly easy to make and even your kids could help out with the coating the chicken, shredding the cheese, topping them off....

This would also be AWESOME on a toasted kaiser bun as a sandwich too!

Chicken Breast on Foodista