Showing posts with label holidays. Show all posts

Sunday, December 23, 2012

Ooey Gooey Chocolate Mint Crackles

If you want a sweet treat before the holidays that is easy to make.  Here is your recipe!!  These are soft, moist and taste just like a Girl Scout Thin Mint Cookie.  Not Paleo....but these can be your 'cheat' or think of the kids or visitors who would enjoy them.

Ooey Gooey Chocolate Mint Crackle Cookies
by JennyMac's Lipsmack

1 (8-ounce) cream cheese, softened
1 stick butter, softened
1 egg
1 teaspoon vanilla extract
1 (18-ounce) box moist chocolate cake mix
1/4 cup unsweetened cocoa
1 cup andes candies (I used the bag of them already chopped in the pink and white candy cane-you can use the green one and chop yourself)
Confectioners' sugar, for dusting

Preheat oven to 350 degrees F.
 In a large bowl with an electric mixer, cream the cream cheese and butter until smooth. Beat in the egg. Then beat in the vanilla extract.
Beat in the cake mix and cocoa.
Add in the chopped Andes Candies.
Roll the into tablespoon sized balls and then roll them in confectioner's sugar. Place on an ungreased cookie sheet, 2 inches apart. Bake 12 minutes.
The cookies will remain soft and "gooey." Cool completely and sprinkle with more confectioners' sugar, if desired.

Cook's Notes:
I came across one last cookie forgotten in the Holiday tins.  It was STILL soft.  SNARF.  Gone.   No one died eating a week old cookie.  LOL


Merry Christmas to you and yours!

Tuesday, December 18, 2012

Paleo Snickerdoodles and a Surprise?

I am on my holiday cookie treat making adventure.  It's an adventure because there is NO SUGAR and no FLOUR....aka Paleo Holiday Treats!  WOOHOO!!!
I am posting my Snickerdoodle Recipe first and a warning!  It's fun....once you get over the scary part....First recipe then explanation...lol.

Paleo Snickerdoodle Cookies
by JennyMac's Lipsmack

1/2 c. almond butter (I used sunbutter-part of the surprise)
1/2 c. coconut oil
1/2 c. maple syrup
2 eggs
1 Tbsp. vanilla
2 c. almond flour
1 tsp. baking soda (second part of the surprise?)
2 tsp. cinnamon
2 Tbsp. truvia
2 Tbsp cinnamon

1.  Beat together almond butter, shortening, syrup, eggs, and vanilla until smooth.
2.  Combine flour, soda, and 2 teaspoons cinnamon in a separate bowl.
3.  Slowly add dry mixture until combined with wet mixture.
4.  Mixture will be wet and sticky, drop tablespoons several inches apart (8 per cookie sheet) and use a circular motion to spread cookie out into a flat disk, about a 1/2 inch thick, onto parchment covered cookie sheet.
5.  In a separate bowl, combine sugar and cinnamon then sprinkle over cookies.
6.  Bake cookies at 375 for 8-10 minutes or until golden brown on the edges, centers should be slightly wet but will be spongy and bounce back if you press on them.
Now read on for the SURPRISE?!?

Baker's Notes:
1.   I made these they are spongy....ok, no worries they won't get dried out too soon.  I turned one over and it looked funny.  I shrugged it off but I kept looking underneath the cookies as they were cooling....'why are they looking funny?'  
I finally opened one up.  This is what I found....

Perfect for the HOLIDAYS!!!  Green Interior.  Or St Patrick's Day...What the heck is going on....GREEN?  Never in my life has this happened to me and I have a Cookie club after school for 15 years and NEVER seen a green interior in a cookie.  So I googled it.
2.  Phew, nothing evil.  Apparently it has to do with the alkalinity of the sunflower seeds and especially the use of baking soda.  Here's a link to more.
Problem solved if you don't use Sunbutter but in fact use Almond Butter.  It's what I had on hand so I used it.  Freaky scary if you don't know why it's happening...but if you take the time to research it....it's safe, no need to throw out perfectly good cookies.  Tomorrow will be fun when I give them to my Paleo Pals....

Stay Tuned for more Paleo Treats:
Chocolate Truffles
Chocolate Mint Truffles
Apple Caveman Bars

And two NON Paleo Chocolate Mint cookies for Neolithic cookie Eaters!


Enjoy!

Saturday, November 24, 2012

Pumpkin Crunch Cake

I know Thanksgiving is over, the time when we are still using pumpkin.  However some of you may still do pumpkin pies at Christmas or perhaps you are looking for a tasty alternative for dessert.  I opted for this instead of pie this year.  Much easier to make and you can get many more servings from this over one pie!

Same pumpkin-like custard on the bottom with crunchy topping.  I have pecans on top however you don't have to put them if you don't wanna.

Pumpkin Crunch Cake
JennyMac's Lipsmack also on Just a pinch

1 can (15 oz) pumpkin puree
1 can evaporated milk
1/2 c. sugar
4 eggs
1 tsp. vanilla extract
1/2 tsp. salt
2 tsp. pumpkin pie spice
1 box yellow/french vanilla cake mix
1 c. pecans, chopped
2 sticks of butter, melted

1. Preheat oven to 350 degrees. Thoroughly grease a 13X9 cake pan.

2.  Place in a large mixing bowl: pumpkin, milk, sugar, eggs, vanilla, spice and salt. Using an electric hand beater, mix well for about 1-2 minutes.

3. Pour pumpkin mixture in greased pan. Top with cake mix. Pat the cake mix down. Sprinkle pecans. Pour all over with melted butter.

4.  Bake in 350 oven for 60 minutes or until set. (Jiggles just ever so slightly)

5. Best served warm or at room temperature.  Enjoy with fresh whipped cream or ice cream. If refrigerated the 'crunch topping' will get very hard (from the butter) so you may want to warm it up a bit in the microwave before serving it 'leftover'


Enjoy!

Saturday, November 3, 2012

Halloween Treats

I know, Halloween is long gone.  However many of us had a lot going on.  I was all excited about posting my Halloween Treats and Hurricane Sandy hit.  We did not have school for two days and alas I was not able to make my treats until the actual day of Halloween and 2 days after.  My plan was to have most of it done BEFORE!  As a teacher trying to reschedule all that cooking and to rearrange the other classes.  AND, keeping my plan to decorate my room for the kids, taking it all down and decorating the house for the kids in the neighborhood.  Between making the treats, passing them out, remembering to take pictures, decorating  (....oh did I mention I had hall duty that week that requires me to monitor the hall 20 minutes before I normally come to work so that means I can't do anything in my room?)  So if I only worked 3 days last week, why did it feel like a full 5 days?  Fortunately, we lost no power and maintained no house/tree damage.  The "cat lady" above and her "roadie" are very blessed.  Enough whining....let's get to the treats, shall we?


Charlotte’s Web Cake

Create a spider web on top of a cake!

Start by spreading a round cake with white or orange frosting. Thin some chocolate frosting with milk until it's about the consistency of melted chocolate, and place it in a piping bag with a ¼-inch tip.  Starting in the center, pipe a spiral pattern radiating out until you come within an inch of the edge of the cake. Now, pretending the cake top is the face of a clock, gently drag the tip of a toothpick from the center to 12 o'clock, continuing all the way to the edge of the cake. Drag the toothpick from 1 o'clock back to the center, and then from the center to 2 o'clock. Continue in this fashion until you have completed the circle. You can also do this on a smaller scale with cookies and cupcakes. Decorate your 'web' with plastic spiders (or gummy ones) and bugs!


Used Tampons
from Divine Dinner Party (digusting food section)

Ingredients:
20 large marshmallows
1 can sour cherries in juice (not cherry pie filling!)
5, 8-9" lengths of food-safe string

 Instructions:
1. String four marshmallows on each of your five strings. I find the easiest way to do this is wrap the string around a wooden skewer, skewer the marshmallows, and pull the skewer out. You can also tie one end of the string around a toothpick.
2. Line the marshmallows up on one end of the string. Knot the bottom of the string.
3. Place marshmallow "tampons" on a serving tray. 5. Pour an undrained can of dark, sour cherries (it's best if you cut up the cherries a bit) over. Or use cranberry juice and dried cranberries.
6. Enjoy!  


Bloody Worm Sandwiches
from Divine Dinner Party (more gross food section)

Ingredients:
8 hot dogs
8 hot dog buns
1/4 C. ketchup Instructions:
1. Bring a pot of water to a boil.
2. Slice each hot dog into long, worm-like strips.
3. Dump hot dog strips into boiling water and cook until they begin to curl a bit. 4. Drain.
5. Return cooked hot dog worms to pan and toss with ketchup until thoroughly mixed.
6. Serve in hot dog buns.


Breadstick Spiderweb

1 can (8 oz) Pillsbury® refrigerated breadsticks (8 breadsticks)
 1 egg
 1 tablespoon water
1/2 cup shredded Cheddar cheese (2 oz)
Pizza sauce or marinara sauce, heated, and garnished with chopped fresh basil leaves or flat-leaf parsley

Heat oven to 350°F. Spray large cookie sheet with cooking spray. Separate dough into 8 pieces; roll each piece into 12 to 14-inch rope. On cookie sheet, place 4 dough ropes overlapping to look like asterisk; with remaining 4 dough ropes, make concentric circles to create spiderweb.
In small bowl, beat egg and water; brush over dough. Sprinkle with cheese.
Bake 12 to 14 minutes or until golden brown. Immediately remove from cookie sheet. Serve warm with sauce for dipping.


Hairy Armpits  
(sorry no picture, what was I thinking? Just imagine some European chick dancing with her arms in the air and you get a quick glance of her unshaved armpits!  lol)

3 large shredded wheat bundles
3 TBSP. honey
1 TBSP. light brown sugar
1 6oz. bag milk chocolate chips
2 TBSP. butter or margarine

Directions:

Break up shredded wheat bundles into single long strands, so that they have the appearance of armpit hairs. Set aside. Place the honey, brown sugar, chocolate chips, and butter in a medium sized heavy saucepan and heat over low to melt. Gently stir mixture with a rubber spatula. Mixture should be smooth and glossy. Remove the saucepan from burner and place it on a heat safe work surface. Gently fold in shredded wheat. When the shredded wheat is completely coated, scoop it onto wax paper in nine equal portions. Use a fork to gently rake "hairs" into one direction. To set Chocolate Armpit Hairs, place them in refrigerator for about thirty minutes. If there are any hairy bundles left over, keep them stored in the refrigerator.


Froot Poops My school site has a photo gallery of these plus many others...


1 and 1/2 pkg (12 oz) chocolate chips
1- 14 oz sweetened condensed milk
Dash salt
2 tsp. vanilla
1 and 1/2 cups chopped, dried mixed fruit

1. Line the bottom of a 9 inch square pan with waxed paper.
2. Pour chocolate chips, sweetened condensed milk, and salt into large glass bowl and melt in microwave. Stir constantly to determine when melted.
3. Pour in vanilla and dried fruit. Stir into chocolate mixture.
4. Pour chocolate mixture into lined pan and spread it evenly with your rubber scraper. Place pan in the refrigerator and chill for at least two hours.
5. When thoroughly chilled, invert chocolate mixture onto cutting board. Cut into 1 inch squares.
6. Create loads of uniquely shaped diarrhea dumps by rolling each square between the palms or your clean, dry hands. Make some flat, round disks, some short, thick poops, and some long skinny ones!

Really Gross: Make sure you present your diarrhea delight on toilet paper wads!

Please print these out for next year.  Again I am sorry for these GREAT recipes being poor timed....but stuff happens.

My thoughts and prayers go out to the people of New York City, Staten Island, Long Island and New Jersey Shorelines.  Of all the people of our Wonderful US of A.  I feel the folks of NY and NJ have the stuff that make them strong survivors.  They survived 911 and this too shall pass.  If you can make a donation to the Hurricane Sandy Fund, even the smallest bit can help. 

Slurp,

Friday, October 5, 2012

Gearing up for Halloween

Let's start out healthy on our treats for Halloween and slowly get evil?  Nah, Halloween food is all about deception and FUN.
I was just telling some colleagues about how I used to do the food for my school's Halloween dances.  My funny observance?  When it comes to FREE food and teenagers....watch out, you may lose a hand.  Chips, cookies, candies for free.....WHOOSH!  It's gone in a few minutes.  When I did the food and gave it gross names and formed it to resemble things like POOP....SCREECH!  For some reason taking raisins stirred melted chocolate forming it into little logs and calling them "Fruit Poops"....I had to talk them INTO coming BACK to the table and eating it.  That was hilarious!  Anyhow, more of those recipes to come. 

Today I'd like to share with you what I made for my fellow FACS teachers at our meeting.
My little Veggie Skeleton.  Isn't he CUTE?  It was just us Middle School teachers the high school teachers were a no show so they missed out.  The four of us 'killed' him easily.  Hahaha.

So if you are planning a Halloween party with a lot of junk....make this little guy and you'll be surprised that he may disappear before the high calorie stuff.  Make sure you hit my cook's notes at the end for the SHORTCUTS!!!

Veggie Skeleton

2 cups of ranch dip
2 celery stalks cut into 3 parts
1 red pepper cut into strips (see picture)
6-8 mushrooms, sliced
2 cauliflower flowerets, halved
8 baby carrots
1 black olive, pitted and cut in half
10 spinach leaves
10 cucumber slices

This really has no directions other than save the picture and arrange it on your platter as shown.  However...

Cook's Notes:
1.  Most of these items I took from the salad bar at my grocery.
2.  Grabbed a tub of ranch dip and placed in white bowl, stuck in spinach leaf hair and two eyes.  Didn't feel the need for a mouth.
3.  I only bought a whole red pepper because the salad bar was LOW on the red ones.
4.  I purchased a container of the celery stalks because the salad bar always chops up their celery for salads.  Same goes for baby carrots.  And you are going to need extras to use up all the dip. 
5.  Very easy to put together and cute as a button!

Friday, February 25, 2011

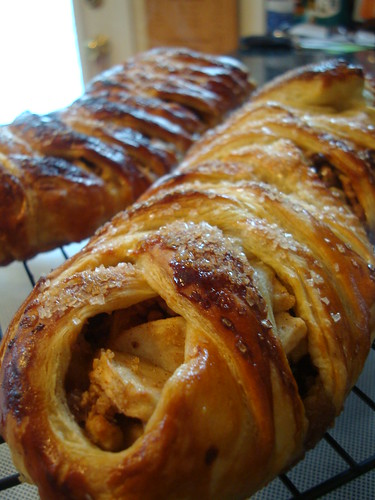
Easy Apple Strudel

This was K-man's request for a dessert. I asked him what he wanted for dessert...."something crunchy, appley, cinnamony, and raisiny"....I went 'trolling around' allrecipes.com to see what I could find under EASY. Always trolling for 'easy'. lol

Easy Apple Strudel2

I took a few ideas from this recipe, and from that recipe.

1. Puff pastry a must....very easy and flaky just like a strudel.
2. Recipes using panko crumbs....hmm good idea...helps absorb the juices so it's not all runny.
3. Plain apple filling or apple cinnamon...K-man likes apples and cinnamon so it won't be authentic strudel....who cares?

So my taking a bit of this and that....this is what I came up with.....

Easy-Peasey Apple Strudel
JennyMac Lipsmack Creation

1 Granny Smith apple - peeled, cored and coarsely shredded
3 Granny Smith apples - peeled, cored and sliced
1 Tbsp. cinnamon
1 cup brown sugar
1 cup raisins
3/4 cup panko bread crumbs
2 sheets frozen puff pastry, thawed
1 egg
1/4 cup milk
sugar for sprinkling

Directions

1. Preheat oven to 400 degrees F (200 degrees C). Line a baking sheet with parchment paper.
2. Place apples in a large bowl. Stir in cinnamon, brown sugar, raisins and bread crumbs; set aside. Place puff pastry on baking sheet. Roll lightly with a rolling pin. Arrange apple filling down the middle of the pastry lengthwise (taking up 1/3) . Snip with kitchen shears, one inch strips on either side of filling. Fold the pastry lengthwise around the mixture, alternating strips. Left, then right. Repeat. Whisk egg and milk together, and brush onto top of pastry. Sprinkle with sugar.
3. Bake in preheated oven for 35 to 40 minutes, or until golden brown.

Cook's Notes:
1. These had to be made on two separate cookie sheets. Make sure you alternate the sheets midway through cooking time. Clearly I got a bit distracted and one was a lil darker than the other.
2. The panko was SPOT ON.....it absorbs the juices so it was not wet and drippy in the least....very moist, held together.
3. Used the large decorator's sugar for the "sparkly effect." Very pretty. K-man gave "three thumbs up" he said. LOL
4. Use whatever apple you prefer....we like the tart to offset the sweetness. Just recommend a firm apple so it doesn't go 'mushy' on you.

Easy Apple Strudel

Yumminess!

Saturday, November 28, 2009

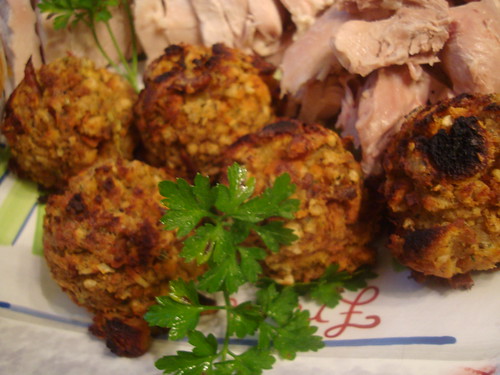
Have a ball during dinner!


Whether you use Stovetop stuffing from a box or make it from scratch, making balls out of it is a great idea for these reasons:

1. Stuffing put in the bird soaks up tremendous amounts of fat, these only have the amount of fat you put in them.
2. Less worry about bacteria when stuffing is cooked separately.
3. You can make these ahead of time and warm them up right before serving.
4. These are already portioned out, one scoop per person (or whatever your count is).
5. Easy to serve/handle.
6. Best of both worlds crunchy on the outside, soft on the inside.
7. Can be made appetizer size or dinner size.
8. Adds visual interest on any plate!

Lisa of The Cutting Edge of Ordinary inspired me to do this and I thought they looked rather cute on the platter with the turkey!

Our stuffing recipe from the family is usually EVIL. So much fat....Cooked sausage....onion and celery sauteed in the pork fat....add a stick of butter then cooked in the turkey..... THUD!
Here's what I did to make them more reasonable fat-wise!

Lower Fat Stuffing Balls

1 turkey neck
3 cups water
scant olive oil
1 onion chopped
2 celery stalks, chopped
1 tsp. poultry seasoning
salt and pepper to taste
3 cups of stale bread cubes (rye is great!)

In a sauce pan, place 3 cups of water and cook the turkey neck until reduced by half. Notice that there is some turkey fat floating around....just what you need. Remove turkey neck and remove as much meat as you can and chop. Add to broth.

In frying pan, one turn of olive oil in pan and saute the onions and celery. Add poultry seasoning and salt/pepper. When onion/celery is soft, turn off heat and add the bread cubes. Stir in broth little by little until absorbed but not mushy.

Line cookie sheet with foil and again another swirl of olive oil in foiled lined pan. Take your ice cream scoop and make portions onto cookie sheet.

Bake in 350 oven for about 10 minutes or until crispy on bottom. I put the 'balls' under the broiler for a minute before serving to get extra brown.

I'd do these again with sausage as an appetizer!

YUMMY!

Sunday, October 18, 2009

Nothing squeaked in the making of this recipe!

"Bubble and Squeak" now there is a fun name for a recipe.


A name kids could really get into as well. I've seen many recipes for B.A.S., none were the same so I never tried it since I didn't know what the original is really supposed to be short of taking a trip to Great Britain to do so.
So when I made corned beef I was debating the usual....carrots and potatoes? mashed only? So when the beef was was done I decided to make my own version of Bubble and Squeak.

B.A.S. typically uses brussell sprouts (aka mini cabbages) and it's considered a leftover dish of potatoes (either chunk or mashed), onions, beef, ham or bacon being used. I wasn't in the mood for a pile of mush but since we'd been having a COLD rain for the past 3 days....I was in the mood for something like a stew or soup and following the ingredients somewhat.

Lipsmacking Bubble and Squeak Stew

1 corned beef in store package with seasonings
Half package of baby carrots
1/2 cup onions chopped
2 cups of brussel sprouts
1 cup barley (uncooked)
Chicken broth (if you need to thin out your stew)

Cover your corned beef with water and the included seasoning packet in your crock pot. About 3 hours on high or boiling in a pot on your stove.

Remove corned beef and with a fine screen mesh strainer remove the 'seeds' from the seasonings or just use an immersion blender to break them up. Keep the corned beef water in crock pot and put your 1 cup of barley in the water. Cook on high about 30 minutes or until soft.

Use a slotted spoon and remove about half of the barley (about 1 -1/2 cups) and put aside in a small bowl. Use an immersion blender to blend up the barley until smooth. Mixture will be thick. Put in your carrots and brussell sprouts. Cook until vegetables are soft. Put the cooked barley in small bowl back into the crock pot and stir. My stew was very thick and could use a little thinning so I used some chicken broth (I used about 1 cup)

You can decide if you want to cut up your corned beef into the Bubble and Squeak stew or just slices on top of your stew.

This was absolutely delicious and was exactly what we needed after three freezing cold rainy days. I served some crusty buttered bread with this. K-man ate TWO big bowls!

Enjoy!

Monday, October 5, 2009

Countdown until Halloween part 1


Time is ticking many of you are looking for cool Halloween ideas....

I've been known to be the Queen of Halloween at my school....that is until we stopped having Halloween dances and my stint of doing the food for many years ceased forever. Yes, our principal thinks that Halloween is culturally insensitive. It is sad to see a kid tradition is removed because of the ignorance of what it really is. Confused with All Saints Day, All Hallow's Eve or even Los Dias de los muertos....let's be for real here.....it's a day when the kids get candy. They live for this stuff. So did we.

Regardless, we are a culture of many countries of origin and many of us wear green on St. Patrick's Day even though we aren't Irish. We may go out for some enchiladas and down a beer on Cinco de Mayo. Or not. It's our choice to participate in whatever cultural celebration comes our way. Funny thing....as a school we do not dress for Halloween, nor have a Halloween due to possibly offending those who do not 'participate' in Halloween but I was told I could do my Halloween foods in my classes if I so desired. What the heck?

Anyway, off my soap box and onto some fun stuff for you to peruse.....

Since I have many Halloween recipes and pictures of the stuff I've made in the past on my school site, I am not going to reinvent the wheel and just give you a link to one page of my site every couple of days. Please keep in mind some of these creations were 'kid made' as opposed to 'teacher made.'

Page One of Halloween Recipes

Page Two of Halloween Recipes

More pages of Halloween ideas are to come, if you don't cheat and go through my web page on my school site. LOL. When we make some new stuff in my classes I will add those later!

Enjoy!

Sunday, January 25, 2009

Kitchen Fun!!!

with KITCHEN TOYS!!!

Today I thought I'd share with you some of my favorite cooking gadgets!!! They make our lives a little easier and make our cooking even more fun!!!

Starting on the left going clockwise:

(Red) Tab Grabbit- On the days I have a freshly manicured hand and don't want to ruin my nails, this magneted tool is on my fridge for when I get my Diet Coke...it's there for me to POP open the tab of my can for me. It also has circle underneath for when you have to twist off those nasty beer bottle cap that seem to want to rip off your skin!!!
Where'd JennyMac get it?-
grocery store hanging in aisle designed for impulse buy.

(Purple) Top Popper- Everyone has those stubborn jars that are so vaccuumed sealed that you are literally grunting as you try to open it. (that is if your man isn't around to open it for you....such ego boosters for them...LOL) This popper you put on your lid (just like you were going to pop it open like a bottle opener. You will break the seal and hear a little "whoosh" and BING....jar opens without a fuss. Love this little guy!!!
Where'd JennyMac get it?- grocery store hanging in aisle designed for impulse buy but found a link for you here @ Walter Drake.

Dry Measuring Cups: These aren't your squared bottom types. Lord knows I've gone through many different styles and end up taking them to my school kitchens for I can't stand them. These are nice for scooping right out of your bins. For an added bonus each handle is a measuring spoon too!!!
Where'd JennyMac get it?-Amazon.com

Measuring Spoons: Okay, now I am talking LOTS of sets of these I've purchased. Looking for the set that works for me most. But these recent ones were obtained SOLELY for getting into those spice jars when your normal measuring spoon wouldn't fit. Those days are gone. LOVE THESE!!
Where'd JennyMac get it?-Amazon.com

Lemon Juicer: This little guy is just too cute. You press the serrated bottom onto your lemon end while twisted and pushing. He goes into the lemon where you can squeeze your lemon juice out (with no seeds) onto your measuring spoon just like those little fake plastic lemons that carry juice in the grocery store!!! You can keep it in the lemon it if you don't use it up and put it in the fridge (in a ziploc of course)
Where'd JennyMac get it?- I believe it was found at BedBath and Beyond with all the other kitchen gadgets, but I've had it for a long time, I searched there online and didn't see it...but that doesn't mean you can't find it in the store.

My favorite Super Sharp Knife: It's non-stick, super sharp (yeah it's gotten me a few times) and I love it cuz it never fails me when I need something sharp.
Where'd JennyMac get it? -I've seen them all over online but for some reason today I could only find it for you on Cooking.com where I did not get it nor at that price.

Meat Thermometer: K-man's parents gave this to us for Christmas when they heard about our constant grilling during the year (just not winter - too dang cold). Put the probe in your meat, connect it to the transmitter(black). The receiver (silver) is where you tell it what type of meat you are cooking how you want it cooked or the temperature. Beeps when done. Fabulous new toy!!!
Where'd JennyMac get it? -They purchased it at Linen's and Things since they were closing and everything was on sale. I found it for you here @ Amazon

Meat Tenderizer: Some days you just want to beat something up!!! I love this to help get those marinades into your meat. I especially like this one for the sharp points are covered so when you are rummaging through your gadget drawer it won't stab you.
Where'd JennyMac get it? - I can't remember but since I was already searching on Amazon...

Mini Grater: Just in the pic, cuz it's just too cute....I don't really use it anymore. Maybe for fresh nutmeg but I don't have any right now. But what I do use for my grating needs....

Microplane: I LOVE this tool.... Garlic, hard cheeses, zesting oranges, lemons, chocolate shavings, so many things...just not my doors that stick!!!
Where'd JennyMac get it? -Hmm, not sure I've had it so long...but it's here @ Amazon

Reynolds Handi-Vac: Total impulse buy at the store....'wonder if this works?' It was on-sale and it had some starter bags in it....why not? Glad I did it... OMG....love it!! I've had it since last summer ('07) and still on the first battery it came with. I buy all the different bags they sell and it's competitors bags work with them too (theirs you have to use a hand pump vacuum...hahahaha). The machine sucks out all the air and you pop it in the freezer and keep out the ice and freezer burn! Run out and get one NOW!!!
Where'd JennyMac get it? - Come on now, you haven't seen these at your grocery yet?

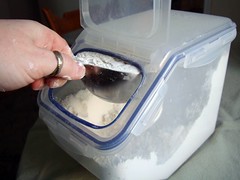
My Flour Bin: This I've spent some time looking for the right container but I didn't know ALL that I wanted for one until I found it by accident....it was on one of those endcaps of the aisle where they are highlighting some dishes, cookware, etc. That particular month it was all these storage containers. I walked by it for weeks. Never paid any attention to it until it was almost bare...so empty, this bin jumped out at me.....there it was staring at me all by its lonesome.

I wanted a bin that I didn't need two hands to get my flour ( meaning: grab the lid and put it down, scoop the flour and level off). The opening had to be big enough for my measuring cups AND I wanted an opening that had a level edge so I wouldn't have to use my finger, spatula or knife to level off. I also didn't want to get flour all over the place while I got my flour...FOR THE ADDED BONUS!!! ...the whole lid can be unsnapped so you can dump your whole bag of flour into it!!! Then you snap all the sides back down and use the opening to get your flour....see me? I am leveling off my flour with ONE hand!!! Love it.
Where'd JennyMac get it? - My grocery store Harris Teeter, brand Name: Lock and Lock....I found the link on Amazon...but they are out of stock....and I didn't want you all to get any ideas....

Ok, just so you know. I am NOT being paid by Amazon, LOL. I've been shopping there for years online. I check there first....search in other sites and I seem to always come back to it. Depending on the amount of stuff I buy...I don't have to pay shipping. I think their prices are pretty good, sometimes I've found it cheaper elsewhere. But to be fair...since they AREN'T paying me....some of the other online places I do shop for fun stuff...

The Home Marketplace
Kitchen and Much More
Harriet Carter and Walter Drake (pretty inexpensive and have lots of clearances)
Brylane Home and Kitchen

I know that there are millions more places....these are just a few of my favorites and the prices are pretty good. If you know of better....for godsake....tell me!!!! LOL.

There you have it....these are a few of my favorite things....(humming tune in head now) raindrops on roses and whiskers on kittens....

___________________
I noticed that many of you post something on the day that celebrates these foods. Many of you don't realize it until that day and SHUCKS, if I only knew, I could have made something.....from cdkitchen....Coming this week are:

Monday- January 26, 2009 National Pistachio Day
Tuesday- January 27, 2009 Chocolate Cake Day
Wednesday- January 28, 2009 National Blueberry Pancake Day
Thursday- January 29, 2009 National Cornchip Day
Friday- January 30, 2009 National Croissant Day
Saturday- January 31, 2009 National Popcorn Day
Sunday- February 1, 2009 National Baked Alaska Day

All days are linked to their recipe suggestions for making some of these treats!!! Have fun!