Showing posts with label bread. Show all posts

Saturday, April 30, 2016

Whole30 Reintroduction Dairy Day 7 and shocking UPDATE


Before I get to the cheesy stuff.  I want to follow through on my non-gluten grains stuff.  So the point of the reintroduction is to isolate one type of food for a day while being compliant with meat and veggies, fruit and wait 3 days to see if it had any effect. I did, in an interesting way.  You are supposed to eat (new food) with a compliant breakfast, lunch and dinner, (if you want) and wait for 3 days.  I ate only one thing (GF stuffing) for dinner BUT for two nights in a row.  No other GF foods though.

After the first dinner, I just didn't feel right.  Not badly, but I just wasn't feeling my norm from the past whole30 days of "happy full." I know it's not very descriptive but "ugh" is all I can give you. I moved around after dinner and that ugh feeling went away.  I slept fine.  Dinner with stuffing day TWO....no 'ugh' feeling BUT I was having a fitful sleep.  Kept waking up and changing positions, was hot in bed even though the AC was on....we had the windows closed and when I woke up and my sinuses were all swollen as though I needed to take my decongestant. 😳 The past few days we've been sleeping with the windows open during this pollen season and I was not taking any meds for it.

Conclusion? Perhaps have something GF grains is not something I should be eating on a daily basis.  That is why doing Paleo makes so much sense now...Once in a while....but NOT definitely back to back. Make enough for just K-man and I .....no leftovers unless he is going to eat it all.  No, he has a two day limit on leftovers.

In preparation for dairy day.....I made Cloud Bread....made two batches, one with greek yogurt and the other with cream cheese.  Fluffy but too delicate for me. I am sticking with my cheenie, chebe breads...


Shaved Beef over sauteed asparagus, mushrooms and onions....Note to self: Shaved beef doesn't need a marinade....or don't add marinade while cooking....I moved too fast while I was thinking this and dumped into pan.  Dry beef, not wet beef next time. Yes, don't send me comments that it looks like a vomit pile.  I realize this, I have eyes. 😖 But I am human and not all my dinner or food pix turn out like a magazine layout, no one's do....except for those food stylist people. I am sure all their meals are photo ready and they look at food blogs to get their critique on....Move on...


All day I dream about cheese......I miss cheese.  The gooey, chewy-ness of it....I really miss cheesy goodness.  I am gonna get cheese wasted...


-The Reintroduction Day 7- Dairy

Breakfast: egg salad sandwich on cloud bread (link above)


Lunch: Roasted chicken and veggie salad with cheese chunks
Dinner: Sausage Spaghetti sauce on spaghetti squash topped with Parmesan.

Noteable Notes:

-I was so excited to eat cheese and it wasn't a thrilling as I thought it was.  Meh. No Angels going "ahhhhh!" around me....no eyes rolling in the back of my head. Then I got a cold.  Was eating dairy responsible?  UPDATE!!!! YES!... Here I sit Sunday suffering from what I think is a cold. I blow my nose....all clear.  I am congested yet can breath with difficulty. I am sneezing. I am coughing up gunk from my lungs and yet my nose stuff runs clear. I started taking my allergy meds then I start to feel better in the nasal area. 12 hours later....congested and blowing out clear stuff. Then I occurred to me...AM I SO STUPID TO NOT KNOW THE DIFFERENCE BETWEEN A COMMON COLD AND MY ALLERGIES COMING BACK? I am typing this after I took some allergy meds again and I feel absolutely fine.  I did NOT EAT DAIRY, one DAY....I did THREE DAYS in A ROW. I. AM. AN. IDIOT. So- did some research online about nasal allergies aggravated by dairy products and....BINGO! I told K-man I feel like I discovered the cure to cancer!(I wish) but I had no idea that my eating dairy was why I have suffered with allergies for SOOOOO long.  Just. WOW. Mind blown!!!

-I am going to to let you know that I am NOT going to do the gluten portion of the whole30.  Reintroduction is done to me. Why?  I just don't miss or need wheat.  And I was eating way too much bread.  Don't get me wrong but I love bread but I wasn't missing it like cheese. Wheat to me is just as bad as corn, GMO'ed to death. If I want a burger, I will ask for no bun if there is a GF option or just wrap it in lettuce if possible. These days restaurants are pretty used to all sorts of requests, "dressing on the side, can I get it without cheese?", etc. Burger places are pretty saavy now with GF buns or lettuce wraps. 

-BIGgest News?!?!?- Do you remember my disappointment with only losing 3 pounds from the original 30 days? AND ....that I said that I would devote my reintroduction week to eating less fruit, and nuts, nut butters and potatoes?  WELL I WAS RIGHT!!!!! I lost more in this week alone that those original 30 days! 6 FREAKIN' POUNDS! And I ate some grain foods for two days and a margarita and some cheese foods for two days and a homemade paleo Butterscotch coffee with a Tbsp of maple syrup!!!  😳 Yes, I know I overused the "ands" but I was happy for myself.

Tune in next time for my overall whole30 evaluation and future plans and recipes!

Saturday, June 9, 2012

Chebe GLUTEN FREE Bread Mixes

A few months ago I trolling around the blogs looking for gluten free and came upon Chebe Bread. These bread ingredients are identical to frozen product I found in my grocery (another post one day). 
When I realized the versatility of the mixes I ordered some from Amazon.com (who orders it directly from Chebe).  It is made from mannioc root or known as tapioca flour.  Other than some baking soda and seasonings (depending on the mix you buy) its really Paleo friendly.  However, the recipe on the box does call for cheese (1 cup) but the nice thing is....the mixes can be made with or without cheese.  SCORE!  I use cheese depending on my splurging mood.
What you see on the left is a few of their mixes.  What is missing is their cheese bread mix, Garlic and Onion breadstick mix.  They also send frozen dough if you want more convenience. They also provide many recipes for you to tickle your creativity bone.

Now, when I want to splurge on some bread (like a hamburger or hotdog) this is what I did...


PIGS in a Blanket....

  • Make the dough (oil, eggs, milk and cheese)
  • Cut my nitrate free organic hot hogs in half
  • Divide dough in the number of 'dog halfs'
  • Flatten dough and pinch/form around them.
  • Bake @ 375 for 20-25 minutes until golden.


Aren't these just so CUTE?  With a little dish of ketchup, mustard, relish or onion....these were FAB!  K-man was thrilled and I didn't even both to mention that they were my gluten free stuff....


When I have a hamburger....too much bun kills me.  I'd rather be full from the protein and fillings of the burger than a huge bun.  Sure I can go bunless but sometime you want a soft, chewy package to PICK up your burger.  So I made a basic mix and instead their suggestion of 4 buns I made 6.  I didn't mind them being thinner.  If you want soft and thick.  Go for it.  I wanted thin and crusty.  When you have tomato and mayo, sometimes the bun falls apart and gets mushy.  NOT CHEBE buns!


 The topping is from King Arthur Flour.  Their Artisan Bread Topping.  It is sesame seeds, sunflower seeds, black caraway, flax and poppy seeds.  Very tasty!


Here's a view how thin they are....(kinda like those sandwich bun makers THIN version)


All in all, the CHEBE company is very accommodating.  I had a little issue that I posted on their FB site and a rep called me and replaced them.  Also in doing so he suggested to mix and match some of their other products.  Now, I've tried all except for the cinnamon rolls.  These will def be my Go-TO mix in the cabinet.  THANKS Chebe!!

My next recipe adventure will be using just straight tapioca flour and making my own rolls to see how they compare.  But it sure is nice to have these mixes around for whenever you need pizza crust, rolls, or buns.  Non-Paleo or gluten sensitive family members won't know what they are missing.  PROMISE!


 Enjoy!


Sunday, May 20, 2012

Paleo Bread- Basic White

One thing I inherited from my Grandmom is the love of bread.  I sure does ruin me at restaurants for it comes first and fills me up too fast before I SHOULD be eating my protein and veggies.  Why can't they serve me the hot and crusty bread after dinner? OR, how about during????  Anyhow....the traditional, crusty, chewy yeast breads are for big splurges for me these days BUT a basic gluten free bread to have with dinner or smeared with almond butter at breakfast will fill the bill!!!
I have waited for a bit to post this recipe for I have been trying many recipes and playing around with different combos that work well for me.... The beauty of this gluten free baby is that there aren't those other GF substitutes that won't work in the Paleo lifestyle like rice flour, potato starch, etc.  Give this a try!

Basic Gluten Free Paleo Bread
adapted by JennyMacLipsmack

3 cups almond flour (not meal, this is a pale yellow bread not brown)
1 tsp. baking soda
4 eggs
2 egg whites
1 Tbsp. honey, agave or maple syrup (whichever you prefer)
1 tsp. vinegar
sesame seeds (optional for taste and look)

Preheat oven to 300 degrees.

Put almond flour in a large bowl and whisk out the lumps and add the baking soda.

In a small bowl, beat the egg and whites together.  Add honey and vinegar.

Mix the liquid in the dry.  Spray loaf pan with organic olive oil non-stick spray and LINE PARCHMENT PAPER in the loaf pan.  I cannot STRESS how important this is or your loaf will be IMPOSSIBLE to remove.  A slicone loaf pan will not require parchment, this is what I do for I was tired of forgetting about the parchment and the loaf sticking....grrrr.

Sprinkle with sesame seeds...(I love the toasty taste of them when I toast the bread!)

Bake @ 300 for 45 minutes

Remove from pan and cool completely.  Slice thinly and put in a bag and store in the fridge for convenient use later!

VARIATION:

Raisin Walnut Paleo Bread
by JennyMac's Lipsmack

3 cups almond flour or meal
1/2 cup flaxseed meal
1 tsp. baking soda
2 Tbsp. cinnamon
5 eggs
2 Tbsp honey, agave or maple syrup
1 tsp. apple cider vinegar
1 cup raisins
1 cup walnuts

Follow the directions for the heat and time from the recipe above....


Great dessert, breakfast or french toast bread!

Enjoy!
  

Sunday, May 6, 2012

Gluten Free Morning Glory Muffins

Moist- full of fiber from carrots, apples and raisins!  Perfect for breakfast, snacks or dessert.  Make sure to check out my notes at the end for suggestions.

Morning Glory Muffins
adapted from Paleo Comfort Foods

2-1/2 cups blanched almond flour
1 Tbsp. cinnamon
2 tsp. baking soda
1/2 tsp. salt
2 cups shredded carrots (about one bag of carrots depending on thickness), grated
1 large apple, peeled, cored and grated
1 cup toasted coconut (adds nutty-ness)
3 large eggs (organic-omega-3)
1/2 cup organic liquid egg whites
2 Tbsp. honey
1/3 cup coconut oil (....see notes)
1 tsp. vanilla

1.  Preheat oven to 350 degrees and line standard size muffin tin.  I needed to line 20...depending on your 'scoop size'.
2.  Combine almond flour, cinnamon, baking soda and salt in a large bowl.  Add carrot, apple coconut and raisins and combine well.
3.  In a separate bowl whisk eggs, egg whites, honey, oil and vanilla  together.
4.  Pour the wet over the dry and mix well.  Batter will be thick.
5.  Using an ice cream scoop place batter into lined muffin tin(s).
6.  Bake for 25-30 minutes or until a toothpick inserted in the top comes out clean.
7.  Cool muffins for 8-10 minutes and then remove to a cooling rack.


Baker's Notes:
1.  I use Honeyville Almond flour from Amazon.com.  It is $36 for a 5 lb. bag.  Best bargain and works best than others I have used.
2.  I am not too fond of coconut oil that tastes like coconut.  It's too much or may be disconcerting to eat sauteed mushrooms that taste like coconut....ugh.  I prefer Spectrum.
3.  In using the organic coconut, I like the flakes over the finely grated.  This adds to the muffins giving it more chewiness as you would get from oatmeal (not used here).  Toasting will tone down the coconut flavor....giving it a subtle undertone.
4.  Go honey, don't substitute stevia for I find it will give a funny after taste.  Think about it....2 Tbsp of honey divided amongst 20 or so muffins?  That is about 1/2 tsp per muffin...not bad for sugar.  I love how these are lightly sweet not like I am eating cake.
5.  Although fat is not the enemy in the Paleo lifestyle, the recipe originally called for 1/2 cup coconut oil.  When peeling off the muffin papers, they absorbed alot of the oil.  What is the point for so much oil if it's only going to leech into the papers, right? I suggest 1/3 cup over using 1/2 cup.  For the muffins still stuck a bit to the papers.

Enjoy!

Wednesday, May 2, 2012

Cinnamon Raisin Bread

YUM!
Great for breakfast, tasty snack and who says you can't eat a slice with dinner?
I was looking for something different from using my basic paleo bread recipe, so I tweaked it to make cinnamon raisin bread.  Yes, I know I haven't posted the basic bread first...but I like to live on the edge!  lol

Cinnamon Raisin Bread
adapted from Paleo Comfort Foods

3-1/2 cups almond flour or meal
3/4 tsp. baking soda
1/4 tsp. salt
2 tsp. cinnamon
5 large organic eggs
2 Tbsp. honey
1 tsp. apple cider vinegar
1 cup organic raisins

1.  Preheat oven to 300 degrees.
2.  Combine all dry ingredients.
3.  In a separate bowl, whisk the eggs, honey and vinegar.  Add raisins.
4.  Combine wet with the dry.
5.  Grease the loaf pan and line with parchment paper.  This is VERY important!!!  I find that this bread as well as the basic loaf likes to STICK despite it being greased.  Consider yourself warned if you don't!!!!
6.  Pour the batter in lined loaf pan.
7.  Bake for 45-55 minutes until golden brown or until a skewer comes out clean when inserted.

LOVE it...hope you will too!


Enjoy!

Sunday, April 22, 2012

Gluten Free Biscuits

Along with my love for chocolate, I admit I also love breads.  Biscuits, rolls...hot and buttery....YUM!  So when I was told that going Paleo meant breads made with almond flour or coconut flour could be made, I felt I wouldn't die.  Of course when we go out to nice dinners I may splurge on the hot crusty yeast breads on occasion but at home I still can have some breads.  I am still find it difficult to render a tall rising bread for a sandwich but when I do....you'll be the first to know.  For know these little biscuits are nice and light and remind be of popovers.  Not too difficult to make either.

Basic Biscuits
from Paleo Comfort Foods

6 large egg whites (I use the carton of egg white sometimes as well)
3/4 cup blanched almond flour
1/4 cup coconut flour
1 tsp. baking powder
1 1/2 tsp organic butter or coconut oil

1.  In a bowl, beat the egg whites until they are very frothy.
2.  In a separate bowl, mix the flours and baking powder.  Cut in the cold butter with a two knives or a pastry blender.  You will be making a crumbly mixture.  Let sit in the fridge for 15-20 minutes.
3.  Preheat oven to 400 degrees.
4.  Remove flour mixture from fridge and gently fold in the egg whites, stirring to combine.
5.  Spoon the biscuit batter in a greased muffin cups.
6.  Bake for 12-15 minutes or until golden brown.
Makes 12.

Cook's Notes:
1.  These are very soft and fluffy.  They are not going to fall apart since they have egg in the them.
2.  These taste very much like popovers despite them not rising as tall.
3.  I have tried other biscuit recipes and there will be other versions to come.
4.  This batter will be 'soupy' at first.  Give it a moment for the coconut flour to absorb the liquid and it will be more manageable.
5.  Use a standard ice cream scoop to keep the biscuits consistently the same size.
6.  I don't know how these biscuits would work on a cookie sheet really....I think they would spread and be thinner.  The muffin cups hold the 'biscuit' shape nicely.
7.  Bits of Cheese and bacon was also suggested to mix in if you were splurging or allowing dairy in your Paleo life.  We use a little cheese now and then and since I had a Tbsp of some leftover organic shredded cheese, I used it up here.  It can be seen in the picture below.

Enjoy!
 

Saturday, December 24, 2011

French Toast Casserole


My present to you is something simple to pop in the oven on Christmas Morning.  This casserole is soft, buttery and so yummy. Oh did I mention it's easy to make?

French Toast Casserole
from JennyMac Lipsmack

1 loaf french bread, cut into 1-inch cubes (10 cups)
8 eggs
3 cups half and half (or cream if you want it silky rich)
1/4 cup sugar
1 teaspoon vanilla extract
3/4 teaspoon salt
12 strips of bacon, cooked and broken into pieces. 
Topping:
2 tablespoons butter, cubed
3 tablespoons sugar
2 teaspoons ground cinnamon
maple syrup

Using a serrated knife cube your french bread into one inch pieces.  
In a large mixing bowl, beat eggs, cream, sugar, vanilla and salt.  Add bread and mix with egg mixture to coat.  Add bacon pieces and mix again.

Grease a 13X9 baking dish (those non stick glass ones are awesome).  Pour all your eggy bready bacony mixture into the baking dish.  Cover and place in fridge overnight.

Preheat oven to 350 degrees.  Uncover and give the bread another stir.  Sprinkle cinnamon sugar all over the bread cubes and dot with butter.  Cover with non stick foil and bake for 45-50 minutes or until knife inserted in center comes out clean.

Serve with maple syrup.
So rich and creamy, I love the smokey bacon with the sweet maple and the not really sweet eggy bread. 

Cooks Notes:
1.  Do not cut off that fabulous crust.  This recipe is awesome even with a day old loaf.  I bought my bread on Tuesday and prepped this Friday afternoon.  Yes, it was 'sketchy' to cut however my fingers all remained intact.
2. If you have homemade vanilla sugar hanging around like I FORGOT to use, this would be the ideal time to use it.
3.  I am going to try this again with some toasted pecans on top....YUM!!!!


Post Script.....
I hope you all are healthy and WARM this holiday season!  We've had a tough few weeks with no heat.  Our house was built in 1959.  We bought it 5 years ago knowing that the 3 Horsemen of the Homeowner's Apocalypse (the furnace, A/C and hot water heater) were OLD.  We feel we were truly blessed from this whole ordeal.   The Carbon Monoxide detector has been going off since last year and we were being stubborn and complacent.  We thought the detector was probably old...took it down, replaced it.  It didn't go off again....few months later it went off...."oh the batteries probably need to be replaced" (um, there is a signal for THAT by the way on the detector).  All the while the detector was going off during the middle of the night waking us up @ 3 in the morning.  The one night K-man was working through the night on a water main break and I was home alone the detector went off one hour after I turned on the heat when I came home from work.  This was odd.  I called K-man....what do I do?  (WHAT, WHERE was my brain?- mmmm, fuzzy from fumes perhaps?)
I called the Fire Dept and waited with my neighbor outside for them to arrive.  I let them in the front door and watched them come in with their CO monitor in hand.  As soon as he stepped in it beeped and he said It's 148!  Pointed to me.  "YOU- Get out."  What you may or may not know, BELOW 35 ppm (parts per million) is okay but anything above that is considered toxic and potentially lethal.  I was sitting in a house where the million of the oxygen molecules were tainted with 148 carbon monoxide ones!....I had no headache, no nausea, no vomiting, wasn't sleepy....however my common sense and get up and go safety know-how was stagnant.  I remember just standing there with K-man on the phone, listening to him tell me what to do and thinking/pouting...."why can't he be here and do this?"  I NEVER THINK like THAT....Add the symptom of DELERIUM to list from CO exposure.  Alas, a cracked heater exchange on a circa 1988 furnace was the cause.
Anyway.....since major appliances like the furnace, A/C and hot water heater a big to-do, located near one another and connected (via gas) and were ALL old.  Bundle the price, work....replace them all at once.  Holy crap.  1988= furnace and HWH but the A/C was the original install!  None of the houses in our development had A/C originally and the original owner of our house finally broke down in the 60's to put it in.  The estimator said it was a miracle we've been having any A/C in the past summers because this model belonged in a museum.  LOL.  So there you have it....an $11,000 to our wallet during the holidays. LOVELY.  Bottom Line....YOU ALL NEED TO MAKE SURE YOU HAVE A CO DETECTOR IN YOUR HOUSE AND CALL 911 IF IT GOES OFF....we are so lucky to be alive.

Enjoying our warmth and feeling blessed, we wish the very same to you as 2011 comes to a close....

POST POST SCRIPT....thanks Anonymous commenter for your tip on correcting my error on the difference between carbon monoxide (CO) and carbon dioxide (CO2).  Clearly my brain was still not functioning right in writing this post since I DO know my chemical elements and their abbreviations usually.  But thanks for your CONCERN.

Saturday, March 12, 2011

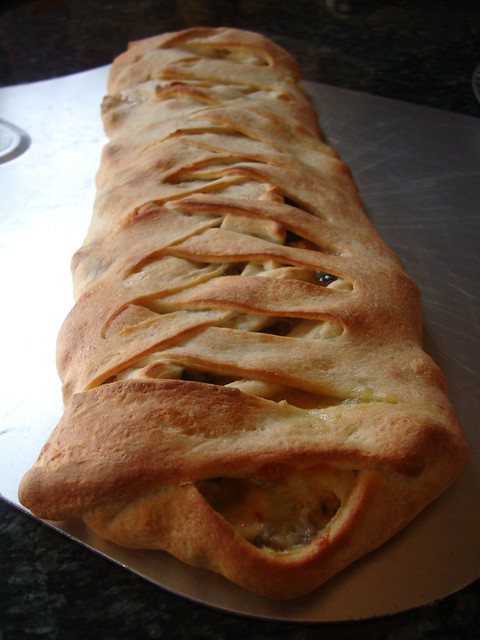
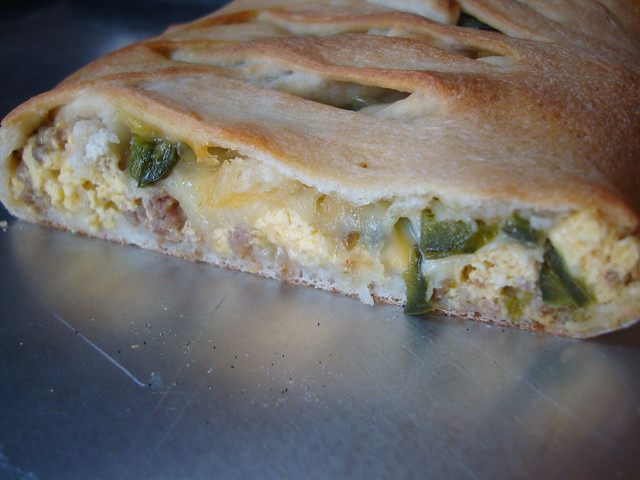
Jalapeño, Sausage and Egg Braid

Breakfast, Brunch, Lunch or Snack? Anytime...it's awesome!

jalapeno sausage egg braid1


Jalapeño, Sausage, Jack, and Egg Breakfast Braid
adapted from Myrecipes.com

1 (13.8-ounce) can refrigerated pizza crust dough (I used Pillsbury thick canned pizza crust)
1 tablespoon olive oil
1/4 cup chopped onion
1/2 lb sausage (I used hot sausage), browned and drained
2 large eggs, lightly beaten
1/2 cup (2 ounces) shredded Pepper Jack cheese
1/4 cup shredded cheddar cheese
1/4 cup chopped seeded jalapeño peppers
1 large egg white, lightly beaten (I forgot to do this and no one died)

Preparation

1. Preheat oven to 425°.

2. Unroll dough onto a silpat or parchment paper; pat into a 15 x 10–inch rectangle.

3. Heat oil in a large skillet over medium heat. Add onion and sausage; cook 9 minutes or until lightly browned. Stir in eggs; cook 1 1/2 minutes or until set. Remove from heat.

4. Sprinkle Pepper Jack lengthwise down center of dough, leaving about a 2 1/2-inch border on each side. Spoon egg mixture evenly over cheese. Sprinkle cheddar over egg mixture; top with jalapeño peppers.

5. Make 2-inch-long diagonal cuts about 1 inch apart on both sides of dough to within 1/2 inch of filling using a sharp knife or kitchen shears. Arrange strips over filling, alternating strips diagonally over filling. Press ends under to seal. Brush with egg white. Bake at 425° for 15 minutes or until golden brown. Let stand 5 minutes. Cut crosswise into slices.

jalapeno sausage egg braid

Braided like my apple strudel just a savory filling with a pizza crust instead of puff pastry. WINNING! K-man's eyes just popped when he saw this for breakfast. You can make all the filling the day before and just assemble it that morning. Yummy stuff. Cuts nicely for snacks later if you like. I'd love to try a bacon version sometime as well!

Enjoy!

Tuesday, March 8, 2011

Easy Cinna Sticks!

TA- DAH!

Easy Cinna-Sticks

I told ya I'd tweak those Garlic Breadsticks....stop getting them from Domino's....knowing your own ingredients is DEFINITELY better! Using the same recipe from the garlic ones...here's the tweaked way.

Easy Cinna-Sticks

1 1/2 C warm water
2 T sugar
1 T yeast
1/2 t salt
3 1/2- 4 C flour (amount will definitely depend on your weather)
1/4 C butter (and butter ONLY)
1/2 C cinnamon and sugar mix

1 cup powdered sugar
milk
vanilla
Tbsp of melted butter

1. Mix the water, sugar and yeast together in a measuring cup or in the bottom of your mixer. Let it sit for 5 minutes.

2. Add the salt and the flour, one cup at a time, until it is well incorporated. Mix on high for 5 minutes. Let the dough rest for 5 minutes.

3. Melt the butter and pour half of it into a jelly roll pan (large cookie sheet).

4. Place the dough in the center of the pan. Let it sit for 2 or 3 minutes. Letting the dough rest makes it MUCH easier to shape.

5. Spread the dough out flat onto the pan until it reaches all of the edges. Doing all of the spreading and cutting of these bread sticks, in the pan makes cleaning up your counter so much easier!

6. Pour the other half of the butter onto the dough. Spread it around with your hands. Sprinkle the cinnamon and sugar mix all over the dough.

7. With a pizza cutter cut the dough into three rows lengthwise, and then into about 12 little height wise rows.

8. Put the pan into a 170 degree oven for about 7-10 minutes. The breadsticks should rise about 1-inch.
9. Turn you oven up to 350 and bake for about 12 minutes, or until golden brown.

10. When they come out of the oven let them sit and rest again for about 5 minutes. Then redefine your cutting lines with the pizza cutter. You may find using a pair of kitchen shears is easier to cut the edges where the cutter can't reach!

11. In a ziploc bag (pushed in a glass with edges draped over rim to make it 'hands-free') place the powdered sugar in the bag and add milk by TEASPOONS until still thick. Add a few drops of vanilla. Pull bag out of glass, seal and mix with hands. Open and add Tbsp of melted butter. If icing looks to thick to squeeze out add just DROPS of milk at a time.

12. Snip corner of bag and squiggle on warm (not hot or icing will melt off) sticks. Let drip off a cooling rack. ENJOY, immediately!

Did my TWEAK satisfy? Oh yeah....they will~ PROMISE!

In Cinna-Heaven,

Sunday, March 6, 2011

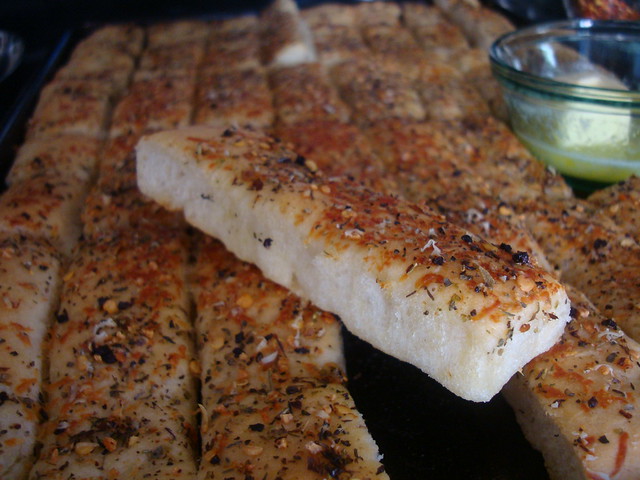
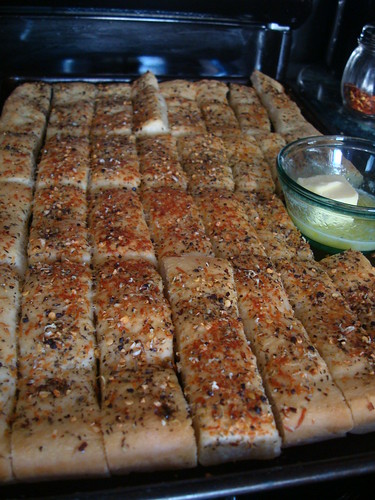
Easy Garlic BreadSticks

Oh yum!

Easy Garlic Breadsticks1

One of my favorite Bloggers Rachelle from Mommy I'm Hungry (she got it from Jamie Cooks it up!) posted about this and it caught my eye....I'm all about easy and in true Jenny Mac fashion- had to tweak it. First let me share the original recipe:

Easy Garlic Breadsticks

1 1/2 C warm water
2 T sugar
1 T yeast
1/2 t salt
3 1/2- 4 C flour (amount will definitely depend on your weather)
1/4 C butter (and butter ONLY)
3/4 C grated Parmesan
Garlic Seasoning/Italian Seasoning

1. Mix the water, sugar and yeast together in a measuring cup or in the bottom of your mixer. Let it sit for 5 minutes.

2. Add the salt and the flour, one cup at a time, until it is well incorporated. Mix on high for 5 minutes. Let the dough rest for 5 minutes.

3. Melt the butter and pour half of it into a jelly roll pan (large cookie sheet).

4. Place the dough in the center of the pan. Let it sit for 2 or 3 minutes. Letting the dough rest makes it MUCH easier to shape.

5. Spread the dough out flat onto the pan until it reaches all of the edges. Doing all of the spreading and cutting of these bread sticks, in the pan makes cleaning up your counter so much easier!

6. Pour the other half of the butter onto the dough. Spread it around with your hands. Sprinkle the seasoning of your choice all over the dough, and then the Parmesan cheese.

7. With a pizza cutter cut the dough into three rows lengthwise, and then into about 12 little height wise rows.

8. Put the pan into a 170 degree oven for about 7-10 minutes. The breadsticks should rise about 1 inch.
9. Turn you oven up to 350 and bake for about 12 minutes, or until golden brown.

10. When they come out of the oven let them sit and rest again for about 5 minutes. Then redefine your cutting lines with the pizza cutter. You may find using a pair of kitchen shears is easier to cut the edges where the cutter can't reach!

Easy Garlic Breadsticks

Break out the lasagna, spaghetti, marinara sauce or tomato soup. This stuff rawks! These definitely taste best the first day. If you eat them past the first day a little warming in the oven is better. If you are "cooking process challenged" then go directly to Jamie for pictorial directions.

OKAY, this was the unaltered recipe....I did it like a good foodie.....BUT tune in next time for my TWEAK...here's a peek. Not tellin' ya what it is yet....you gotta come check it out. Just as easy and the kids will FALL OUT!

Munch Out!

Thursday, February 3, 2011

I have this problem....

I am either a rebel and can't follow the rules OR way too creative to respect a recipe 'as is'.

Hello, I am JennyMac and I am a rebel....

Perhaps my rebelliousness is due to the fact when I have it in my head, "I am going to make this recipe" I go to the kitchen I and I don't have EXACTLY everything the recipe calls for. The rebel in me says something like "I don't need no stinkin' 3 bananas....I can manage with only 2"

Banana Bread

I have made and eaten lots of banana bread. I don't like making banana bread for it always comes out very flat. Although it tastes great....looks aren't it's biggest appeal.

Found on Cutting Edge of Ordinary, I am dovetailing on Lisa's revelation of a 'secret technique' for banana bread and my rebellious change of her recipe. She used dates....I used apples. Ehhh. Dates, Shmates. Apple, Smapples. It's fruit. lol Regardless of the extra fruit....make this recipe for the SECRET TECHNIQUE....it's works!

Lisa said she found in an old Yankee Magazine back from the turn of the century. Lucky, Yankee Magazine has all their old recipe online now. Lisa gets props for bringing this to my attention. This is the original recipe from Yankee.

Banana Bread

3 large bananas
1/2 cup butter
1 cup sugar
2 eggs
1 tsp. vanilla (sorry, I had add this - I make my own vanilla, I like to use it, so kill me)
2 cups flour
1 teaspoon soda
1/4 cups nuts if desired (also chopped dates- I used chopped dried apples)

Preheat the oven to 325 degrees F.

Crush bananas and whip until very light. Cream butter and sugar. Add eggs, then flour, soda, and nuts. Add bananas last. Turn into well-greased bread pan. Bake slowly about 1 hour.

Banana Bread2

SECRET TECHNIQUE: The bananas end up liquefied, which may be why this bread does indeed have a very delicate texture.

My REBELLION: I had only 2 bananas in my freezer....dangit...I wanted banana bread now. OH well, time to be creative then....moist fruit.....I took a handful of dried apple rings....soaked them 1/4 cup spiced rum. Pureed them in the mini chopper (with the rum) and added them to the bananas and whipped some more.

Cook's Notes:
1. Toast your nuts- always! Flavors are best this way.
2. Sprinkle top of loaf with sugar....makes it "sparkly" and a nice crunchy sweetness on top when bitten.

Be a Rebel- Go Bananas!

Sunday, August 8, 2010

Almond Joy Scones

Almond Joy Scones3

I don't know about you but every so often I really like the coconut, almond and chocolate combination. Just like some people like the chocolate/peanut combo....Or my favorite the sweet/salty pairing as in chocolate covered pretzels. I saw a recipe for a coconut scone and I tweaked it up like one of my favorite candy bars. You can certainly leave out the almond paste or the coconut to restyle it your own way too.

Almond Joy Scones
JennyMac Lipsmack creation

2 cups all-purpose flour
1/3 cup sugar
1 teaspoon baking powder
1/4 teaspoon baking soda
1/2 teaspoon salt
8 tablespoons unsalted butter, frozen
1/2 cup toasted coconut
1/2 package chocolate chips
1/4 cup almond paste
1/2 tsp. coconut extract
1/2 cup milk or cream
1 large egg
1/2 package chocolate chips, melted

1. Adjust oven rack to lower-middle position and preheat oven to 400 degrees.
2. In a medium bowl, mix flour, 1/3 cup sugar, baking powder, baking soda and salt. Grate butter and almond paste into flour mixture on the large holes of a box grater; or use your fingers to work in butter (mixture should resemble coarse meal), then stir in chocolate chips and coconut.
3. In a small bowl, whisk milk/cream, coconut extract and egg until smooth.
4. Using a fork, stir sour cream mixture into flour mixture until large dough clumps form. Use your hands to press the dough against the bowl into a ball. (The dough will be sticky in places, and there may not seem to be enough liquid at first, but as you press, the dough will come together.)
5. Place on a lightly floured surface and pat into a 7- to 8-inch circle about 3/4-inch thick. Use a sharp knife to cut into 8 triangles; place on a cookie sheet (preferably lined with parchment paper), about 1 inch apart. Bake until golden, about 15 to 17 minutes. Cool on cooling rack.
6. Melt remaining 1/2 package of chocolate chips and stir in oil until smooth. Drizzle chocolate on cooled scones. Serve when chocolate is set.

Almond Joy Scones1

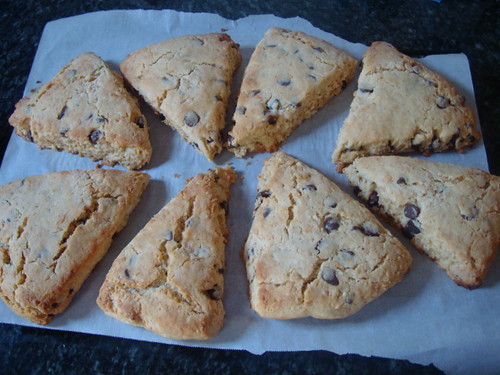
Yummy! I think these would have been better with the mini chocolate chips....but the regular is what I had on hand.

Almond Joy Scones2

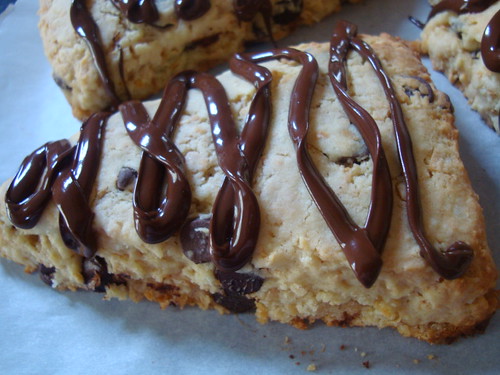
Although the first picture appearing on this post looks luscious with the chocolate drizzle. It took longer to cool and was not so easy to store. I think they are good with or without the drizzle buy easier to store and tote around for a snack without the drizzle. Regards....delish!

Enjoy!

Saturday, July 24, 2010

Orange Monkey Bread

I am a bread lovin' fool...sweet, savory... I've been making that no knead Artisan Bread in 5 minutes recipe every week (added below) and I love it. I used that dough instead of the canned biscuits shown here. I've done both....so use what is most convenient for you!

This is a great alternative from the cinnmon-y type monkey bread standard. I love the buttery orangey flavor...the crispy, crunchy outside yet spongy soft inside. Delish!


Orange Monkey Bread

1 1/4 cups sugar
1 tablespoon finely grated fresh orange zest
1/3 cup orange juice
1/4 cup melted butter
2 (10 ounce) cans refrigerated biscuit dough, separated and halved

1. Preheat an oven to 375 degrees F (190 degrees C). Grease a 10-inch Bundt pan.
2. Toss the sugar and orange zest together in a small bowl. Whisk the orange juice and melted butter together in a separate small bowl.
3. Roll the biscuit dough pieces into balls. Dip each ball into the orange juice mixture and then roll in the sugar mixture. Arrange the coated balls evenly in the prepared pan. Pour the remaining orange juice mixture over the biscuits.
4. Bake in the preheated oven until golden brown, about 30 minutes. Allow to cool in the pan for a few minutes before turning out onto a serving platter. Serve warm.

If you want the "make your own dough" adventure....this is really no fuss dough recipe...

1. In a large lidded container... mix

3 cups lukewarm water
1 1/2 Tbsp. granulated yeast
1 1/2 Tbsp. salt
1 1/2 Tbsp. sugar
6 1/2 cups flour

2. Let rise for 2 hours....I wait until it's doubled or gets flat on top. No biggie really.
3. Put in fridge for whatever/however you want to make from it....see the link to their site for ideas.
4. If you use this dough for the monkey bread, you have to let it rise until doubled then bake it. Its easier to do this before bed and put in the oven first thing when you wake up. Great weekend treat!

Here is what I've made with this GREAT dough so far:

Jalapeno Bread
Pepper Jack Rolls
Sticky Caramel Rolls (with or without bacon)

Honestly I have made at least 15 other things....but we ate them up too fast before I could get a picture....cloverleaf rolls, flat breads, pizza...it's so cool to always have dough in the fridge to get creative with! I will try to post more about my dough creations!

Enjoy!

Thursday, July 15, 2010

Most Yummy Jalapeno Cheesey Bread and a Winner

Years ago at one of those wholesale clubs I always got their jalapeno cheese bread. Loved it!

Either they don't make it anymore or I don't go that club anymore but I don't see it anymore (I only go to BJ's now and not very frequently) Sometimes I see a smaller version in the grocery but they just don't seem to have much flavor either.

Inspired by a cinnamon roll boule style bread I saw this is what I came up with....


Jalapeno Cheesy Bread

JennyMac Lipsmack Creation

2 thawed bread dough loaves (found in your freezer section) or the 1/2 recipe for no knead bread dough
1/2 stick melted butter
6-8 sliced jalapenos (don't use those pickled ones!)
1 lb. shredded mild cheddar or colby cheese (don't use the stuff in the bag!)

1. Shred your mild cheddar cheese (the sharp stuff just doesn't taste right with the zingy jalapeno). I really have stopped using those bagged cheese not only to save money on buying blocks but the flavor is SOOOOOO much better. The cornstarch/flour they put on the pre-shredded stuff really mutes the cheese flavor I feel.

2. Slice your jalapenos. Remember the seeds and the veins inside hold the heat. If you want your bread zingy....slice with abandon. I take a few of the peppers and dig out the seeds and veins to help balance out the heat. Some bites are zingy so not AS zingy. Every bite is a surprise! If you do half seeded and half not....mix up your pile so they distribute well through the bread.

3. Set aside your peppers, cheese and melted butter.

Sorry I don't have step by step pictures of this....It's a pain to keep wiping off doughy hands to snap a pix. I need an assistant....

4. On a floured surface, roll out your dough. Don't worry so much about the size. Just as big as you can get without it the dough getting too thin. Spread on the melted butter. Sprinkle on half of the cheese and half of the jalapenos. Roll up from the longest edge and pinch edges.(kinda like making cinnamon rolls!)

5. Hopefully your roll with be nice and thick from the pepper and cheese. Very gently with both hands roll back and forth (like you did with play dough as a kid) to 'snake' it out longer. Just aim for double in length. Mine was about 2-1/2-3 feet at first and it slowly shrinks as you work with it more.

6. Take one end and start to curl it into itself making one big spiral. Be sure to grab a bunch of cheese and jalapenos as you roll along. Roll, stuff with cheese and peppers. Roll and stuff with cheese and peppers, etc.


7. Top with remaining cheese and space out the peppers. Generously grease a 10 inch springform pan. Cover with towel and let rise in warm place until double or filled the pan.

Preheat oven to 400 degrees.

8. Bake for 45 minutes. You can cover the top of the bread with foil if you feel it's overbrowning after 30 minutes. You can also remove the bread from the springform ring and bake on parchment for the final 15 minutes to get the rest of the bread 'crusty'.

9. Let cool on cooling rack until room temperature. Do not try to cut this bread while hot. You will flatten it and the cheese will ooze out.


OH GAWD, the smell.....


The GOOEY cheese....


Someone get me some butter..... Heaven!

I've also got so distracted by this bread that I failed to announce my Good Earth Giveaway Winner....Cheryl from The Lucky Lady Bug she journals and has a separate blog where to lists who is having giveaways. You should check her out. Congrats Cheryl....dinner is on MyBlogSpark and the wonderful people at Good Earth!

Jalapeno Cheese Bread on Foodista

Enjoy!